DoughSeeDough

a balanced plate with room for dessert


Leave a comment

Hoisin-Lime Chicken with Zucchini

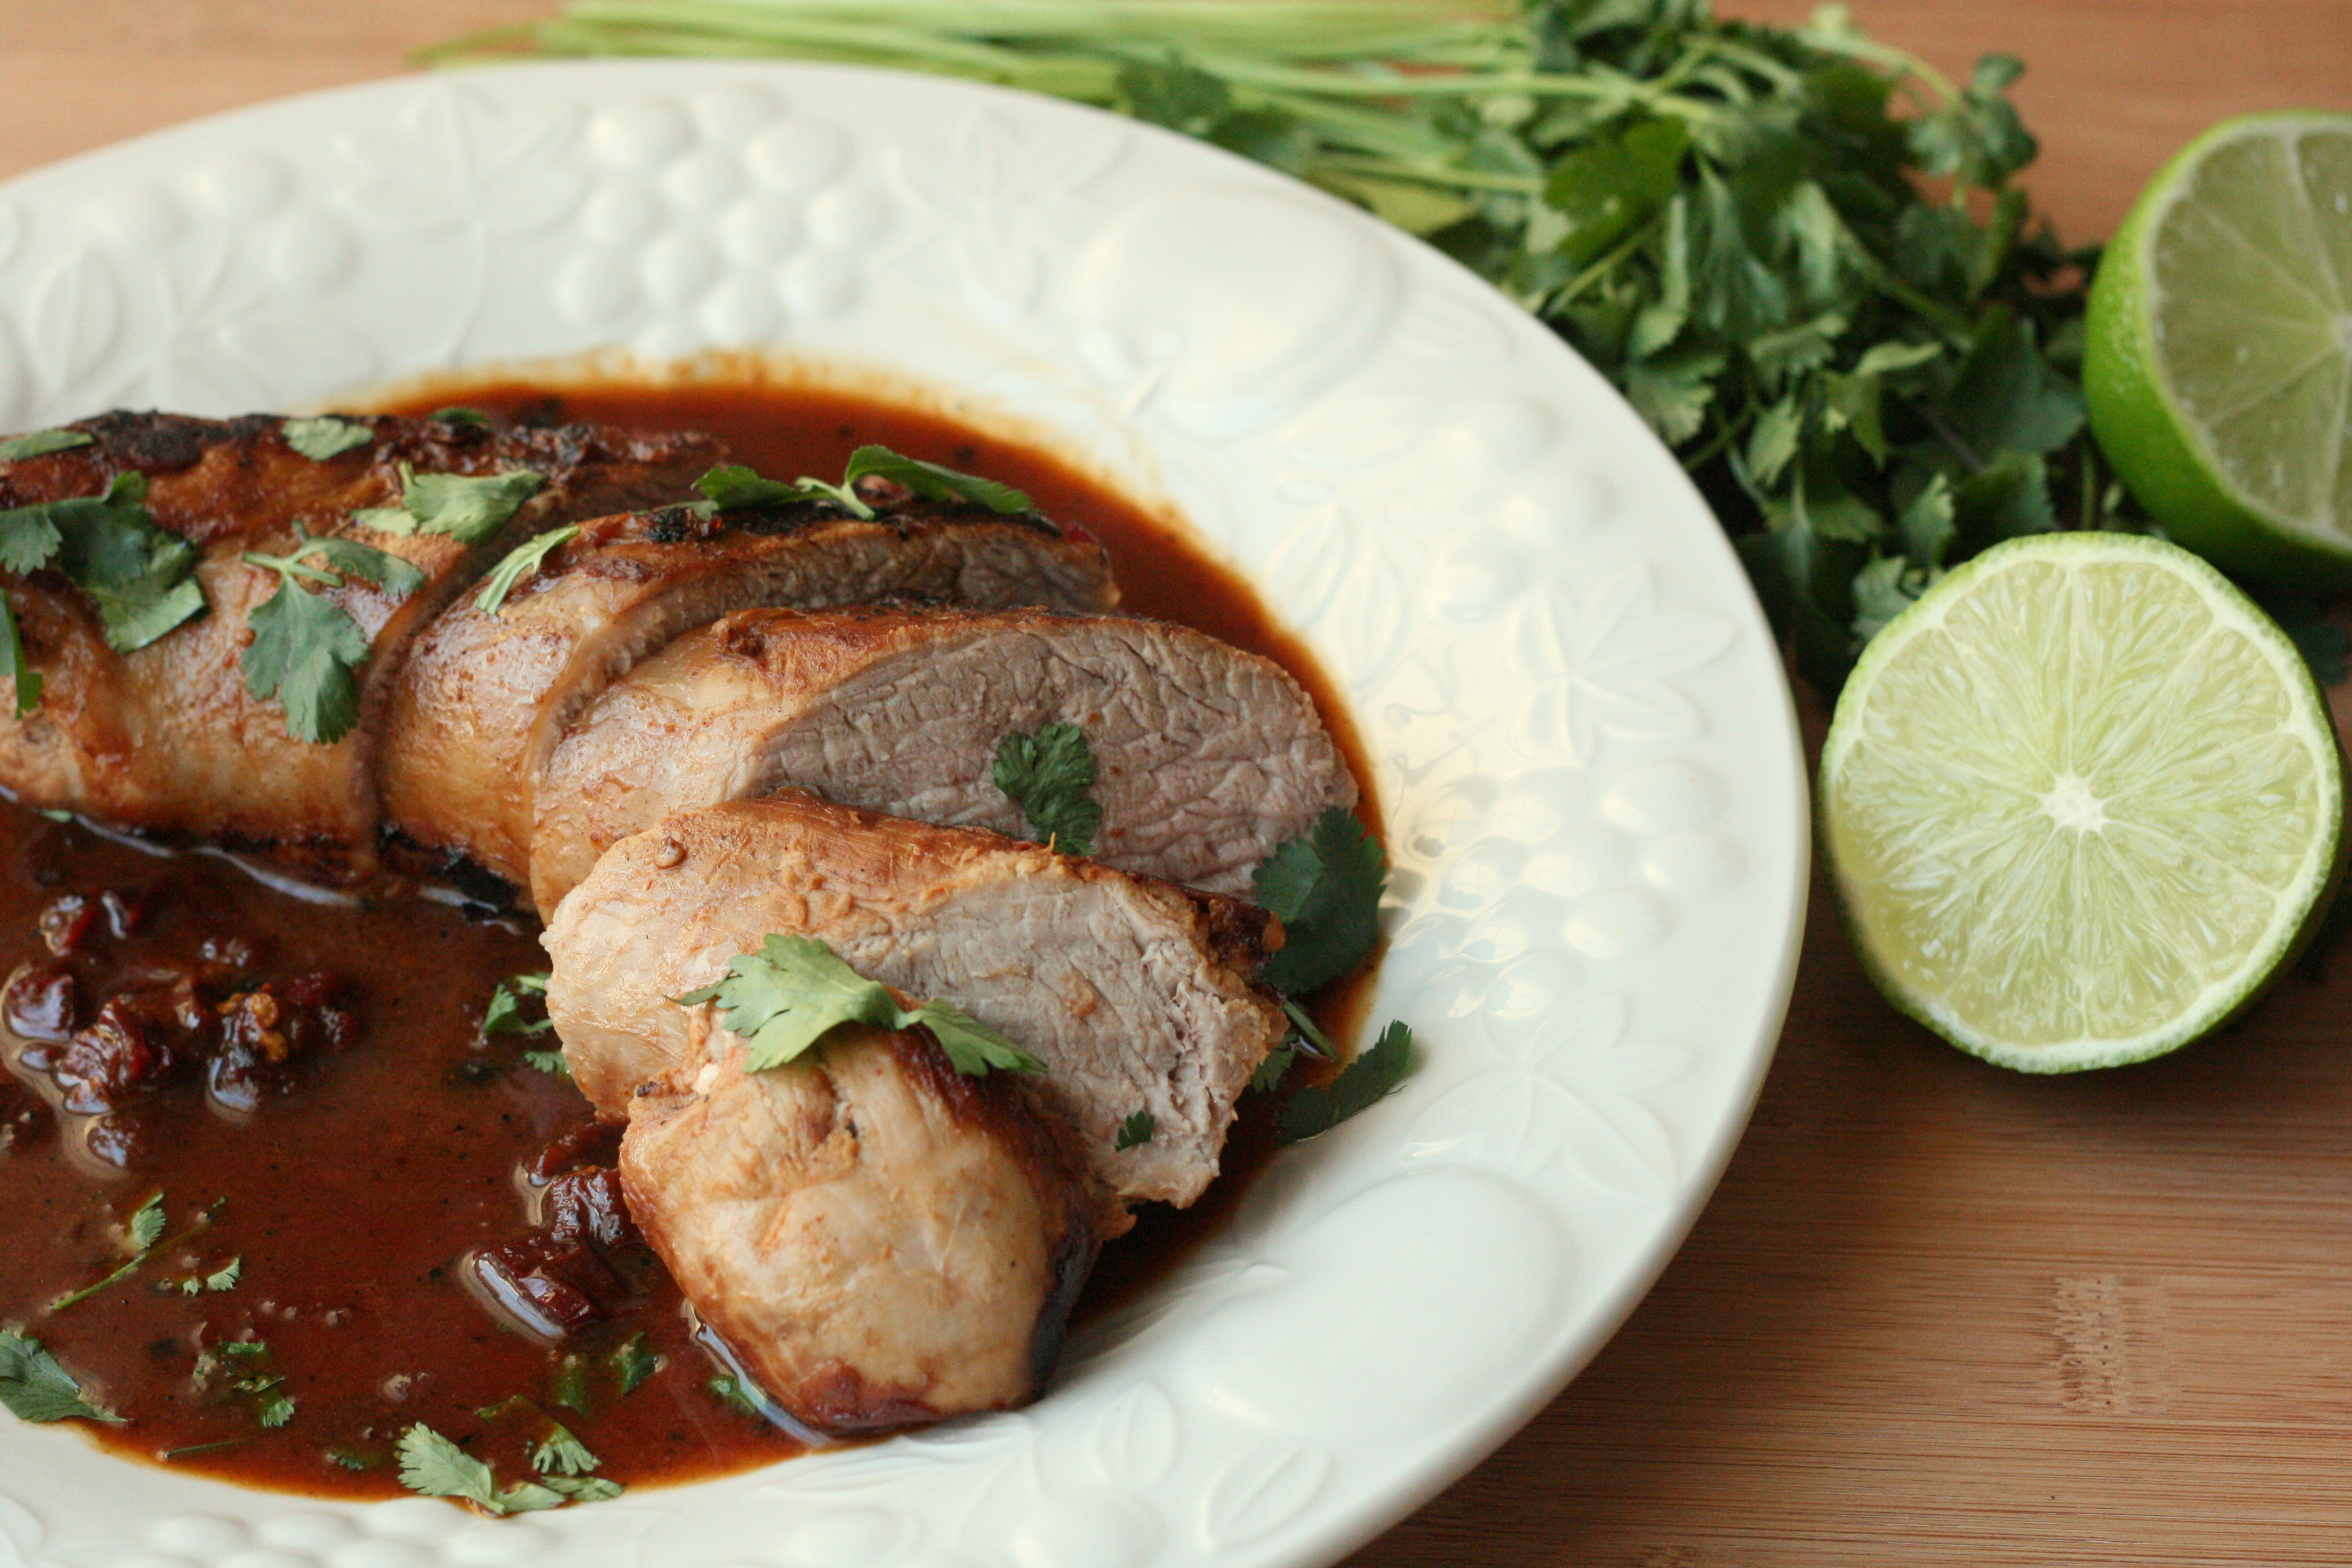
This recipe involves a little bit of planning since you have to prepare a marinade, let it cool, and then marinate the chicken for a few hours, but the results are worth it. Once the marinade is prepared, and the chicken is in the fridge, the rest is easy – grill and enjoy!

Hoisin-Lime Chicken with Zucchini | doughseedough.net

Hoisin-Lime Chicken with Zucchini

2 1/4 cups hoisin-lime sauce, divided (recipe below)
1 tablespoon sambal oelek
6 boneless, skinless chicken breasts
1/2 cup thinly sliced green onions, plus more for garnish
4 zucchini, halved lengthwise
salt and freshly ground black pepper, to taste

  1. Combine 1 1/2 cups of hoisin-lime sauce and sambal oelek in a large non-reactive container or bowl. Add the chicken and scallions and toss well. Cover and let the chicken marinate in the refrigerator for 2 – 24 hours. Turn the chicken at least one time. Thirty minutes before cooking, add the zucchini and toss to coat.
  2. Heat a grill pan over medium-high heat. Spray with nonstick spray. Remove chicken from marinade and grill, turning once, until the chicken is cooked through and reaches an internal temperature of 165°F, about 8 – 12 minutes.
  3. Remove zucchini from the marinade and cook, tuning once, until brown, about 8 minutes. Discard the marinade.
  4. While chicken and zucchini are being grilled, pour marinade into a saucepan and bring to a boil. Reduce heat to a simmer and cook until thickened.
  5. Slice the zucchini and chicken diagonally and arrange on a serving platter. Drizzle with reserved 3/4 cup marinade and garnish with additional sliced green onions, if desired.


Hoisin-Lime Sauce

1/4 cup canola oil, divided
2 tablespoons minced garlic
1 tablespoon peeled and minced fresh ginger
2 cups hoisin sauce
1/2 cup fresh lime juice
1/4 cup low-sodium chicken broth
salt and freshly ground black pepper, to taste

  1. Heat a large pan over medium heat. Add 2 tablespoons of oil and swirl to coat the bottom of the pan. Add the garlic and ginger and cook until soft and fragrant, about 2 minutes. Add the hoisin sauce and cook, stirring frequently, for 1 minute. Stir in lime juice.
  2. Transfer mixture to a blender and blend, drizzling in remaining 2 tablespoons of canola oil and the 1/4 cup chicken broth. Season with salt and pepper to taste. Cool completely before using.


recipes from Ming Tsai


Leave a comment

Southwest Turkey Meatball Skillet

This easy meal uses my favorite baked turkey meatballs and is on the table in 20 minutes. The best part? Cleanup is simple – this is a one pot meal, folks. If you’re a starch-lover like me, serve this with your favorite crusty bread, quinoa, or brown rice.

Southwest Turkey Meatball Skillet | doughseedough.net

Southwest Turkey Meatball Skillet
serves 4 – 6

16 baked turkey meatballs (recipe here)
2 teaspoons extra virgin olive oil
1 large onion, chopped
3 cloves garlic, minced
1 cup frozen corn
1-15 ounce can low-sodium black beans, drained and rinsed
4 vine-ripened tomatoes, diced
4 cups chopped kale
1 cup low-sodium chicken broth
juice of 1 lime
1 teaspoon cumin
salt and freshly ground black pepper, to taste
1/4 cup fresh cilantro, chopped

  1. Heat olive oil in a large skillet over medium-high heat. Add onions and garlic and cook, stirring frequently, until onions are soft, about 3 – 5 minutes. Stir in corn, beans, tomatoes, kale, and broth. Season with lime juice, cumin, salt and pepper and stir to combine.
  2. Nestle meatballs into the vegetables and bring mixture to a simmer. Partially cover and let cook for 3 – 5 minutes, or until meatballs are heated through.
  3. Sprinkle with cilantro before serving.


Leave a comment

Cheeseburger Chili Mac

This dish is obviously cheesy and not at all dairy-free. The crazy thing is, it actually tastes really, really good without the cheese. I guess the version I had would be more appropriately titled “Chili Burger Mac” or something. It makes me incredibly happy when I can find a dish that tastes good with and without cheese. Mike had it both ways and insisted that the cheesy version wasn’t better than the non-cheesy version. I think he’s full of it, but it does make me feel a bit better 🙂

This recipe makes a scary amount of chili mac. But don’t fret – it freezes beautifully! I made it so Mike would have enough food to feed him for a few days while we were apart. If you’re ever short on time, give this meal a try. It’s super simple and comes together in just minutes. As an added bonus, you probably have most of these ingredients lurking around in your pantry and fridge already!

Cheeseburger Chili Mac {dairy-free adaptable} | doughseedough.net

Cheeseburger Chili Mac // Chili Burger Mac
serves 8 – 10

olive oil spray
2 pounds lean ground beef
2 large onions, finely chopped
1/4 cup chili powder
salt and freshly ground black pepper, to taste
1 cup ketchup
1/2 cup dijon mustard
2 cups beef stock
2 pounds whole wheat elbow macaroni
2 cups shredded extra sharp cheddar cheese, optional

  1. Coat a large pan with olive oil spray and heat over medium-high heat. Add beef and cook, stirring occasionally, until browned and cooked through, about 8 minutes. Drain the meat thoroughly and return to pan.
  2. Add in onions, chili powder, salt and pepper and stir to combine. Cook until onions are soft, about 5 minutes. Stir in ketchup, mustard, and beef stock. Bring mixture to a simmer and allow to cook until thickened, about 5 minutes.
  3. Bring a large pot of water to boil over high heat for the pasta. Cook pasta according to package directions, drain, and set aside.
  4. Serve macaroni with a scoop of the chili and top with shredded cheddar, if desired.
  5. Alternatively, mix the chili and macaroni together and pour into an oven-safe dish. Sprinkle with cheese and broil until cheese is browned and melted.


adapted from Rachael Ray


2 Comments

Bangers and Mash with Red Wine Onion Gravy

Happy St. Patrick’s Day to you all! If you didn’t get a chance to drink a ton of green beer this weekend, don’t worry – you can still celebrate by whipping up the quick and easy meal of bangers and mash.

Bangers and Mash with Red WIne Onion Gravy | doughseedough.net

I found the bangers at Trader Joe’s. If you can’t find any, another type of pork sausage should do. I was blown away by how tasty this was and I kind of regret not buying more of the sausages to freeze for later. This, folks, is comfort food.

Ripley | doughseedough.net

Mr. Ripley was watching me intently as I photographed this meal. He ended up with some mashed potatoes on his ear (see bottom right). Don’t know how, but he did. Weird dog.

Bangers and Mash with Red WIne Onion Gravy | doughseedough.net

And, yes, that is a bottle of 3-buck-Chuck in the background. Turns out, we still like to drink like poor college kids.

Bangers and Mash with Red Wine and Onion Gravy
serves 4 – 6

for the bangers:
1 pound Irish banger sausages
1/4 cup dry red wine
extra virgin olive oil spray
2 tablespoons fresh sage leaves, torn

for the mash:
2 pounds Yukon gold potatoes, peeled and quartered
2 tablespoons dairy-free butter
1/4 cup dairy-free milk
salt and freshly ground pepper, to taste

for the gravy:
1 tablespoon extra virgin olive oil
2 large sweet onions, thinly sliced
2 tablespoons all purpose flour
1/2 cup dry red wine
1 1/2 cup beef broth
1 tablespoon Worcestershire sauce

  1. To prepare the bangers: Preheat oven to 350°F. Heat a cast iron skillet over medium high heat and spray with olive oil. Add the bangers and brown on all sides. Add red wine and sprinkle with sage. Transfer the skillet to the oven and bake until fully cooked, about 15 – 20 minutes.
  2. Meanwhile, prepare the mashed potatoes and gravy. Bring a large pot of water to a boil. Add the potatoes and cook until tender. Drain and return potatoes to the pot. Mash potatoes with butter, milk, salt and pepper.
  3. While potatoes are cooking, prepare the gravy. Heat 1 tablespoon olive oil in a large skillet over medium heat. Add onions and cook, stirring occasionally, until onions are very soft and browned, about 20 minutes. Sprinkle onions with flour and stir to coat. Continue to cook, stirring frequently, for 2 minutes. Stir in red wine, broth, and Worcestershire sauce. Allow to cook until reduced to desired thickness.
  4. Place the mash on a plate and top with bangers and serve with a generous spoonful of onion gravy.

adapted from Williams-Sonoma


2 Comments

Easy Baked Turkey Meatballs

I love it when I can make one thing and use it for several meals. These meatballs were meant to go into a southwestern meatball dish, but I was wiped out after a long day of work and a 10 mile run. By the time I finished mixing up the meatballs, I was done. I just couldn’t do anything more – I threw together a quick tomato sauce and cooked up a few meatballs for dinner and threw the rest of the meatballs into the fridge for later.

Fair warning – this recipe makes a lot of meatballs. Like 5 dozen+ depending on how big you make them. But, don’t worry – they are super versatile and freeze beautifully!

Easy Baked Turkey Meatballs

Easy Baked Turkey Meatballs

3 pounds lean ground turkey
1 1/4 cups panko bread crumbs
6 egg whites
1/2 cup parsley, finely chopped
1/2 cup finely chopped onion
6 cloves garlic, minced
3/4 teaspoon salt
3/4 teaspoon freshly ground black pepper

  1. Preheat oven to 350°F. Lightly grease two large baking pans and set aside.
  2. In a large bowl, combine all ingredients and mix with hands until well incorporated, being careful not to over-mix. Roll into meatballs about 1 inch in diameter and place onto prepared baking pans about 1 inch apart. Bake in preheated oven for 20 – 25 minutes, or until meatballs are golden brown and reach an internal temperature of 165°F.
  3. Use meatballs immediately, or lay on a baking sheet and place in the freezer. Once the meatballs are frozen, transfer to a freezer-safe bag or dish. Meatballs will keep for up to 2 months in the freezer. 


1 Comment

Potato Pancakes with Ginger-Apple Scallion Cream

I’m back with another recipe that uses that delicious ginger-apple chutney I mentioned last week. I love potato pancakes – usually smothered with applesauce and in my past life, butter. Occasionally, sour cream would make its way onto my plate, too. This is a wonderful take on that – the potato pancakes are topped with a dairy-free sour cream mixed with the chutney and it is so, so, so good.

Potato Pancakes with Ginger-Apple Scallion Cream | doughseedough.net

Potato Pancakes with Ginger-Apple Scallion Cream

1 cup ginger-apple chutney
1 cup dairy-free sour cream, purchased or homemade (recipe below)
4 scallions, white and green parts separated and thinly sliced
4 large russet potatoes, peeled
2 eggs, lightly beaten
kosher salt and freshly ground black pepper, to taste
2 tablespoons canola oil

  1. To make the ginger-apple scallion cream, combine the chutney, sour cream, and the sliced scallion greens in a small bowl. Stir and refrigerate until ready for use.
  2. Grate potatoes and transfer to a large strainer placed over a bowl or the sink. Using a spatula, gently press down on the potatoes to remove as much liquid as possible. Place potatoes into a large bowl and combine with sliced scallion whites, eggs, salt, and pepper.
  3. Preheat oven to 200°F. Heat 1 tablespoon of the oil in a large pan over medium heat. Drop 1/3 cup mounds of the potato pancake mixture into the pan and gently press down to flatten into a pancake about 4 – 6 inches in diameter. Cook until lightly browned on the bottom, about 3 – 4 minutes. Flip and brown the other side. Transfer cooked pancakes to a oven-safe pan and keep warm in preheated oven. Repeat with remaining potato mixture.
  4. Serve warm with a dollop of the ginger-apple scallion cream.

recipe slightly adapted from Ming Tsai

Potato Pancakes with Ginger-Apple Scallion Dairy-Free Sour Cream | doughseedough.net

Dairy-Free Sour Cream

14 ounce package firm tofu, well drained
1 teaspoon extra virgin olive oil
1 – 2 tablespoons freshly squeezed lemon juice
2 teaspoons apple cider vinegar
1 teaspoon honey
1/2 teaspoon salt

  1. Place tofu, olive oil, 1 tablespoon of lemon juice, vinegar, honey and salt into a food processor. Blend until very smooth and creamy. Taste and adjust with more lemon juice, if desired.

recipe slightly adapted from VegWeb


Leave a comment

Pork and Ginger-Apple Pot Stickers

I’ve been on the lookout for more interesting pot sticker variations. Yes, pork and chive pot stickers are delicious. As are shrimp pot stickers. Even the vegetarian pot stickers I made a while back are pretty darn tasty. But, these pork and ginger-apple pot stickers take the dumpling game to a whole new level.

You remember that ginger-apple chutney that I was raving about on Monday? Well, take that and mix it with some pork and chives and… mind blown. I doubled the original recipe because pot stickers freeze wonderfully and are great when you’re in a crunch for dinner. (If you’re not a great planner (coughmecough) and only buy 1 package of wrappers and run out … the filling is pretty darn tasty cooked up and served over some brown rice with a splash of the dipping sauce.)

Pork Ginger-Apple Pot Stickers | doughseedough.net

Pork and Ginger-Apple Pot Stickers
makes about 75 pot stickers

2 pounds ground pork
1/4 cup low sodium soy sauce
1 cup green onions, thinly sliced
2 cups ginger-apple chutney
1/4 teaspoon each: kosher salt, freshly ground black pepper, white pepper (or, to taste)
1 1/2 packages dumpling wrappers (about 75)
canola oil, for frying

for the dipping sauce:
1/2 cup low sodium soy sauce
1/2 cup rice wine vinegar
1 teaspoon toasted sesame oil
1 teaspoon sambal oelek

  1. To make the filling: combine pork and soy sauce in a large bowl. Fold in green onions, chutney, salt, black pepper, and white pepper. Mix until well combined.
  2. Set up your station: bowl of filling, stack of pot sticker wrappers, a small bowl filled with water, and a large baking sheet.
  3. To fold: place a wrapper in your non-dominant hand. Scoop a scant tablespoon of filling into the center of the wrapper, being careful not to get any on the edge. Wet a finger on your dominant hand and lightly trace the outside of the wrapper. Fold wrapper in half to form a half circle and pinch at the top. Starting at the center, make 3 pleats down toward the bottom-right corner. Repeat on the left side. Continue with the remaining filling and wrappers. (There are pictures on how to fold in my vegetarian pot stickers post.)
  4. To cook: heat a large, lidded saute pan over high heat. Add in 1 teaspoon oil and swirl pan to coat. Add pot stickers, pleat-side up, being careful not to overcrowd. Cook until bottoms are browned, about 5 minutes. Add in 1/2 cup water and immediately cover the pan to contain the splatter. After 30 seconds, when splattering has subsided, slightly crack the lid open to allow steam to escape. Cook for an additional 5 minutes or until heated through and water has evaporated. Let cook for an additional 1 – 2 minutes to allow bottom to re-crisp. Serve immediately with dipping sauce.
  5. To make dipping sauce: combine soy sauce, vinegar, sesame oil, and sambal in a bowl and whisk to combine.

recipe slightly adapted from Ming Tsai


Leave a comment

Vegan Lentil and Kale Soup

I drift between longing for warmer spring weather and hoping that this cold lasts forever. There are times when I actually love the cold – for a few hours a week, I really, really appreciate the cold weather because I run faster and stronger in it. The warmer it gets, the more I slow down… and the more water I need to carry to counter my very unladylike sweating.

Another reason to love the cold? Soup. Big, steaming bowls of heart-warming soup.

Vegan Lentil & Kale Soup | doughseedough.net

Vegan Lentil and Kale Soup
serves 4 – 6

1 tablespoon extra virgin olive oil
2 medium onions, diced
3 cloves garlic, minced
4 stalks celery, diced
2 large carrots, diced
1 1/2 teaspoons garam masala
1 1/2 teaspoons cumin
1 1/2 teaspoons chili powder
1 teaspoon red pepper flakes
1/2 teaspoon cardamom
salt and pepper, to taste
2 cups dried green lentils
8 cups vegetable stock
1 – 15 ounce can light coconut milk
6 cups torn kale

  1. Heat oil in a large pot over medium-high heat. Add in onions, garlic, celery, and carrot and cook, stirring occasionally, until onions are softened, about 5 minutes.
  2. Stir in garam masala, cumin, chili powder, red pepper flakes, cardamom, salt and pepper until well combined. Stir in lentils and vegetable stock. Bring soup to a boil, cover, and reduce to a simmer. Let cook for 30 minutes or until lentils are cooked through.
  3. Stir in coconut milk and kale. Let simmer for a minute to warm the coconut milk and slightly wilt the kale. Serve immediately.

recipe adapted from the Good Food cart


4 Comments

Chipotle Honey-Lime Pork Tenderloin

I don’t know if this is a problem other people have, but every single time I cook for something that calls for chipotles in adobo sauce I am left with two or three lonely chiles. I never know what to do with them and they often go to waste. This time, I planned accordingly. On the first night, I made chipotle quinoa chili. A few nights later, I used up the rest of the chipotle peppers in this delicious pork tenderloin.

Chipotle Honey-Lime Pork Tenderloin | doughseedough.net

Chipotle Honey-Lime Pork Tenderloin

1 pound pork tenderloin
1/2 cup freshly squeezed lime juice
zest from 1 lime
1/4 cup honey
1/2 tablespoon salt
1/2 teaspoon garlic powder
1 – 2 chipotle chiles in adobo sauce, chopped
1/2 tablespoon adobo sauce
1 tablespoon canola oil
cilantro, chopped

  1. Place the tenderloin in a shallow container with a lid to marinate.
  2. In a medium bowl, whisk together lime juice, lime zest, honey, salt, and garlic powder. Pour half the marinade over the tenderloin; reserving the remaining half of the marinade for the sauce.
  3. Pour chipotle chiles and adobo sauce over the tenderloin. Cover and allow to marinate overnight in the refrigerator.
  4. Remove the tenderloin 30 minutes before cooking. Preheat oven to 450°F.
  5. Heat canola oil in a cast iron skillet over medium-high heat. Remove tenderloin from marinade and sear in skillet on all sides, about 3 minutes per side.
  6. Place skillet in preheated oven and cook for 15 minutes, turning once halfway through.
  7. Once the pork’s internal temperature reaches 140°F, remove from the oven. Move pork to a cutting board and cover with foil. Let rest for 10 minutes or until the temperature  reaches 150°F.
  8. Meanwhile, prepare te sauce: pour reserved lime juice mixture and leftover marinade into the skillet and heat over medium-high heat. Allow sauce to reduce and thicken. Meanwhile, slice pork into 1-inch medallions. Serve sauce over the sliced pork and garnish with cilantro, if desired.

recipe slightly adapted from The Way to His Heart


2 Comments

Chipotle Quinoa Chili


This chili is a breeze to throw together. It’s an easy one-pot meal that takes no time to cook. Instead of making a frozen pizza or grabbing fast food, put this chili into your weeknight menu rotation. It’s packed full of good-for-you quinoa, beans, and veggies and a small bowl will keep you full for a long time.


Chipotle Quinoa Chili | doughseedough.net

Chipotle Quinoa Chili

1 tablespoon extra virgin olive oil
1 large onion, chopped
4 garlic cloves, minced
2 tablespoons chili powder
1 tablespoon ground cumin
2 chipotle chiles in adobo, minced
3 – 14.5 ounce cans diced tomatoes with chiles
1 can black beans, rinsed and drained
1 can red kidney beans, rinsed and drained
2 bell peppers, chopped
1 cup frozen corn
1 cup quinoa, rinsed
4 green onions, thinly sliced
optional toppings: cilantro, tomatoes, cheese, sour cream, hot sauce

  1. Heat oil in a dutch oven over medium-high heat. Add onions and cook until softened, about 5 minutes. Add in garlic and cook for an additional minute.
  2. Stir in chili powder and cumin and cook for a minute. Stir in chiles, tomatoes, beans, bell peppers, corn, and quinoa. Bring to a boil, stirring occasionally. Cover and reduce heat to medium-low and simmer for 25 minutes or until quinoa is tender, stirring once or twice.
  3. Remove from heat and stir in green onions. Top with your favorite chili toppings and enjoy!


recipe from Alida’s Kitchen, originally from Kraft