DoughSeeDough

a balanced plate with room for dessert


3 Comments

Carbonara Pizza

Carbonara Pizza | doughseedough.netI love weekends more now than I ever did before. Weekends are associated with quality time with Mike and my pups; something I took for granted when I could come home to them every night. Weekends are associated with cooking new foods since cooking for one on during the week isn’t really all that fun. I love binge watching shows on Netflix with Mike, going for long walks with the dogs, and cooking up food for us to enjoy as a couple.

Carbonara Pizza | doughseedough.net

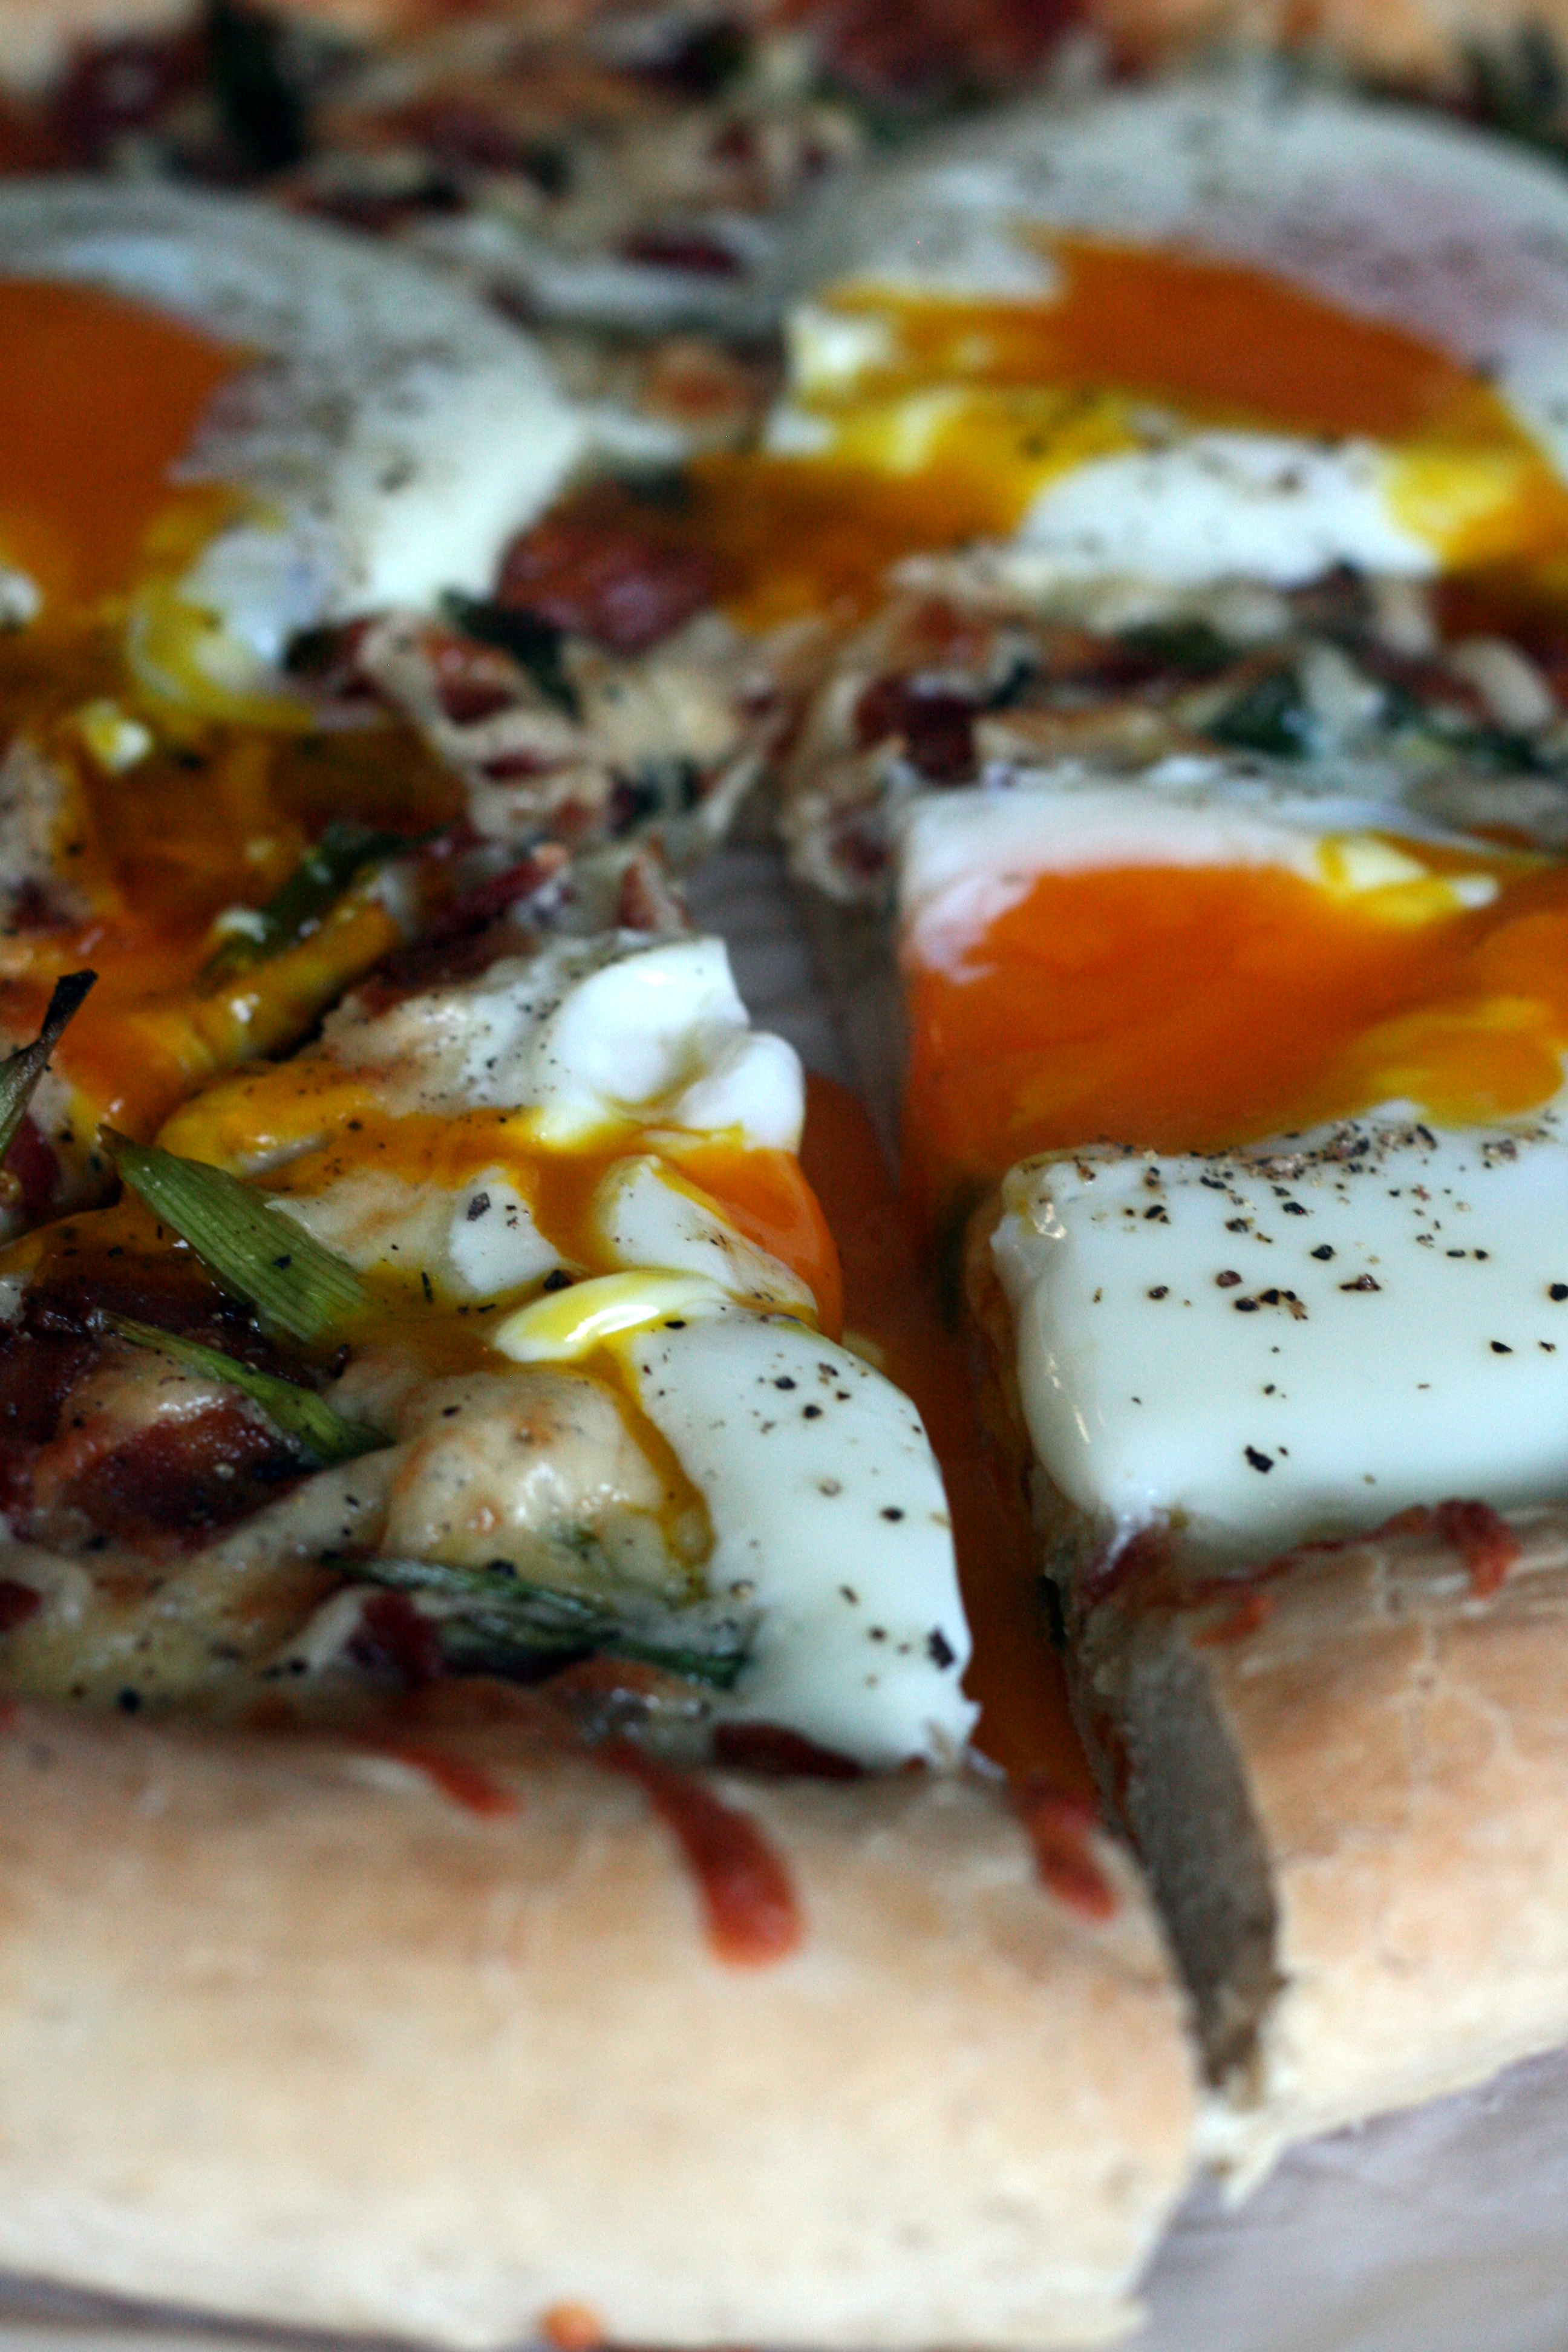
This weekend, I was inspired to make a carbonara pizza after I bought some farm fresh eggs. The grocery store eggs don’t even come close to fresh eggs. Really. I wanted to showcase the eggs in something wonderful. What better way to do that than incorporate the eggs into a creamy sauce for the pizza and then crack a few on top? Eggs, cheese, bacon – you honestly can’t go wrong with that combination.

Carbonara Pizza | doughseedough.net

Carbonara Pizza

for the dough:
3 cups all purpose flour
1 – .25 ounce package active dry yeast (2 1/4 teaspoons)
2 tablespoons vegetable oil
1 teaspoon salt
1 tablespoon sugar
1 cup warm water (~110°F)

for the pizza:
4 ounces mozzarella, shredded
6 ounces Parmesan, grated and divided
5 large eggs, divided
8 ounces bacon, diced
2 sprigs thyme
2 cloves garlic, smashed
4 green onions, thinly sliced
freshly ground black pepper

  1. Preheat oven to 450°F. Place a pizza stone or baking sheet in the middle of the oven to heat up for at least 30 minutes.
  2. To make the dough: Fit stand mixer with dough hook. Combine dry ingredients in mixing bowl. Pour in oil and water. Mix on low speed until dough pulls away from side of bowl and gathers around hook and is smooth and elastic. Place dough in a large lightly greased bowl and cover loosely with plastic wrap. Set aside and let rise for 30 – 40 minutes.
  3. While dough is rising, cook bacon in a large pan with thyme and garlic until crispy. Remove cooked bacon from the pan and drain on a paper towel. Discard bacon drippings, garlic, and thyme.
  4. To make the sauce: Place 4 ounces Parmesan, 2 eggs, and 1 teaspoon of black pepper into a food processor and blend until smooth.
  5. To form the dough: Place dough on a flat surface. Gently press the center to create a large dimple. Gently push it outward from the center with your fingertips. Pick up the dough circle and, holding it under the rim, turn the dough in a circle; gravity will gently stretch the dough. Drape the dough over the back of your hands and gently stretch outward while rotating. Your pizza dough should have a thinner middle and a thicker edge. Place the dough onto a piece of parchment paper.
  6. Spread the sauce over the dough. Sprinkle shredded mozzarella on top, followed by bacon and green onions. Top with remaining 2 ounces of grated Parmesan. Slide pizza onto preheated pizza stone and bake for 10 minutes.
  7. Remove pizza from oven and use a large spoon to create 3 indentations on the top of the pizza. Crack the 3 remaining eggs into each of the indentations and return the pizza to the oven for 3 – 5 minutes, or until the egg whites are set but the yolk is still runny.
  8. To serve, use a knife to break the yolk and spread it around. Season with freshly ground black pepper before serving, if desired.

Carbonara Pizza | doughseedough.net

Advertisement


2 Comments

My Favorite Slow Cooker Ribs

Slow Cooker Ribs | doughseedough.net

Years ago when I first started blogging, I posted about slow cooker ribs. To this date, it’s one of the most popular recipes on the blog. My cooking techniques and recipes have evolved over the years and I thought that it might be a good time to make an updated post about my favorite ribs. Instead of baking the ribs first, I bake them after the slow cooking to get the caramelized stickiness that we all know and love. I also start the ribs out with a rub to give them an extra dose of flavor.

I know that some people might consider sticking ribs into the slow cooker sacrilegious, but it works for me and I think the results are pretty stellar! Plus, I don’t know the first thing about starting up a grill. That’s Mike’s domain.

Slow Cooker Ribs | doughseedough.net


As a side note – that beer you see in the back? Amazing. Two thumbs up for Southern Tier and their amazing Choklat stout.

Slow Cooker Ribs

3 pounds baby back ribs
1/2 cup light beer (don’t use the previously mentioned Choklat!)
1 onion, sliced
2 cloves garlic, smashed
2 1/2 cups barbecue sauce (storebought or homemade), divided

for the rub:
2 tablespoons paprika
1 teaspoon freshly ground black pepper
1 teaspoon salt
1 teaspoon chili powder
1 teaspoon garlic powder
1 teaspoon onion powder
1/2 teaspoon cayenne pepper (optional)

  1. Make the rub: mix all ingredients together.
  2. Season ribs evenly with the rub to taste. Brush 1 cup of the barbecue sauce over the ribs. Arrange ribs along the side of the slow cooker insert or cut ribs into thirds or halves and place them in the bottom of the insert. Pour in beer and add onion and garlic cloves. Cook on high for 3.5 – 4 hours or until ribs are tender but not falling off the bone.
  3. Preheat oven to 350°F. Transfer ribs to a baking sheet and baste with remaining barbecue sauce. Bake for 10 – 15 minutes, turning every 5 minutes and basting with additional sauce as needed.


2 Comments

Slow Cooker Beef & Veggie Chili

Is it cold where you live? Do you have mountains of snow outside your window? Are you short on time? Do you hate doing dishes? Do you love comfort food that warms you up? If you answered yes to any or all of those questions, this chili is for you. Tossing everything into the slow cooker means you don’t have to spend hours standing over the stovetop, stirring and tending to your chili. Plus, who doesn’t love coming home after a long day to a house that smells amazing?

Slow Cooker Beef & Veggie Chili | doughseedough.net

Slow Cooker Beef & Veggie Chili

1 tablespoon olive oil
1 pound 93% lean ground beef
2 medium onions, diced
8 cloves garlic, minced
1/3 cup chili powder
1 tablespoon ground cumin
2 bell peppers, diced
8 ounces cremini mushrooms, chopped
16 ounces tomato sauce
2 (15-ounce) cans diced tomatoes
2 (15-ounce) cans kidney beans, drained and rinsed
1 jalapeno, seeds removed and minced (optional)

for serving (optional):
cooked macaroni noodles
fat free Greek yogurt or sour cream
shredded cheese
thinly sliced green onions
jalapeno slices
hot sauce
diced onions

  1. Heat oil in a large skillet over medium-high heat. Add beef, onions, and garlic and cook until beef is no longer pink, about 7 minutes; stir with a spoon to break beef up into smaller pieces. Add chili powder and cumin and stir to coat. Cook for 1 – 2 minutes or until fragrant, stirring frequently. Transfer mixture to a slow cooker.
  2. Stir in bell peppers, mushrooms, tomato sauce, diced tomatoes, and kidney beans. Cover slow cooker and cook for 6 hours on high or 8 hours on low. Season with salt and pepper to taste before serving  toppings of your choice.


Leave a comment

Easy Slow Cooker Italian Chicken Sandwiches

Football season is over this weekend. I don’t know what I’m going to do with all my extra time. What am I going to eat now that game foods are out? I’m assuming that eating spinach artichoke dip for lunch isn’t acceptable unless you’re watching football. On second thought, it’s probably not acceptable during football season either.

Once in a while, I will eat real food during a football game. You know, something that isn’t 99% cheese. Like this super easy slow cooker Italian chicken sandwich. Holy bucket of yum, I tell ya. If you don’t have your Superbowl menu set yet (shame on you!), make sure you get this delicious sandwich on there! Your friends and family will thank you.

Slow Cooker Italian Chicken Sandwiches |doughseedough.net

Easy Slow Cooker Italian Chicken Sandwiches

3 pounds boneless, skinless chicken breast
1 envelope Good Seasons Zesty Italian salad dressing mix
8 ounces pepperoncini slices, drained + 2 tablespoons liquid
8 ounces hot giardiniera, drained
2 cups low-sodium chicken broth

for serving
whole wheat buns
provolone cheese slices
giardiniera
pepperoncini

  1. Place chicken in the bottom of a slow cooker and sprinkle with dressing mix. Top with pepperoncini, giardiniera, and chicken broth. Cover and cook on low for 6 hours.
  2. Remove meat from slow cooker and shred with two forks. Alternatively, place the chicken into the bowl of a stand mixer fitted with the flat beater. Beat on low for 30 or so seconds or until chicken is shredded. Return shredded chicken to slow cooker for 5 minutes.
  3. Scoop chicken onto buns and top with provolone cheese, giardiniera, and pepperoncini. Serve immediately.


2 Comments

Lightened-Up Cheesy Chicken & Rice Casserole

When I hear the word casserole, images of cheesy, fatty, not-so-great-for-you comfort food comes to mind. What if I told you that you could have all the comfort food flavor without all the bad stuff? This dish is loaded to the top with veggies and whole grains. It’s a dish you can feel great about eating.

Lightened Up Cheesy Chicken & Rice Casserole

Lightened-Up Cheesy Chicken & Rice Casserole

3 cups cooked brown rice
3 boneless, skinless chicken breasts
1/2 large onion, chopped
3 cloves garlic, minced
8 ounces mushrooms, sliced
1 green bell pepper, chopped
1 jalapeno, seeded and chopped (optional)
1 head broccoli, cut into florets and steamed (about 4 cups)
10.75 ounce can fat-free cream of mushroom soup
1 cup low-sodium chicken broth
2 tablespoons light mayo
1 tablespoon Dijon mustard
1 1/2 cups shredded cheddar cheese

  1. Preheat oven to 350°F. Spread cooked rice in the bottom of a 9×13 baking dish.
  2. Heat a large pan over medium-high heat. Spray with cooking spray. Add chicken and cook until cooked through and no longer pink in the middle. Remove chicken from pan to a separate bowl.
  3. Add onion, garlic, mushrooms, bell pepper, and jalapeno to pan. Cook until vegetables just begin to soften. Stir in soup, broth, mayo, and mustard until well combined. Mix in broccoli, 3/4 cup of the cheese, and the cooked chicken. Scoop mixture on top of rice in baking dish and sprinkle remaining cheese on top.
  4. Bake in preheated oven for 20 minutes or until cheese is bubbly. Allow to cool 5 minutes before serving.


Leave a comment

Niu Rou Mien (Taiwanese Beef Noodle Soup)

I’ve realized that some dishes are just better when my mom makes it. My mission this time was to replicate the delicious beef noodle dish I ate growing up – niu rou mien. I asked her for a recipe, and she told me to just come over and watch her make it and take notes. She ended up sending me an email with a rough draft of a recipe; I’ve done my best to assign amounts to the various ingredients.

This recipe is long. It has many, many ingredients. I thought about finding shortcuts, but I honestly don’t think there are any. This recipe is truly a labor of love and it’s not something you can cheat and simplify without sacrificing taste.

One thing I noticed from pouring over niu rou mien recipes is that most of them instructed you to boil the beef to get rid of the impurities. If you have bone-in meat, you’ll want to make sure you boil it or you will end up with a film of gunk on your finished product. And that would be a major bummer after you spent all that time prepping and cooking, right?

This dish is my childhood in a bowl. And I’m so happy that I have been able to recreate it in my kitchen.

Niu Rou Mien (Taiwanese Beef Noodle Soup) | doughseedough.net


Slow Cooker Niu Rou Mian (Taiwanese Beef Noodle Soup)

3 pounds beef shank and/or chuck roast  (I used 1 1/2 pounds each)
2 tablespoons canola oil
2 medium onions, chopped
10 cloves garlic, peeled and smashed
2-inch piece ginger, thinly sliced
2 tablespoons fermented black beans
2 teaspoons five spice powder
2 tablespoons Sichuan bean sauce
1 tablespoon hot chili sauce
1/2 cup Shaoxing wine (vodka, vermouth, or sherry will also work)
1/3 cup low-sodium soy sauce
1/3 cup dark soy sauce
1 tablespoon rock sugar
2 cups beef broth
2 tomatoes, quartered
5 green onions, cut into thirds
3 dried chili peppers, optional
8 hard boiled eggs, peeled
1 tablespoon Sichuan peppercorns
5 star anise
2 cinnamon sticks
2 bay leaves
5 large carrots, sliced

for serving:
baby bok choy, blanched
noodles of choice, cooked (I prefer medium-width Chinese noodles)
green onions, thinly sliced
rice wine vinegar
pickled mustard greens, recipe below

  1. Bring a large pot of water to a boil. Add beef and reduce to a simmer. Cook until beef is cooked all the way through. Skim off the impurities floating on top of the water. Remove beef and reserve the cooking water.
  2. Heat a large pot over medium-high heat and add the oil. Brown the beef on all sides. Remove beef from pot and place into the bottom of a slow cooker.
  3. Add the onion, garlic, and ginger into the pot and cook, stirring frequently, for 2 minutes. Add the black beans, five spice powder, Sichuan bean sauce, and hot chili sauce and stir to combine. Stir in the Shaoxing wine, both types of soy sauce, and rock sugar and cook until the sugar has dissolved. Pour mixture on top of the beef.
  4. Add in the beef stock, tomatoes, green onions, chili peppers, and hardboiled eggs. Add the Sichuan peppercorns, star anise, cinnamon sticks, and bay leaves (optional: combine these ingredients in a cheesecloth and tie it up to make removing all the little pieces a bit easier at the end.) Top everything off with stock and six cups of the reserved cooking water (or use 8 cups of beef stock). Cover and cook on low for 5 – 6 hours or until the meat is tender. Add carrots and cook for an additional 30 minutes or until carrots are tender. Taste and add more soy sauce if necessary.
  5. To serve, place noodles in a bowl and top with bok choy. Ladle scoops of the beef stew on top. Garnish with green onions and the pickled mustard greens relish. Top with a splash of rice wine vinegar, if desired.


Pickled Mustard Greens Relish

10.5 ounce package mustard greens
2 hot chili peppers
2 tablespoons sugar

  1. Rinse the pickled mustard greens and soak in water for 30 minutes. Change the water twice during this time period to get rid of excess salt.
  2. Dice the mustard greens into pea-sized pieces.
  3. Heat a nonstick pan over medium heat and add the mustard greens. Cook for 2 minutes. Add in chili peppers and sugar and stir until sugar is evenly distributed. Continue to cook, stirring frequently, until water has evaporated.
  4. Allow to cool and store in the refrigerator in an air-tight jar.


recipes slightly adapted from my Mama’s recipe


Leave a comment

SNAP Challenge Day 6 (+ chicken taco soup)

SNAP Challenge Day 6 | doughseedough.net

Mike and I were out running errands today and ended up at the mall around lunch time. We had been out all morning running from store to store looking at flooring. By the time we got to the mall to look at some clothes for Mike, we were hungry and tired. Mostly hungry. As we walked around, the smells from the food court, the samples from the pretzel shops and coffee shops tempted us.

It was so hard to walk past everything. I was speed walking as fast as I could manage to get away from whatever tempting food was lurking in the area. The chicken taco soup we had for lunch was so good after spending two hours in that Sbarro-Panda Express-Auntie Anne’s haze.

For the soup, I used farmers’ market sweet corn and just barely cooked it so that it still retained its delicious crunch. If you don’t have any fresh corn on hand, 1 1/2 cups of frozen corn will work just fine. But nothing will ever beat good ol’ Wisconsin sweet corn!

Today we ate:

Breakfast: oatmeal with egg (me), oatmeal with agave (Mike)
Lunch: chicken taco soup
Snack: peanut butter toast
Dinner: spaghetti with zucchini and tomatoes in a creamy lemon-yogurt sauce (check back Monday for the recipe!)
Snack: peanut butter toast with banana

Chicken Taco Soup | doughseedough.net

Chicken Taco Soup

3 chicken breasts
olive oil spray
2 teaspoons chipotle chili powder
1 teaspoon cumin
3/4 teaspoon garlic powder
3/4 teaspoon onion powder
1/4 teaspoon salt
1 teaspoon ground black pepper
2 onions, chopped
4 cloves garlic, minced
1 –  2 jalapenos, minced
2 bell peppers, chopped
8 ounce can tomato sauce
2 – 14.5 ounce cans diced tomatoes
2 – 14.5 ounce cans black beans, drained and rinsed
5 cups chicken broth
2 ears sweet corn, kernels removed
garnishes (optional): shredded cheddar, nonfat plain Greek yogurt (or sour cream), cilantro, jalapeno slices, diced avocados, tortilla chips

  1. Preheat oven to 375°F. Spray a baking pan with olive oil.
  2. In a small bowl, combine chili powder, cumin, garlic powder, onion powder, salt and pepper. Sprinkle a little bit of the mixture of the chicken breasts and set the rest of the spice mixture aside. Bake chicken in preheated oven for 20 – 25 minutes or until cooked through. Shred chicken with two forks.
  3. Meanwhile, heat a large pot over medium heat and spray with olive oil. Add in onions, garlic, and jalapenos. Cook for 3 minutes. Stir in the remaining spice mixture and stir to evenly distribute. Stir in tomato sauce, bell pepper, diced tomatoes, and beans. Stir in chicken broth and bring mixture to a boil. Reduce heat to a simmer and cook for 20 minutes. Stir in shredded chicken and corn and cook for an additional 2 minutes to heat chicken through.
  4. Serve soup hot with desired toppings.


recipe slightly adapted from The Pioneer Woman


3 Comments

Char Siu Bao (Chinese BBQ Pork Buns)

I think making these buns might have been the biggest mistake of my life. They’re just too dang good and I crave them constantly. The first batch quickly dwindled to nothing – I sent a bun or two off to my family and to Mike’s parents and sent a half-dozen off with Mike. I was left staring at four buns. I tried to make them last as long as possible, but I have to be honest… they lasted four days. Maybe less.

Baked Char Siu Bao (Chinese BBQ Pork Buns) | doughseedough.net

I think these buns might be the first thing I will ever put on my monthly “must make” list. I rarely make repeat dishes. It takes a good dish to warrant a second visit into my kitchen more than once a year. It takes a stellar dish to make a visit a few times a year. A dish that I want to make every month? Unheard of, until now.

Baked Char Siu Bao (Chinese BBQ Pork Buns) | doughseedough.net

I just can’t explain why I loved these buns so much. It’s a combination of the slightly sweet, mostly salty filling surrounded by an impossibly soft, fluffy, yet chewy bun. The texture of the buns is partially due to the tangzhong (roux) made from combining flour with water and milk. The tangzhong  is incorporated into the dough and the endresult is a bun that’s… well, good.

Baked Char Siu Bao (Chinese BBQ Pork Buns) | doughseedough.net

I made this dish for this month’s What’s Baking. The host for August is Ali from Sparks from the Kitchen. She challenged us to bake up something to represent our heritage.  I waffled between making dan ta, an egg custard tart, and feng li su, little flaky cakes encasing a pineapple filling. I don’t know how I ended up making neither of those and instead making the char siu bao, but I don’t regret my actions one bit. I loved char siu bao growing up, and I love them still. I hope you enjoy them as much as I do!

Char Siu Bao (Chinese BBQ Pork Buns)

for the buns:
6 cups bread flour, divided
2/3 cup water
1 1/3 cup milk, divided
1/3 cup sugar
1 teaspoon salt
4 teaspoons instant yeast
2 large eggs
4 tablespoons butter, melted

for the filling:
1 tablespoon canola oil
1/2 cup finely chopped shallots
2 tablespoons honey
1 1/2 tablespoons low-sodium soy sauce
2 tablespoons oyster sauce
1 1/2 tablespoons sesame oil
1 tablespoon dark soy sauce
1/4 cup low-sodium chicken stock
3 tablespoons flour
2 cups diced char siu (Chinese BBQ roast pork)

for garnishing:
1 egg beat with 1 teaspoon water (egg wash)
1 tablespoon sesame seeds

  1. To make the tangzhong (roux/flour paste), mix together 1/3 cup flour, 2/3 cup water, and 1/3 cup milk in a small saucepan until well combined. Place the pan over medium heat and cook, stirring constantly, until the mixture thickens up and has the consistency of a thick yogurt. The temperature of the roux should not exceed 150°F. Remove the mixture from heat and set aside to cool.
  2. In a large mixing bowl, combine 5 cups flour, sugar, salt, and yeast and mix with a wooden spoon to combine. Add the tangzhong/flour paste, 1 cup milk, 2 eggs, and melted butter. Stir together to form a soft dough. Knead by hand for 15 – 20 minutes. If your dough is sticky and not coming together, add the remaining 2/3 cup flour a little at a time until your dough is smooth and elastic.
  3. Lightly grease a large bowl. Place dough inside and turn to coat. Cover the bowl lightly with plastic wrap. Place the bowl in a warm, draft-free place and let rise for 60 minutes or until it has doubled in size.
  4. Meanwhile, get started on the filling. Heat the oil in a large pan over medium-high heat. Add the shallots and cook for 2 minutes, stirring constantly. Stir in the honey, soy sauce, oyster sauce, sesame oil, and dark soy sauce. Cook until mixture starts to bubble, stirring frequently. Stir in the chicken stock and flour until well combined. Reduce heat to medium-low and cook for 2 – 3 minutes, or until thickened. Remove from heat and stir in the diced roast pork. Set aside to cool.
  5. Separate the risen dough into 16 equal pieces. Roll each piece into a 4-inch circle, leaving the center slightly thicker than the edges. Place a heaping tablespoon of filling into the middle of each circle. Crimp them closed, making sure they are tightly sealed. Don’t fret if they’re a little ugly – the crimped side ends up on the bottom, hidden from judging eyes 😉
  6. Line baking sheets with parchment paper. Lay the buns seam-side down on the prepared baking sheets and let rise for another hour.
  7. Preheat oven to 350°F. Brush the tops of the buns with the egg wash. Sprinkle with sesame seeds and bake in the preheated oven for 25 minutes, or until buns are golden brown. Let cool slightly before eating.


yields 16 buns. recipe slightly adapted from The Woks of Life


2 Comments

Char Siu (Chinese BBQ Roast Pork)

Char siu, or Chinese BBQ roast pork, brings back really fond memories for me. I remember seeing huge slabs of roast pork hanging from windows in restaurants or at grocery stores. I remember stuffing my face full of buns filled with the sweet-salty succulent pork.

Char Siu (Chinese BBQ Roast Pork) | doughseedough.net

I can’t even begin to tell you how awesome this pork smelled as it was roasting away in the oven. I might go so far as to say that it beat any cookie, cake, or pie smell that I’ve ever created in my kitchen. Seriously. It was that good.

I think I spent the majority of the cook time staring all googly-eyed into the little oven window, watching this pork cook up into what I can only describe as heavenly. If you’re looking for a little happiness in your life, you’re in luck. I’m bringing it to you in the form of some Chinese roast pork.

This little piggy… turned out awesome. Stay tuned for part two when this little piggy gets turned into some char siu bao (Chinese roast pork buns). Yeehaw!

Char Siu (Chinese BBQ Roast Pork) | doughseedough.net

Char Siu (Chinese BBQ Roast Pork)

3 pounds pork shoulder
4 tablespoons sugar
1 teaspoon salt
1 teaspoon five spice powder
2 teaspoons paprika
1/2 teaspoon white pepper
2 tablespoons sherry
2 tablespoons low sodium soy sauce
1 teaspoon sesame oil
4 teaspoons hoisin sauce
4 teaspoons tomato paste
4 teaspoons molasses
1 tablespoon canola oil
6 cloves garlic, minced
2 tablespoons water

  1. Cut pork into 3-inch thick strips lengthwise. Place pork into a large zip-top bag and set aside.
  2. Combine the remaining ingredients in a medium bowl. Whisk until well combined. Remove 1/2 cup of the marinade into a container. Cover and refrigerate for later use.
  3. Pour the remaining marinade into the zip-top bag. Make sure pork is evenly coated with the marinade. Squeeze excess air out of the bag and seal it. Place bag into a baking dish and refrigerate overnight (at least 12 hours).
  4. Preheat oven to 375°F. Line a sheet pan with foil and place a metal baking rack on top. Remove pork from marinade, letting excess marinade drip off. Place pork on rack, making sure the pieces don’t touch. Bake the pork for 20 – 25 minutes on each side, or until pork reaches an internal temperature of 145°F. Baste pork with half of the reserved marinade. Move the oven rack to the top third and turn the broiler on. Return the pork to the oven and cook for a few minutes on each side or until the pork is slightly charred.
  5. Let the meat rest for 10 minutes before slicing.


recipe slightly adapted from The Woks of Life


1 Comment

Turkey & Rice Taco Skillet

Before I dive into our weekend adventures and the recipe,  I want to explain why I haven’t been posting as much (and why I’m eating dairy again). I’m unable to complete even a simple 5 mile run without almost collapsing. I can’t eat without being sick. Two of the most important things in my life: running and food, are now what frustrate me the most.  I’m taking it a day at a time, praying that my doctors can figure out what’s wrong with me soon so I can go back to being normal. Until then, I’ll be posting a bit less; it’s hard to post new recipes when you don’t each much of anything besides cereal and salads 🙂

But onto happier things… Mike and I went on our first camping trip of the season this past weekend with our pups. It rained Friday, but Saturday was picture-perfect and we were able to get in a nice long hike. Really long hike. Because we got lost. But hey, what’s the point of life without a little adventure? I’ve got two camping meals to share with you this week. For our Friday night dinner, I made a Turkey and Rice Taco Skillet. It was pouring, but we huddled under the tarp with the dogs and ate our dinner. It was the perfect meal to keep us warm in the cold, wet weather. I figured I would share this recipe first since it kind of works with the whole Cinco de Mayo thing, too.

Though this was made over a campfire, it is easily adaptable to be made at home on the stove top. That’s the beauty of cast iron – it can be used inside and outside. I’ve finally gotten my “inside use” Dutch oven and skillet to where they are pretty darn well seasoned. The skillet I used while we were camping, though, has been on hundreds of camping trips with Mike when he was growing up. The skillet is so perfectly seasoned that it puts my pieces to shame. I guess I have something to work on, eh?

Turkey & Rice Taco Skillet {camping meal} | doughseedough.net

Turkey and Rice Taco Skillet
serves 4 – 6

2 cloves garlic, minced
1/2 red onion, diced
1 jalapeno, minced (seeded if desired)
1.25 pounds lean ground turkey
1 packet hot taco seasoning mix
4 cups water, divided
3 cups Minute Brown Rice
1 – 15 ounce can corn
1 – 15 ounce can black beans, rinsed and drained
1 – 14.5 ounce can chopped tomatoes with jalapenos
1 cup shredded extra sharp cheddar cheese
2 cups shredded romaine lettuce
sour cream to garnish
olive oil spray

  1. Spray a large 12″ cast iron skillet with olive oil. Add garlic, onion, and jalapeno and cook over the fire (or medium-high heat) until onions are tender. Add the turkey and cook until browned, about 5 minutes. Stir in taco seasoning and two cups of water. Bring to a simmer and stir in rice and remaining two cups of water. Let simmer for 10 minutes, stirring occasionally. Stir in tomatoes, beans, and corn and continue to cook, stirring occasionally, until liquid is absorbed.
  2. To serve, divide between 4 – 6 bowls. Sprinkle with lettuce, cheese and top off with sour cream.