DoughSeeDough

a balanced plate with room for dessert


2 Comments

Chocolate Caramel Coconut Bars

I’m gearing up for the holidays once again. It seems like the reasons to bake are never ending- fundraisers, brunch and cookie swaps at work and just-for-the-hell-of-it treats for friends and family. I’m going to send as many holiday baked goods your way in the next few weeks. You won’t want to miss any updates, so make sure you’re signed up for my email updates or follow me on Facebook (check it out on the right).

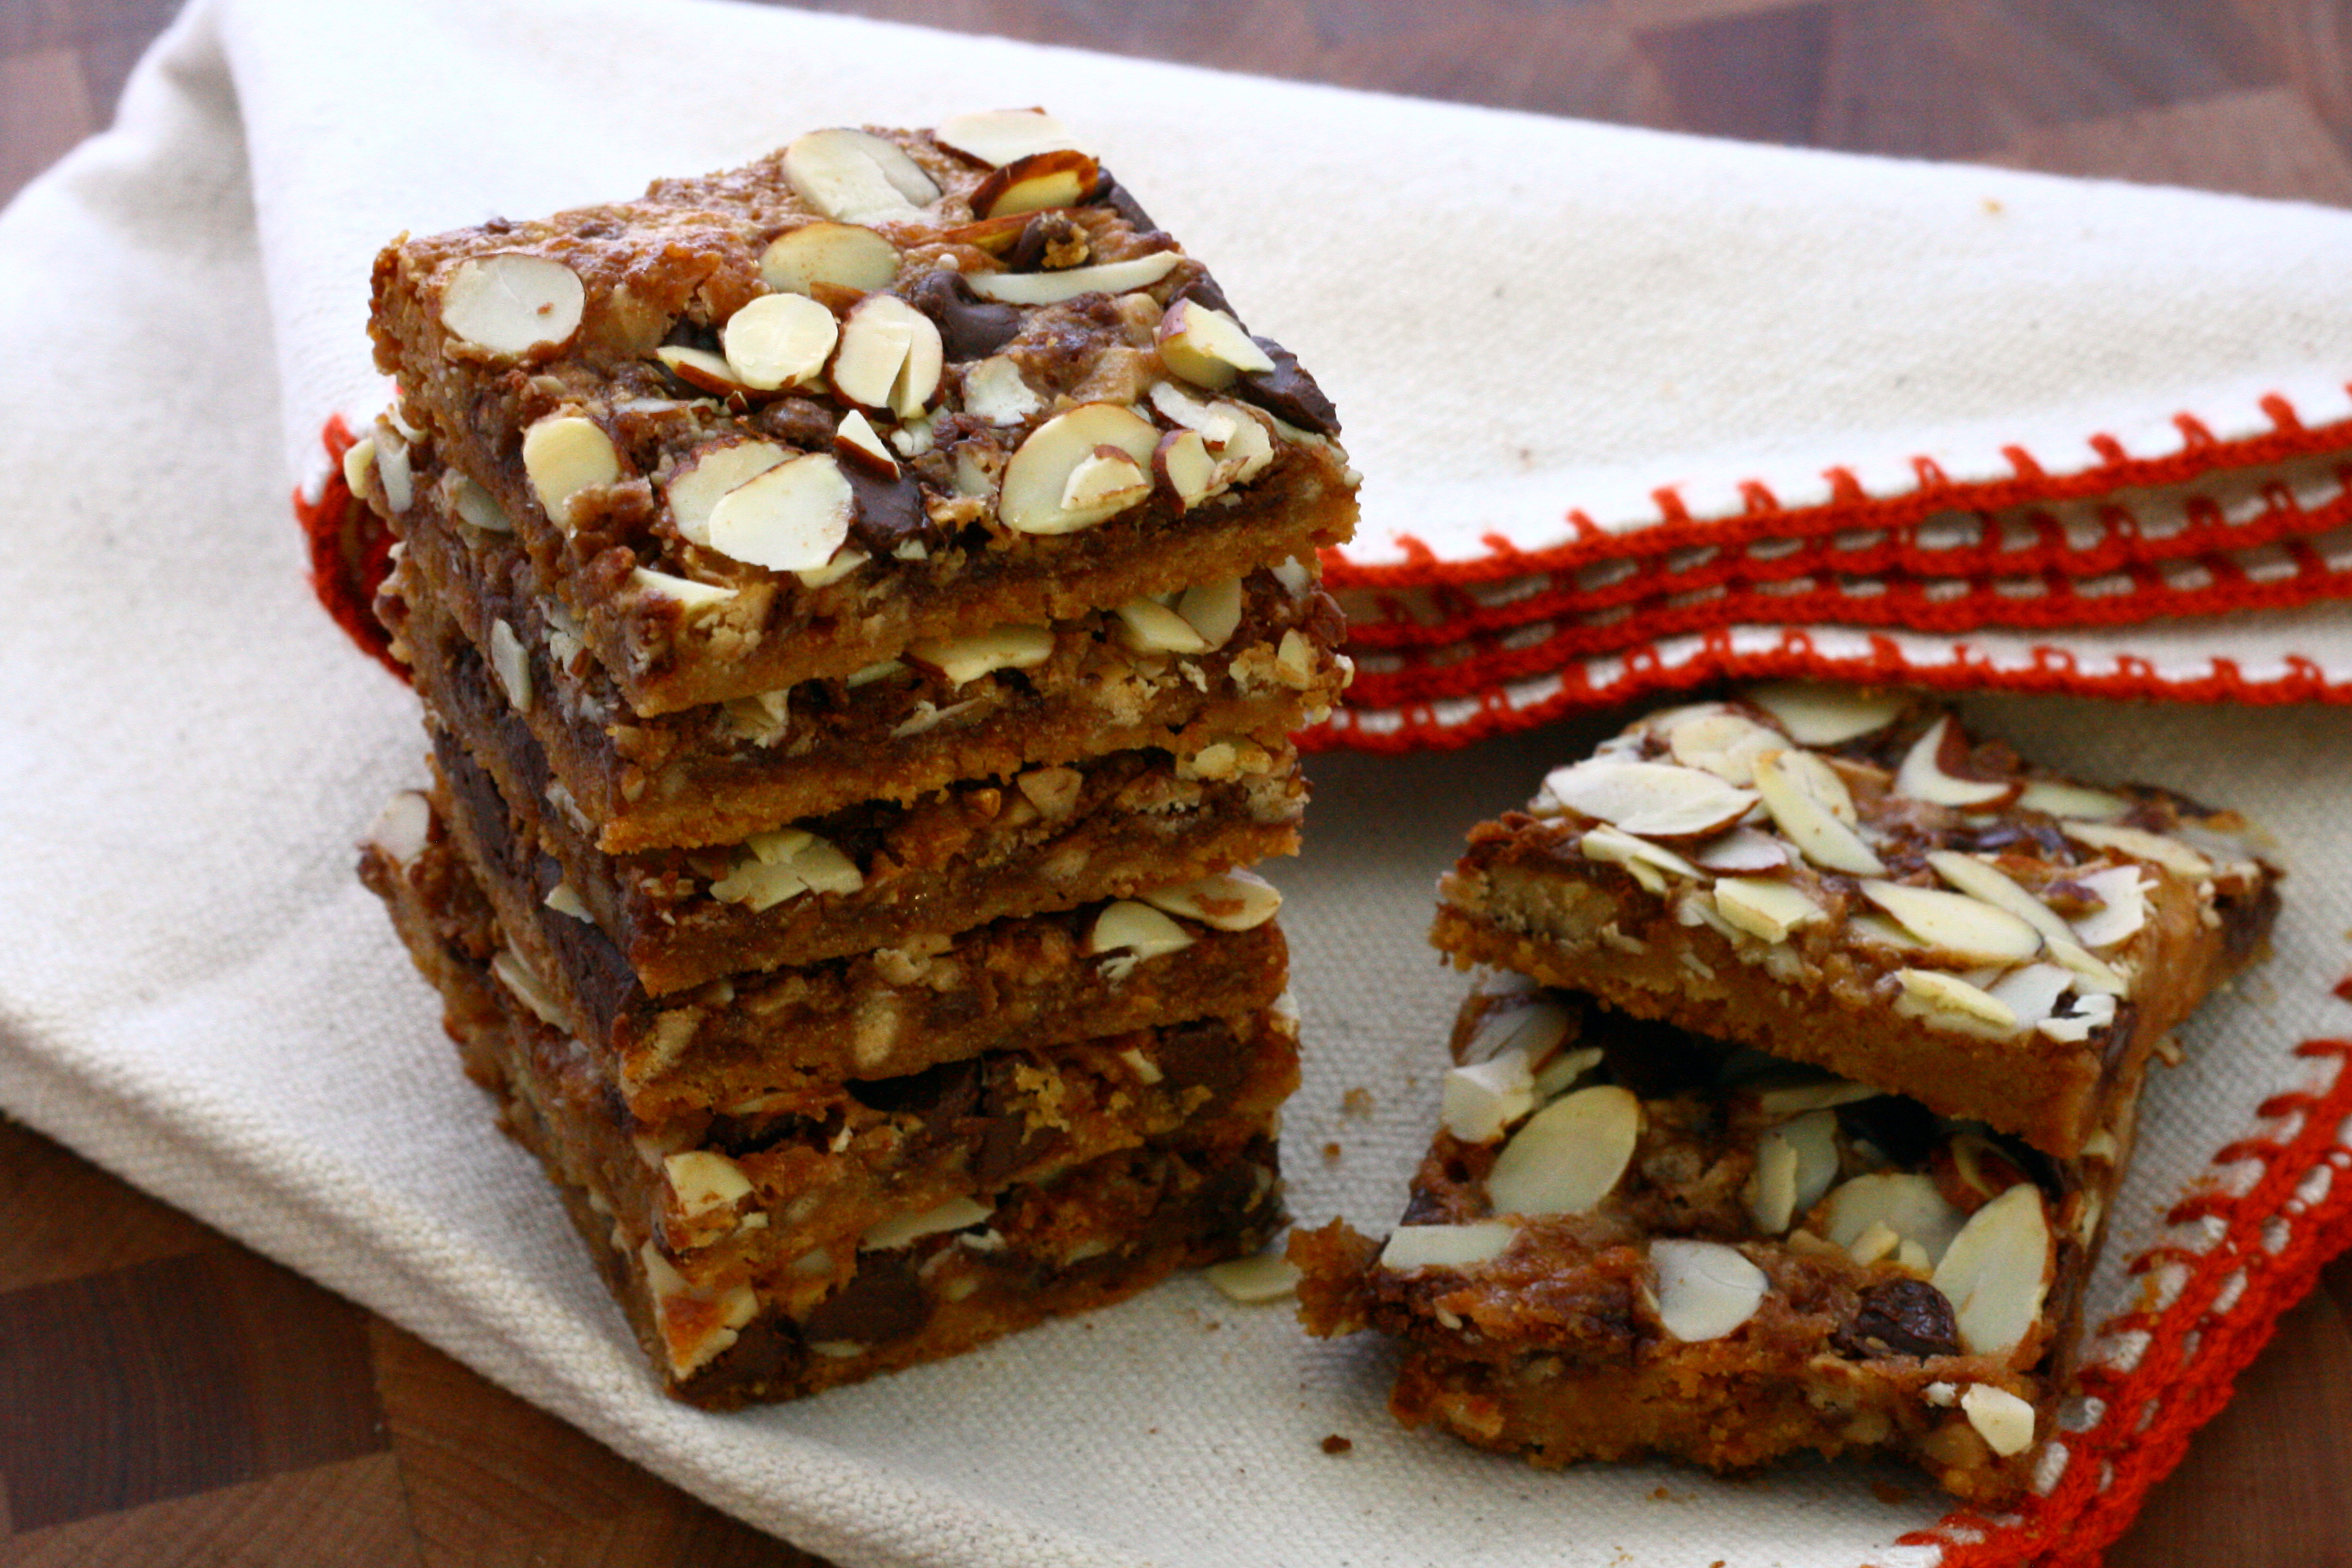
I’m kicking things off with these Chocolate Caramel Coconut Bars. You guys, this dessert it to die for. I got a bar similar to this at the farmers’ market a few weeks back. It was good, but not great. The bars were so insanely sweet that it took me four days to eat the tiny square. These bars? They’re definitely decadent and sweet, but not overly sweet. That said, I’m a big fan of sweet + salty, so I have a feeling that salted caramel will be making an appearance in the next batch I make!

Chocolate Caramel Coconut Bars | doughseedough.net

Chocolate Caramel Coconut Bars

38 caramels (about 1 ¼ cup), unwrapped
6 tablespoons heavy cream
½ teaspoon vanilla extract
½ cup sugar
1 cup all purpose flour
1 cup old fashioned oats
¼ teaspoon salt
½ teaspoon baking soda
½ cup butter, room temperature
1 ½ cups semisweet chocolate chips
1 ½ cups shredded sweetened coconut

  1. Preheat oven to 325°F. Line a 7×11-inch (or 9×9-inch) baking pan with parchment paper and set aside.
  2. In a small pan over medium heat, heat the caramels and heavy cream until caramels are melted. Remove pan from heat and stir in vanilla extract. Set aside.
  3. In a large bowl, mix together sugar, flour, oats, salt, baking powder and butter until mixture is crumbly. Press the mixture into the bottom of the prepared pan. Bake in preheated oven for 20 minutes.
  4. Sprinkle chocolate chips on top of crust in an even layer. Pour the caramel sauce over the chocolate chips and sprinkle the coconut on top. Bake for an additional 20 – 25 minutes or until coconut is toasted and the edges of the bars are golden brown.
  5. Let cool completely and lift the bars out of the pan with the parchment paper. Set on cutting board and cut bars into squares.


recipe adapted from Eva Bakes


Advertisement


2 Comments

Chocolate Chip Chickpea Blondies

Still here? You didn’t run away at the mention of chickpea + chocolate + blondie? Good. Trust me – these are delicious. They don’t taste anything like beans. All you get is a chewy, delicious peanut buttery blondie studded with chocolate chips.

Chocolate Chip Chickpea Blondies | doughseedough.net

The weird thing is, I actually found the unbaked batter to be tastier than the baked product. So you choose – bake it or just eat the batter by the spoonful. I won’t judge.

Chocolate Chip Chickpea Blondies | doughseedough.net

Chocolate Chip Chickpea Blondies

15 ounce can low-sodium chickpeas (garbanzo beans)
3/4 teaspoon baking powder
1/8 teaspoon baking soda
1/4 teaspoon salt
3/4 cup brown sugar
2 teaspoons vanilla extract
1/4 cup old fashioned oats
1/4 cup natural creamy peanut butter
1/2 cup mini chocolate chips, divided

  1. Preheat oven to 350ºF. Grease an 8×8 square pan and set aside.
  2. Drain and rinse the chickpeas well. Remove and discard the skins from the chickpeas. Place the skinned chickpeas into the bowl of a food processor and blend until smooth. Add in baking powder, baking soda, salt, sugar, vanilla, oats, and peanut butter. Blend until very smooth.
  3. Mix in 1/4 cup of the mini chocolate chips and spread into prepared pan. Sprinkle remaining 1/4 cup chocolate chips on top. Bake for 30 – 35 minutes, or until golden brown on top, being careful not to overcook. The blondies will appear to be undercooked, but they will firm as they cool.
  4. Allow to cool completely before cutting into 16 pieces and serving.


recipe slightly adapted from Chocolate Covered Katie


1 Comment

Peanut Butter Crispy Bars

Peanut Butter Crispy Bars | doughseedough.net

I’m going to be honest: this was my second attempt at making these bars from the Baked: New Frontiers in Baking cookbook. You see, the first time I didn’t make it too far. I started with the crispy rice cereal base and cooked the sugar base exactly as written. I used my candy thermometer and everything. Unfortunately, it wasn’t cooked long enough. The sugar water mess remained, well, a mess. It never got to the point where it became beautiful and syrupy. I mixed it into the cereal anyway, but the cereal turned into mush.

Take two was much more successful. I do think that I will make these a third time with a new modification: double the cereal base. These treats are decadent. The authors of the cookbook say that these can be cut into 9 squares. I say they should be cut into 16 squares. Or 25 squares. The chocolate:peanut butter:cereal ratio was just a little off to me. Mike loved them, though.

Peanut Butter Crispy Bars | doughseedough.net

Peanut Butter Crispy Bars
adapted from Baked: New Frontiers in Baking

for the crispy crust:
1 3/4 cups crisped rice cereal
1/4 cup sugar
3 tablespoons light corn syrup
3 tablespoons unsalted butter, melted

for the milk chocolate peanut butter layer:
5 ounces milk chocolate chips
1 cup creamy peanut butter

for the chocolate icing:
3 ounces dark chocolate, coarsely chopped
1/2 teaspoon light corn syrup
4 tablespoons unsalted butter

  1. Make the crispy crust: Lightly grease an 8×8-inch baking pan. Set aside. Place cereal in a large bowl and set aside.
  2. Pour 1/4 cup water into a small saucepan. Add sugar and corn syrup to the center of the pan, being careful to not let to let it touch the sides of the pan. Using a small wooden spoon, gently stir the mixture until just combined. Place a candy thermometer in the saucepan. Cook over medium-high heat and bring to a boil. Cook until the mixture reaches the soft ball stage, 235 – 245°F.
  3. Remove mixture from heat and stir in butter. Pour mixture over cereal and stir until thoroughly coated. Pour into prepared pan and using the palm of your hand, gently press mixture into the bottom of the pan (do not press up the sides). Let the crust cool to room temperature while you make the milk chocolate peanut butter layer.
  4. Make the milk chocolate peanut butter layer: in a large nonreactive metal bowl, stir together the chocolate and the peanut butter. Set the bowl over a saucepan of simmering water and cook, stirring constantly with a rubber spatula, until chocolate is melted and the mixture is smooth. Remove bowl from the pan and stir for about 30 seconds to let it cool slightly. Pour evenly over crispy crust. Place into the refrigerator and chill for one hour.
  5. Make the chocolate icing: in a large nonreactive metal bowl, combine all ingredients. Set the bowl over a saucepan of simmering water and cook, stirring with a rubber spatula, until mixture is smooth.  Remove bowl from the pan and stir for about 30 seconds to let it cool slightly. Pour mixture evenly over peanut butter layer. Place into the refrigerator and chill for one hour.
  6. Cut into 16 squares and serve. Or, store in the refrigerator, covered tightly, for up to 4 days.


6 Comments

Toffee Almond Magic Cookie Bars

It’s recipe swap time again! I’m finally getting back into the swing of things, and that means participating in a recipe swap with a really great group of bloggers. This swap’s theme: desserts!

I can’t believe how lucky I got with this one. It has everything I love in life. Toffee. Chocolate. Nuts. Is it ok for a dietitian to admit that she can single-handedly polish off an entire tray of this? No? Ok, well I didn’t. Mike helped. A little.

toffee almond cookie bars

I rarely make the same dish twice in a month. For me to do so it has to be really good. Really, really good. And yeah, these were that good. I made not one, but two pans of this in a week. The second pan is sitting in the kitchen right now, taunting me. I’ve already munched away a corner of it, but I plan on shipping the rest of it to work with Mike and bringing a few pieces to my office as well so I’m not tempted at home.

Also, I burned my mouth and I’m a little angry at them. But that’s my own stupid fault because I have no self control and I couldn’t wait until they were even a teeny bit cooled before sneaking a bite. I think I can find it in my heart to forgive them, though.

toffee almond cookie bars

Toffee Almond Magic Cookie Bars
very slightly adapted from Kate’s Recipe Box

9 full graham crackers
4 tablespoons unsalted butter, melted
1 can sweetened condensed milk
1/2 cup bittersweet chocolate chips
1 cup Heath milk chocolate toffee bits
1/2 cup sliced almonds

  1. Preheat oven to 350°F. Grease bottom and sides of a 9×13″ pan with butter and line with parchment paper. Grease parchment paper with butter. Set aside. 
  2. Crush graham crackers into crumbs using a food processor rolling pin. Mix in melted butter until well-combined. Press crumbs into lined baking dish.
  3. Evenly pour the sweetened condensed milk over the graham cracker layer. Sprinkle the chocolate chips, toffee bits, and almonds evenly over the sweetened condensed milk. Gently press in a little.
  4. Bake for 30 minutes or until browned and pulling away from the edges of the pan. Let cool completely before cutting.

Be sure to head on over to Taste of Home Cooking to check out the recipe swap round-up!


3 Comments

Dark Chocolate Cherry Almond Bar

I finally grew up. I inherited a DSLR from my generous sister, Becca, who has moved onto bigger & better cameras. I started using it just a couple of weeks ago. The trouble is, I don’t know how to use it. Pfft, technology. I’m clunking my way through photos. Each time I make a dish it goes something like this.

Plate food
Poke at it with my fingers to make it look “better”.
Give up because I’m not expert at food plating and presentation.
Set it down and take some pictures.
Too dark.
Mash some buttons on the camera.
Too light.
Mash more buttons.
Too blurry.
Setup a makeshift tripod with my rolled up yoga mat (shut up, it’s all I have).
Still blurry (not surprising).
Prop camera on cake stand.
Snap a few more photos.
Still not great.
Give up and tell myself I’ll fix it in Picasa.
Get to Picasa and can’t figure it out.
Post the picture any way.

Some day I will learn how to use this thing… and how to edit the photo I take. Until then, you’ll have to bear with the cake-stand-as-makeshift-tripod unedited photos.

I’ll make up for subpar photos with stellar recipes, though! I give to you today a fruit & nut bar that will rock your world. It’s inspired by the Cranberry Almond KIND bars, but at a fraction of the cost. It’s filled with amazing goodies – almonds, cashews, dates, cranberries, and cherries.

I was a bit skeptical at first, because the fruit base is a bit unsightly after you blend it all together–
fruit & nut bar paste
But the end result? So good.  Not overly sweet with a bit of tang from the cranberries and just the right amount of saltiness from the nuts.
063
Dark Chocolate Fruit & Nut Bar
makes 16 bars
Olive oil spray
1/2 cup cashews
1 1/2 cup pitted dates
1 cup dried cherries
1/2 cup dried cranberries
1 cup roasted almonds, divided
1/2 cup puffed rice cereal
1/2 cup semisweet chocolate chips
  1. Place cashews in food processor and pulse a few times or until cashews are very roughly chopped. Place into a large, bowl lightly sprayed with olive oil.
  2. Generously spray food processor bowl and blade with olive oil. Place dates, cherries, and cranberries into food processor and blend until a paste forms.
  3. Place fruit paste, 1/2 cup of almonds, and puffed rice into bowl with cashews. Lightly spray hands with olive oil, and hand-mix until all ingredients are well combined. I find it easiest to knead it like I would with bread dough.
  4. Line an 8×8 pan with aluminum foil, leaving an overhang. Press fruit and nut mixture evenly in pan. Sprinkle remaining 1/2 cup of almonds on top and press firmly into fruit and nut mixture. Place in freezer for 15 minutes.
  5. Lift bars out of pan with foil. Gently peel off foil. Spray a large knife with olive oil and cut bars into 16 bars, approximately 1×4″.
  6. Melt chocolate chips in a small bowl in microwave in 20 second intervals until fully melted.
  7. Drizzle chocolate with a fork over bars. Let chocolate cool and harden before enjoying.


2 Comments

Friday Favorites (& Granola Bars)

Happy Friday everyone! Hope everyone had a fabulous week. While my week was better than usual, I’m still looking forward to the weekend. I’m starting something new – Friday Favorites. Read on for little moments from the week that grabbed me as well as a delicious new recipe!

Favorite blast from the past: school lunch. Yup, that’s right. I started my 1 month school food service rotation this week and they are feeding me lunch!  This is my first rotation to offer me food, so I’m pretty psyched. Some menu items that brought me back to my elementary and middle school days? Pizza dipper, mini corn dogs, and the good ol’ chicken nuggets. Don’t worry, they’ve got some amazing fruit and veggie spreads along with some other healthier options. Also, for the first time in a loooong time (quite possibly years) I’ve had a cup of skim milk every. single. day. My favorite part of eating school lunch? The spork.

image from newsone.com

Favorite  can’t-live-without-it workout equipment: Foam Roller. Best $20 I spent. You can find me rolling around on it for a good half hour after all my runs and cycling workouts.

 image from synergy-athletics.com

Favorite breakfast inspiration: overnight steel cut oatmeal. I’ve been eating old fashioned oatmeal for breakfast day-after-day. I love it, but it’s getting a little… boring. I finally went out last night and bought some steel cut oats and I can’t wait to give this recipe a try!

photo from thebittenword.com

 Favorite kitchen find: olive wood salt keeper. I’m drooling over this. I’ve seen so many salt keepers and I still haven’t snatched one up. Someday…

image from williams-sonoma.com

Favorite jewelry find: “asymmetry” earrings from Paon Blanc. I love big, dangly earrings. I love sparkly things. Check and check. These earrings are perfect.

image from etsy.com/shop/paonblanc

 and finally, my Favorite new holiday: National Granola Bar Day. There will never be a shortage of bizarre “holidays”. Celebrate National Granola Bar Day with me on January 21, 2012 with these delicious, no-added-sugar granola bars!! These granola bars are chock full of goodness – cranberries, bananas, pecans, oats, and flax. They were so easy to whip up and they taste a-maaaaazing.

Low Fat Granola Bars with Bananas, Cranberries, and Pecans
recipe from Cookin Canuk via Prevention RD 

3 1/2 cups old-fashioned oats
3/4 cup pecans, roughly chopped
3 large, ripe bananas
2/3 cup unsweetened applesauce
3/4 cup dried cranberries
3/4 teaspoon ground cinnamon
1/2 teaspoon ground nutmeg
2 tablespoons ground flax seed (or flax meal)
1/2 teaspoon salt

  1. Preheat oven to 350°F.
  2. Line a 9×13 baking sheet with parchment paper, with about 1 inch of parchment paper overlapping the sides.
  3. Spread out the oats and chopped pecans on a baking sheet. Place in the oven until they are lightly toasted, stirring occasionally, about 10 minutes.
  4. In a medium bowl, mash the bananas with the back of a fork. Stir in applesauce until combined.
  5. Transfer the oats and pecans to a large bowl and stir in dried cranberries, ground flax seed (flax meal), cinnamon, nutmeg and salt.
  6. Stir the banana mixture into the oat mixture until well combined and starting to clump together. Transfer to the prepared baking dish and press down evenly.
  7. Bake until the bars are golden brown and starting to separate from sides of the pan, about 30 minutes. Let cool on a wire rack for 15 minutes.
  8. Use the parchment paper to lift the bars out of the pan. Let cool to room temperature, then cut into 15 bars. Serve or store in an airtight container.


Leave a comment

Lemon Bars

I’m not sure why I thought summer would be less busy than the school year, because it certainly is not. I’ve spent the last few weeks packing, moving, and unpacking. The unpacking continued for several days and I still don’t think it’s quite over. I don’t really understand how I accumulated so much stuff over the last two years. I’m now in DC on vacation with my father, siblings, and my boyfriend. I felt so bad for neglecting my blog that I decided to take a time-out in my life to update.

I made these lemon bars right before I left for vacation last week – they were perfectly tart and not too sweet. I urge you to try them while it’s still summer!

Lemon Bars

Lemon Bars

3 cups all purpose flour
1 1/3  cups confectioners’ sugar
1 1/2  cups unsalted butter, softened
6 eggs
1 3/4 cup granulated sugar
6 tablespoons all purpose flour
1 cup lemon juice (approximately 6 large lemons)
confectioners’ sugar, for dusting

  1. Preheat oven to 350°F. Grease a 13×7 baking dish with butter and set aside.
  2. To make crust, combine the first 3 ingredients. Pat dough into the baking dish. Bake for 20 minutes or until lightly browned.
  3. Meanwhile, prepare filling. Whisk together eggs, sugar, lemon juice and flour until frothy. Pour over baked crust.
  4. Bake for 20 minutes or until the lemon topping is just hardened. Cool completely in pan on a wire rack. Cut into bars and dust with powdered sugar before serving.