DoughSeeDough

a balanced plate with room for dessert


Leave a comment

Brownie Cake with Biscoff Frosting

Brownie Cake with Biscoff Frosting |doughseedough.net

I can’t really explain my obsession with Biscoff cookies. I love them so much that my sister hoards them from her travels and gives them to me. On her last trip back from the UK, she brought me a jar of Biscoff spread along with a handful of the cookies. The spread sat in my pantry for months; I didn’t know what to do with it. She threw some ideas at me – eat it with a spoon! on bread with Nutella! with a banana! – but none of them really sounded special enough to me. This was my first experience with Biscoff spread. I wanted everything to be perfect. After searching a bit, I found this recipe for a Biscoff Brownie Cake and I was sold.

Brownie Cake with Biscoff Frosting |doughseedough.net

I will admit that I ate a disgusting amount of frosting with a spoon. And I may have eaten a spoonful of the spread when I was making the frosting, too. Maybe.

Brownie Cake with Biscoff Frosting
slightly adapted from Bakers Royale

for the brownie:
12 tablespoons unsalted butter
6 ounces unsweetened chocolate, roughly chopped
2 1/4 cups granulated sugar
1/2 teaspoon salt
3 teaspoons vanilla extract
3 large eggs
1 1/2 cups all purpose flour
3 tablespoons cocoa powder

for the frosting:
1/2 cup butter, room temperature
1 cup Biscoff spread
1 1/2 cups powdered sugar, sifted
1 – 3 tablespoons milk

  1. Preheat oven to 350°F. Line a 9-inch springform pan with parchment paper and butter parchment paper. Set aside.
  2. To make the brownie: Combine butter and chocolate in a large microwave-safe bowl. Heat in 30 second increments, stirring after each increment, until chocolate is melted and mixture is smooth. Set aside to cool slightly. Stir in sugar, salt, and vanilla until blended. Add in eggs, one at a time, stirring after each egg until well blended. Stir in flour and cocoa powder and mix until just combined. Scrape batter into prepared springform pan and smooth out the top with a spatula. Bake for 35 – 40 minutes, or until a toothpick inserted into the center comes out with a few moist crumbs.
  3. Set pan on a wire rack to cool. Run a knife around the edge of the brownie and release from the springform pan. Flip brownie onto a flat surface and peel off parchment paper. Turn brownie right-side up and allow to cool completely.
  4. To make the Biscoff frosting: Beat butter and Biscoff spread on medium speed until smooth. Add in powdered sugar and milk until mixture is smooth. Add more milk and/or powdered sugar to reach desired consistency.
  5. To assemble: Spread frosting on top of cake and smooth with an offset spatula. Decorate with chocolate sprinkles, if desired.

Brownie Cake with Biscoff Frosting |doughseedough.net


6 Comments

New York Cheesecake

I love cheesecake. I can’t really pinpoint when or how my love for cheesecake started, but there are two memories I strongly associate with the dessert:

  1. Back in high school, Mike and I would buy Sara Lee cheesecakes and eat the whole dang thing while watching Family Guy. Yes, a whole cheesecake. Between two people. Oh, how I wish I could still get away with eating like that!
  2. My sister, a self-proclaimed cheesecake-hater-turned-cheesecake-lover all because of (drum roll please) my cheesecake. I’m convinced that she’s just never had good cheesecake until I made one from scratch.

Part of me regrets ever introducing my sister to the magic of a good cheesecake; she’s always requesting it. I declined more than I care to admit. The stress of a cheesecake was just too much for me sometimes. Yes, I am that weirdo that will stress out to the max over a cheesecake that browned a little too much or cracked just when I thought everything was perfect. I finally gave in over Thanksgiving weekend and made a New York cheesecake for her. This beaut has five (yes, five) bricks of cream cheese in it. Make sure you mix well or you will end up with chunks of cream cheese. I mixed, scraped, mixed, and scraped for a long time and still ended up with some streaks of cream cheese. I blame it on my mixer bowl: it could barely contain the massive amount of filling. (Will someone please convince Mike that I need an industrial mixer in my kitchen?)

If your cheesecake browns a little too much or if it cracks, don’t fret – smother it in a delicious strawberry topping and it will be your little secret. 😉

New York Cheesecake with Strawberry Topping | doughseedough.net

New York Cheesecake with Strawberry Topping

for the crust:
15 full graham cracker sheets
8 tablespoons butter, melted

for the filling:
5  8-ounce packages cream cheese, softened
1 3/4 cups sugar
3 tablespoons all-purpose flour
zest of 1 orange
zest of 1 lemon
5 large eggs
2 large egg yolks
1 teaspoon vanilla extract

for the strawberry topping:
1 pound strawberries, hulled and sliced
1/4 cup water
1/8 – 1/4 cup sugar
1/2 lemon, juiced

  1. Preheat oven to 500°F. Butter the bottom and sides of a 9-inch springform pan and set aside.
  2. Prepare the crust: Place graham crackers in a food process and pulse into fine crumbs. Combine graham cracker crumbs and melted butter in a medium bowl until well combined. Press the crumbs onto the bottom and 2 1/2-inches up the sides of the prepared springform pan. Place pan in freezer until ready to fill.
  3. Prepare the filling: Place cream cheese, sugar, flour, orange zest and lemon zest in the bowl of a stand mixer or in a large bowl. Mix on medium-low speed until smooth. Add eggs and egg yolks one at a time, mixing well and scraping down the sides of the bowl between each addition. Mix in vanilla extract.
  4. Place springform pan in a shallow baking pan. Pour filling into the crust (it will be very full) and bake in the middle of the preheated oven for 12 minutes, or until puffed. Immediately reduce the temperature to 200°F without opening the oven door and continue baking for an additional hour, or until cheesecake is mostly firm with a slightly wobbly center.
  5. Run a knife around the top edge of the cheesecake to loosen. Place pan on a wire rack and allow to cool completely. Chill cheesecake, loosely covered, for at least 6 hours.
  6. Prepare the topping: Combine strawberries, water, sugar, and lemon juice in a saucepan over medium heat. Bring to a simmer and allow to cook for 20 minutes. Mash strawberries with a fork or blend with a stick blender, if desired. Transfer to a covered container and chill until ready to use.
  7. To serve: Remove side of pan and transfer the cheesecake to a serving plate. Spread topping over the top. Serve immediately or bring to room temperature before serving.

recipe adapted from Gourmet Magazine


2 Comments

Vegan Iced Pumpkin Coffee Cake

Vegan Iced Pumpkin Coffee Cake with Streusel Topping | doughseedough.net

I’ve finally given in to pumpkin. Pumpkin treats, that is. I suppose it’s that time of year – leaves are turning, it’s getting colder, days are getting shorter… there’s even a threat of snow around here.

I love all things pumpkin except for pumpkin pie. Pumpkin cookies, pumpkin cheesecake, pumpkin cinnamon rolls… you name it, I’ll eat it. This pumpkin cake has won over my heart. It is definitely the pumpkin treat of choice for me. I will eat and eat and eat and eat until it’s gone. Seriously, it’s that good. Pumpkin cake with a streusel topping and some icing – what can be better than that?

I came across this recipe when I was looking around for a brunch dish for a work party. I made the coffee cake and it smelled (and looked) so good that I knew I couldn’t wait until the next day to eat it. So, I made another one. Big mistake. Mike and I ate about a quarter of the cake that night. And then we kept eating it the next day… and the next. And then it was gone. I was heartbroken when it was gone because I was also out of pumpkin. I stocked up on pumpkin this weekend so I can make sure we have a steady supply of this amazingness for a couple weeks 😉

Vegan Iced Pumpkin Coffee Cake with Streusel Topping | doughseedough.net

Vegan Iced Pumpkin Coffee Cake
serves 10

for the streusel topping:
1/2 cup all purpose flour
1/2 cup brown sugar
1/4 teaspoon salt
2 teaspoons ground cinnamon
1/4 cup dairy free butter substitute (I use Earth Balance)

for the cake:
2 cups all purpose flour
1 teaspoon baking soda
1/2 teaspoon baking powder
1/2 teaspoon salt
1 1/2 teaspoons ground cinnamon
2 teaspoons pumpkin pie spice
1 cup pure pumpkin puree
1/2 cup brown sugar
1/2 cup canola oil
1/4 cup pure maple syrup
1/4 cup plain almond milk

for the glaze:
1 cup powdered sugar
2 tablespoons unsweetened almond milk

  1. Preheat oven to 350°F. Spray an 8×11 or 9×9 baking pan and grease with butter substitute or nonstick spray. Set aside.
  2. To make the streusel topping, combine flour, brown sugar, salt and cinnamon in a small bowl. Cut in butter with a fork, two knives, or a pastry blender until mixture is crumbly. Set aside.
  3. To make the cake, combine flour, baking soda, baking powder, salt, cinnamon, and pumpkin pie spice in a large bowl. In a separate bowl, whisk together pumpkin puree, brown sugar, oil, maple syrup and milk until well combined. Pour wet ingredients into the dry ingredients and mix until just combined, being careful not to over mix. Pour batter into prepared baking pan and use a spatula to smooth out the top.
  4. Sprinkle prepared streusel topping over the batter and gently press down into the batter. Bake in preheated over for about 30 minutes, or until a toothpick inserted into the center comes out clean.
  5. When cake is almost done baking, make the glaze. In a small bowl, combine the powdered sugar and almond milk and whisk until smooth. Drizzle over cake. Serve immediately, or keep at room temperature for up two three days.

recipe slightly adapted from Sally’s Baking Addiction


8 Comments

Chocolate Stout Cupcakes with Salted Caramel Frosting

Chocolate Stout Cupcakes with Salted Caramel Frosting  | doughseedough.net

My last post was a week and a half ago. I got back from vacation last Tuesday and meant to post a vacation recap (aka photo-dump a select few of the thousands of pictures we took) and a recipe later last week. Obviously, that didn’t happen. Life got a little… crazy.

Let me back up to a month ago. I applied to a really awesome nutrition program consultant job. I didn’t think I would get a call back from them. Fast forward about a week: I get a call for an interview. I go to the interview, it goes fine, and I don’t think much more of it. Fast forward again to last Wednesday.

I got a job offer. I cried, called Mike, and didn’t sleep for the next two days. They needed an answer by Friday, and I hadn’t had time to fully process everything yet. Taking this job would mean moving back to Madison, our college town. Mike’s business is in Appleton. Our families are in Appleton. We have a house in Appleton.

After several long discussions and a total of 6 hours of sleep in two nights, I called them back and accepted. We’re moving back to Madison! Kind of. I’m estimating that I will be spending 1/3 of my time in Madison at the office, 1/3 of my time traveling to my sites,a nd 1/3 of my time in Appleton. I still can’t believe that all this is happening. Needless to say, I have a lot to prepare in the next month for the big transition. It looks like the travel yoga mat I bought for vacation is actually going to get put to some good use!

Anyway, I will spare you the photos from my vacation (for now) and instead share with you these cupcakes that I made for Mike’s birthday over the weekend. My handsome hubby turned the big 2-5! Mike gave me the go-ahead to make whatever birthday treat I wanted. Perfect.

These cupcakes were to die for. Seriously. Make these now. Everything from the cake (moist, fluffy, and chocolatey with a hint of stout) to the frosting (creamy, caramely deliciousness) is perfect. In fact, I ate all the extra frosting with pretzels and ate the rest of the caramel with a spoon. Don’t judge, because when you go finish reading this post, you will go and make these cupcakes. And you will eat all the leftover frosting and caramel, too.

Chocolate Stout Cupcakes with Salted Caramel Frosting  | doughseedough.net

Chocolate Stout Cupcakes with Salted Caramel Frosting
makes 24 cupcakes

for the cupcakes:
3/4 cup Hershey’s Special Dark Cocoa
2 cups sugar
2 cups all-purpose flour
1 teaspoon baking soda
1/4 teaspoon salt
1-12 ounce bottle Guinness Extra Stout (or other stout beer), room temperature
1 stick (1/2 cup) unsalted butter, melted
1 tablespoon vanilla extract
3 large eggs
3/4 cup nonfat Greek yogurt

for the salted caramel:
1/2 granulated sugar
1/4 cup water
1/2 cup heavy whipping cream
2 teaspoons vanilla extract

for the salted caramel frosting:
1 1/4 cup unsalted butter, room temperature
1/4 teaspoon kosher salt
4 cups powdered sugar, sifted
mini pretzel twists  to garnish, optional
sea salt to garnish, optional

  1. To make the cake: Preheat oven to 350°F. Lightly grease 24 muffin tins or line with cupcake liners.
  2. In a medium mixing bowl, whisk together cocoa powder, sugar, flour, baking soda, and salt.
  3. In a large mixing bowl, combine the stout, butter, vanilla and eggs. Beat together until combined. Mix in Greek yogurt until smooth and well combined. Carefully stir in dry ingredients 1/2 cup at a time.
  4. Fill muffin tins 3/4 full and bake in preheated oven for 25 minutes, rotating halfway through, until cupcakes are domed in the center and a toothpick inserted into the center comes out clean. Let cool for 5 minutes in pan before place removing to a cooling rack to cool completely.
  5. To make the salted caramel: place sugar and water in a 3 quart saucepan over medium-high heat. Stir carefully until sugar is dissolved, being careful not to touch the sides of the pan. Bring mixture to a boil and stop stirring. Continue to cook over medium-high heat until mixture turns a deep amber brown color, about 10 minutes. Remove mixture from heat and carefully stir in whipping cream and vanilla extract. Let cool for 1 hour.
  6. To make the frosting: In a large mixing bowl, beat butter and salt until light and fluffy. Beat in powdered sugar 1 cup at a time until well combined. Add in 1/2 cup of caramel and mix until fluffy.
  7. Frost cooled cupcakes with salted caramel frosting and drizzle remaining caramel on top. Garnish with a mini pretzel twist and a tiny sprinkle of sea salt, if desired.

cupcake recipe barely adapted from Food Network and frosting recipe adapted from Carla’s Confections


3 Comments

Strawberry Rhubarb Coffee Cake

Spring means rhubarb to me. I’ve been lucky enough to get a fair share of rhubarb from my in-laws and parents over the years to bake with. But, this weekend, things changed!

I was able to take my first cutting off our rhubarb plant! We transplanted it two years ago and the past two years it’s been extremely sad looking and scraggly. I actually thought it had died after it got trampled during our garage re-siding project last summer. It looked dead, that’s for sure.

Then this year, it miraculously grew into beautiful stalks. I got a mere half pound off of it, so it still has a long ways to go, but it’s a great start!

This was originally meant to be a 9×13 pan of coffeecake, but all of my 9×13 pans have disappeared. I really need to keep better track of my bakeware. Thankfully, the muffin pan worked just as well 🙂

Strawberry Rhubarb Coffee Cake | DoughSeeDough.net

Strawberry Rhubarb Coffee Cake
makes 1 9×13 cake or 24 individual cakes

for the filling:
1/2 pound fresh rhubarb, sliced (about 2 cups)
1 pound strawberries, hulled and sliced (about 3 cups)
2 tablespoons lemon juice
1/2 teaspoon freshly grated ginger
1/4 cup cornstarch

for the cake:
2 cups all purpose flour
3/4 cup sugar
1 teaspoon baking powder
1 teaspoon baking soda
1/2 teaspoon salt
1 cup butter, cut into small pieces
1 1/2 cups buttermilk
2 eggs
1 teaspoon vanilla extract

for the topping:
1/4 cup butter
3/4 cup all purpose flour
1/3 cup sugar
1/3 cup brown sugar
1/2 teaspoon freshly grated ginger

  1. Preheat oven to 350°F. Line a muffin pan with muffin liners or spray with nonstick spray.
  2. To make the filling: in a large saucepan, combine rhubarb, strawberries, and lemon juice. Bring to a simmer and let cook for 5 minutes. Stir in sugar and cornstach. Bring to a boil and let cook for 2 minutes or until thickened, stirring frequently. Remove from heat and set aside.
  3. To make the cake: whisk together flour, sugar, baking powder, baking soda, and salt in a large bowl. Cut in butter until mixture resembles coarse crumbs. In a medium bow, stir beat buttermilk, eggs, and vanilla until wellc ombined. Pour into crumb mixture and stir until combined.
  4. To make the crumb topping: melt butter in a small pan over medium heat. Stir in flour, sugar, brown sugar, and ginger until the mixture resembles coarse crumbs.
  5. Fill prepared muffin cups half way with batter. Add a heaping tablespoon of filling on top and drop 1 tablespoon of batter on top of filling. Sprinkle with  crumb topping.
  6. Bake for 25 – 30 minutes. Cool in pan for 5 minutes before moving a wire rack to cool completely.

recipe adapted from Taste of Home


1 Comment

Layered German Chocolate Cupcakes

I rarely crave cake. When I do, it’s usually one of two types: a white cake with a strawberry filling or a chocolate cake with nuts.

german chocolate cupcakes | doughseedough.net

So German chocolate cupcakes? They totally hit the spot.

These bad boys were a two day project for me. It all started on Sunday night after a long, long day. I baked the cupcakes and decided that I was simply too exhausted to deal with them any more. I let them cool, scooped them out of the pans, and covered them before collapsing in bed.

On Monday morning, I got ready for work as fast as I could and whipped together the chocolate ganache and coconut-pecan filling for the cupcakes. After cooking them, I scooped them into bowls and let them hang out for the day while I went to work. After a crazy day at work, I finally got around to decorating and photographing them. Phew!

german chocolate cupcakes | doughseedough.net

A few lessons I learned along the way:

  • These cupcakes are fragile. I almost threw them all away after I spent what seemed like a million hours carefully removing them from the cupcake pans. I’ll probably opt to use cupcake liners in the future, even though it won’t look as nice.
  • Splitting this into a 2-day project was smart. The cupcakes were still very moist the next day (and for days after).
  • These are delicious (and dangerous to have around). How good are they? Well, I took the cupcakes that I failed to remove in one piece and layered them in a ramekin with the filling and ganache to create a little German chocolate cake parfait of sorts. I couldn’t bear to throw any of the goodness away.
  • The recipe from the box can be trusted!
  • German chocolate cupcakes >> German chocolate cake

german chocolate cupcakes | doughseedough.net

German Chocolate Cupcakes
adapted from Baker’s German’s Sweet Chocolate Box, makes 30 cupcakes

for the cupcakes:
1 cup skim milk
1 teaspoon lemon juice
4 ounces German chocolate
1/2 cup water
4 egg whites
4 egg yolks
2 cups flour
1 teaspoon baking soda
1/4 teaspoon salt
1 cup butter, room temperature
2 cups sugar
1 teaspoon vanilla

for the coconut-pecan filling:
5 egg yolks
12 ounces evaporated milk
1 1/2 teaspoons vanilla
1 1/2 cups brown sugar
3/4 cup butter
2 1/2 cups unsweetened flake coconut
1 1/2 cups chopped pecans

for the chocolate ganache:
12 ounces semisweet chocolate
1 pint whipping cream

To make the cupcakes:

  1. Preheat oven to 350°F. Generously grease cupcake pans and set aside.
  2. Mix together milk and lemon juice in a small bowl and let sit for 10 minutes.
  3. Heat chocolate and water in a large bowl for 1 1/2 – 2 minutes in the microwave, stirring every 30 seconds, until chocolate is melted.
  4. In a medium bowl, beat egg whites with a mixer on high speed until stiff peaks form.
  5. In a separate bowl, mix together flour, baking soda, and salt.
  6. In a large bowl, beat butter and sugar on medium-high speed until light and fluffy. Add egg yolks, one at a time, beating well after each. Mix in melted chocolate and vanilla. Stir in flour mixture alternately with the milk, beating well after each addition.
  7. Gently fold in egg whites until well combined.
  8. Fill prepared cupcake pan no more than half full. Bake for 15 – 18 minutes, or until a toothpick inserted into the center comes out clean.
  9. Immediately run a small spatula along the edges of the cupcakes to loosen. Allow to cool in the pan 15 minutes before removing to a wire rack to cool completely.

To make the coconut-pecan filling:

  1. Beat egg yolks, milk, and vanilla in a large saucepan with a whisk until well combined. Add sugar and butter and cook over medium heat for 12 minutes or until mixture has thickened and golden brown, stirring constantly. Stir in coconut and pecans until well combined. Let cool to room temperature before use.

To make the chocolate ganache:

  1. Place chocolate in a medium bowl. In a small saucepan over medium heat, bring cream to a boil. Remove from heat and pour over chocolate. Stir until chocolate is melted and the mixture is smooth. Let cool to room temperature before use.

To assemble the cupcakes:

  1. Carefully cut cupcakes in half horizontally. Spread a spoonful of coconut-pecan filling onto the bottom half. Place the top of the cupcake on and spread more coconut-pecan filling on top. Place the chocolate ganache into a piping bag fit with a medium or large star tip. Pipe ganache onto the top of the cupcake and garnish with a pecan, if desired.


5 Comments

Lightened Up Lemon Yogurt Cake

I’ve got a storm of baked goods comin’ your way. I would apologize for not posting healthier foods or main dishes, but I’m really not sorry. If you want someone to blame, you can start with Mothers’ Day. And then birthdays. Because all those occasions require baked goods. And when they all fall within a few days of each other… well, I end up pumping out a lot of goodies from my tiny kitchen.

I’ll start off with a lightened up lemon yogurt cake. I loved how light and spring-y this cake was. I’ve mentioned in the past how much I love lemons and their tartness. The next time I make this cake I will bump up the zest to 3 lemons and I’ll consider using a lemon-flavored Greek yogurt as well. I may double the glaze as well – I couldn’t get enough of that stuff! My sister liked it so much that she ate the top off a slice of the cake, leaving behind a sad naked slice. Rude 🙂

lightened up lemon yogurt cake | doughseedough.net

Lightened Up Lemon Yogurt Cake
adapted from Ina Garten

1 1/2 cups all-purpose flour
2 teaspoons baking powder
1/2 teaspoon kosher salt
1 cup plain nonfat Greek yogurt
1 1/3 cups sugar, divided
3 extra-large eggs
2 teaspoons grated lemon zest (2 lemons)
1/2 teaspoon pure vanilla extract
1/3 cup canola oil
1/3 cup freshly squeezed lemon juice

For the glaze:
1 cup confectioners’ sugar
2 tablespoons freshly squeezed lemon juice

  1. Preheat oven to 350°F. Butter an 8.5″ loaf pan with butter. Line the bottom with parchment paper and butter and flour the pan.
  2. In a medium bowl, whisk together flour, baking powder, and salt.
  3. In a large bowl, beat together yogurt, 1 cup sugar, eggs, lemon zest, and vanilla. Slowly pour dry ingredients into wet ingredients and stir gently to combine. Mix in canola oil until combined.
  4. Pour batter into prepared loaf pan and bake in preheated oven for 45 – 50 minutes, or until a toothpick inserted into the center comes out clean.
  5. Meanwhile, combine remaining 1/3 cup sugar and 1/3 cup lemon juice in a small pan. Cook over low heat, stirring frequently, until sugar has dissolved. Set aside.
  6. When cake is done, let cool in pan for 10 minutes before placing on a wire rack over a sheet pan . Using a toothpick, pierce top of cake several times. Pour lemon-sugar syrup over warm cake. Allow cake to cool completely.
  7. To make the glaze: in a small bowl combine lemon juice and confectioners’ sugar and mix until smooth. Pour over cake.


10 Comments

Carrot Cake with Lemon Cream Cheese Frosting

Carrot cake. I love it in all different forms and with all different sorts of add-ins and toppings. Nuts, coconut, pineapple, cupcake or cake: I will shove it into my mouth. In fact, I love it so much that it made an appearance at our wedding:

Photo taken by Alacrity Photography

I don’t think I’ve ever had carrot cake with lemon, though. Not surprisingly, I love carrot cake with lemon, too. I love it a lot.

Let me back up a second. This whole carrot cake madness started because of a recipe swap. This swap was Blogger’s Choice. I was assigned Feed Me, Seymour. I found so many recipe on Kim’s blog it was impossible to narrow it down. I had five of her recipes open on my iPad, no joke. I finally narrowed it down to two and couldn’t go any further. So, I made both. The other recipe I picked from her blog will be coming shortly. I just couldn’t wait to share this carrot cake with you!

healthy carrot cake with lemon cream cheese frosting | doughseedough.net

Carrot Cake with Lemon Cream Cheese Frosting
adapted from Feed Me, Seymour

for the cake:
2 eggs
3/4 cup brown sugar
1/2 cup canola oil
1/4 cup honey
1 teaspoon vanilla
2 cups shredded carrots
1 teaspoon freshly grated ginger
1 cup white flour
1/2 cup whole wheat pastry flour
1/2 teaspoon ground cinnamon
1/4 teaspoon baking soda
1 teaspoon baking powder

for the frosting:
8 ounces reduced-fat cream cheese, softened
1 cup confectioner’s sugar
2 teaspoons lemon zest
1 tablespoon skim milk

  1. Preheat oven to 350°F. Grease a 9×13-inch cake pan with butter and line bottom with parchment paper. Grease parchment paper with butter. Set pan aside.
  2. In a medium-sized bowl, whisk together eggs, brown sugar, oil, honey, and vanilla until combined. Mix in carrots and ginger.
  3. In another medium-sized bowl, whisk together white and whole wheat flours, cinnamon, baking soda, and baking powder.
  4. Mix the dry ingredients into the wet ingredients until just combined. Pour mixture evenly into prepared cake pan. Bake for 20 – 25 minutes or until toothpick inserted into the center comes out clean. Cool completely and slice into 36 bars.
  5. To make the glaze: combine all ingredients in a large bowl and beat on medium until well combined. Pipe onto bars and serve immediately or store, covered in the refrigerator, for up to 3 days.

Thanks to Taste of Home Cooking for organizing! Make sure to check out the other recipe swap posts!


7 Comments

Domo Cake

I would like to take a second and…


HAPPY BIRTHDAY, BECCA!


Ok, so this cake is (obviously) for my sister’s birthday. She came home over the weekend and we had a dinner for her at my parents’ house. I asked her about a week ago what kind of cake she wanted – fruit? chocolate? She replied “cheese”, as in cheesecake. And then said chocolate fruit. I replied “chocolate cheesecake with fruit?” She said “haha, I don’t think so” and finally ended it by telling me to make whatever I wanted.

Yes ma’am.

I set out and found the perfect, beautiful cake to make – a chocolate raspberry layer cake from Bon Appetit. At the grocery store, I had a change of heart. Why stop at a beautiful cake? I should go above and beyond and cake-ify her favorite thing in the world – Domo.

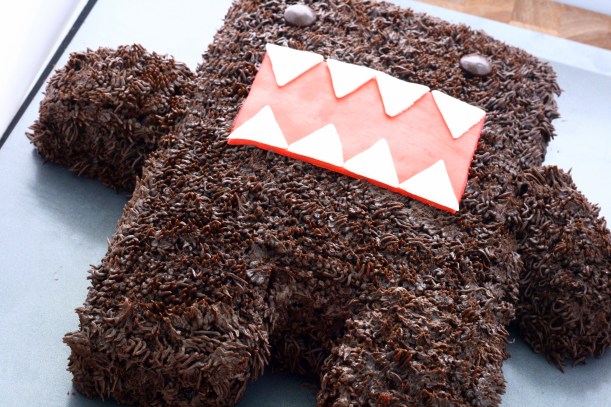
Yeah, Domo. That weird brown creature thing that is actually really, really cute –

photo from here

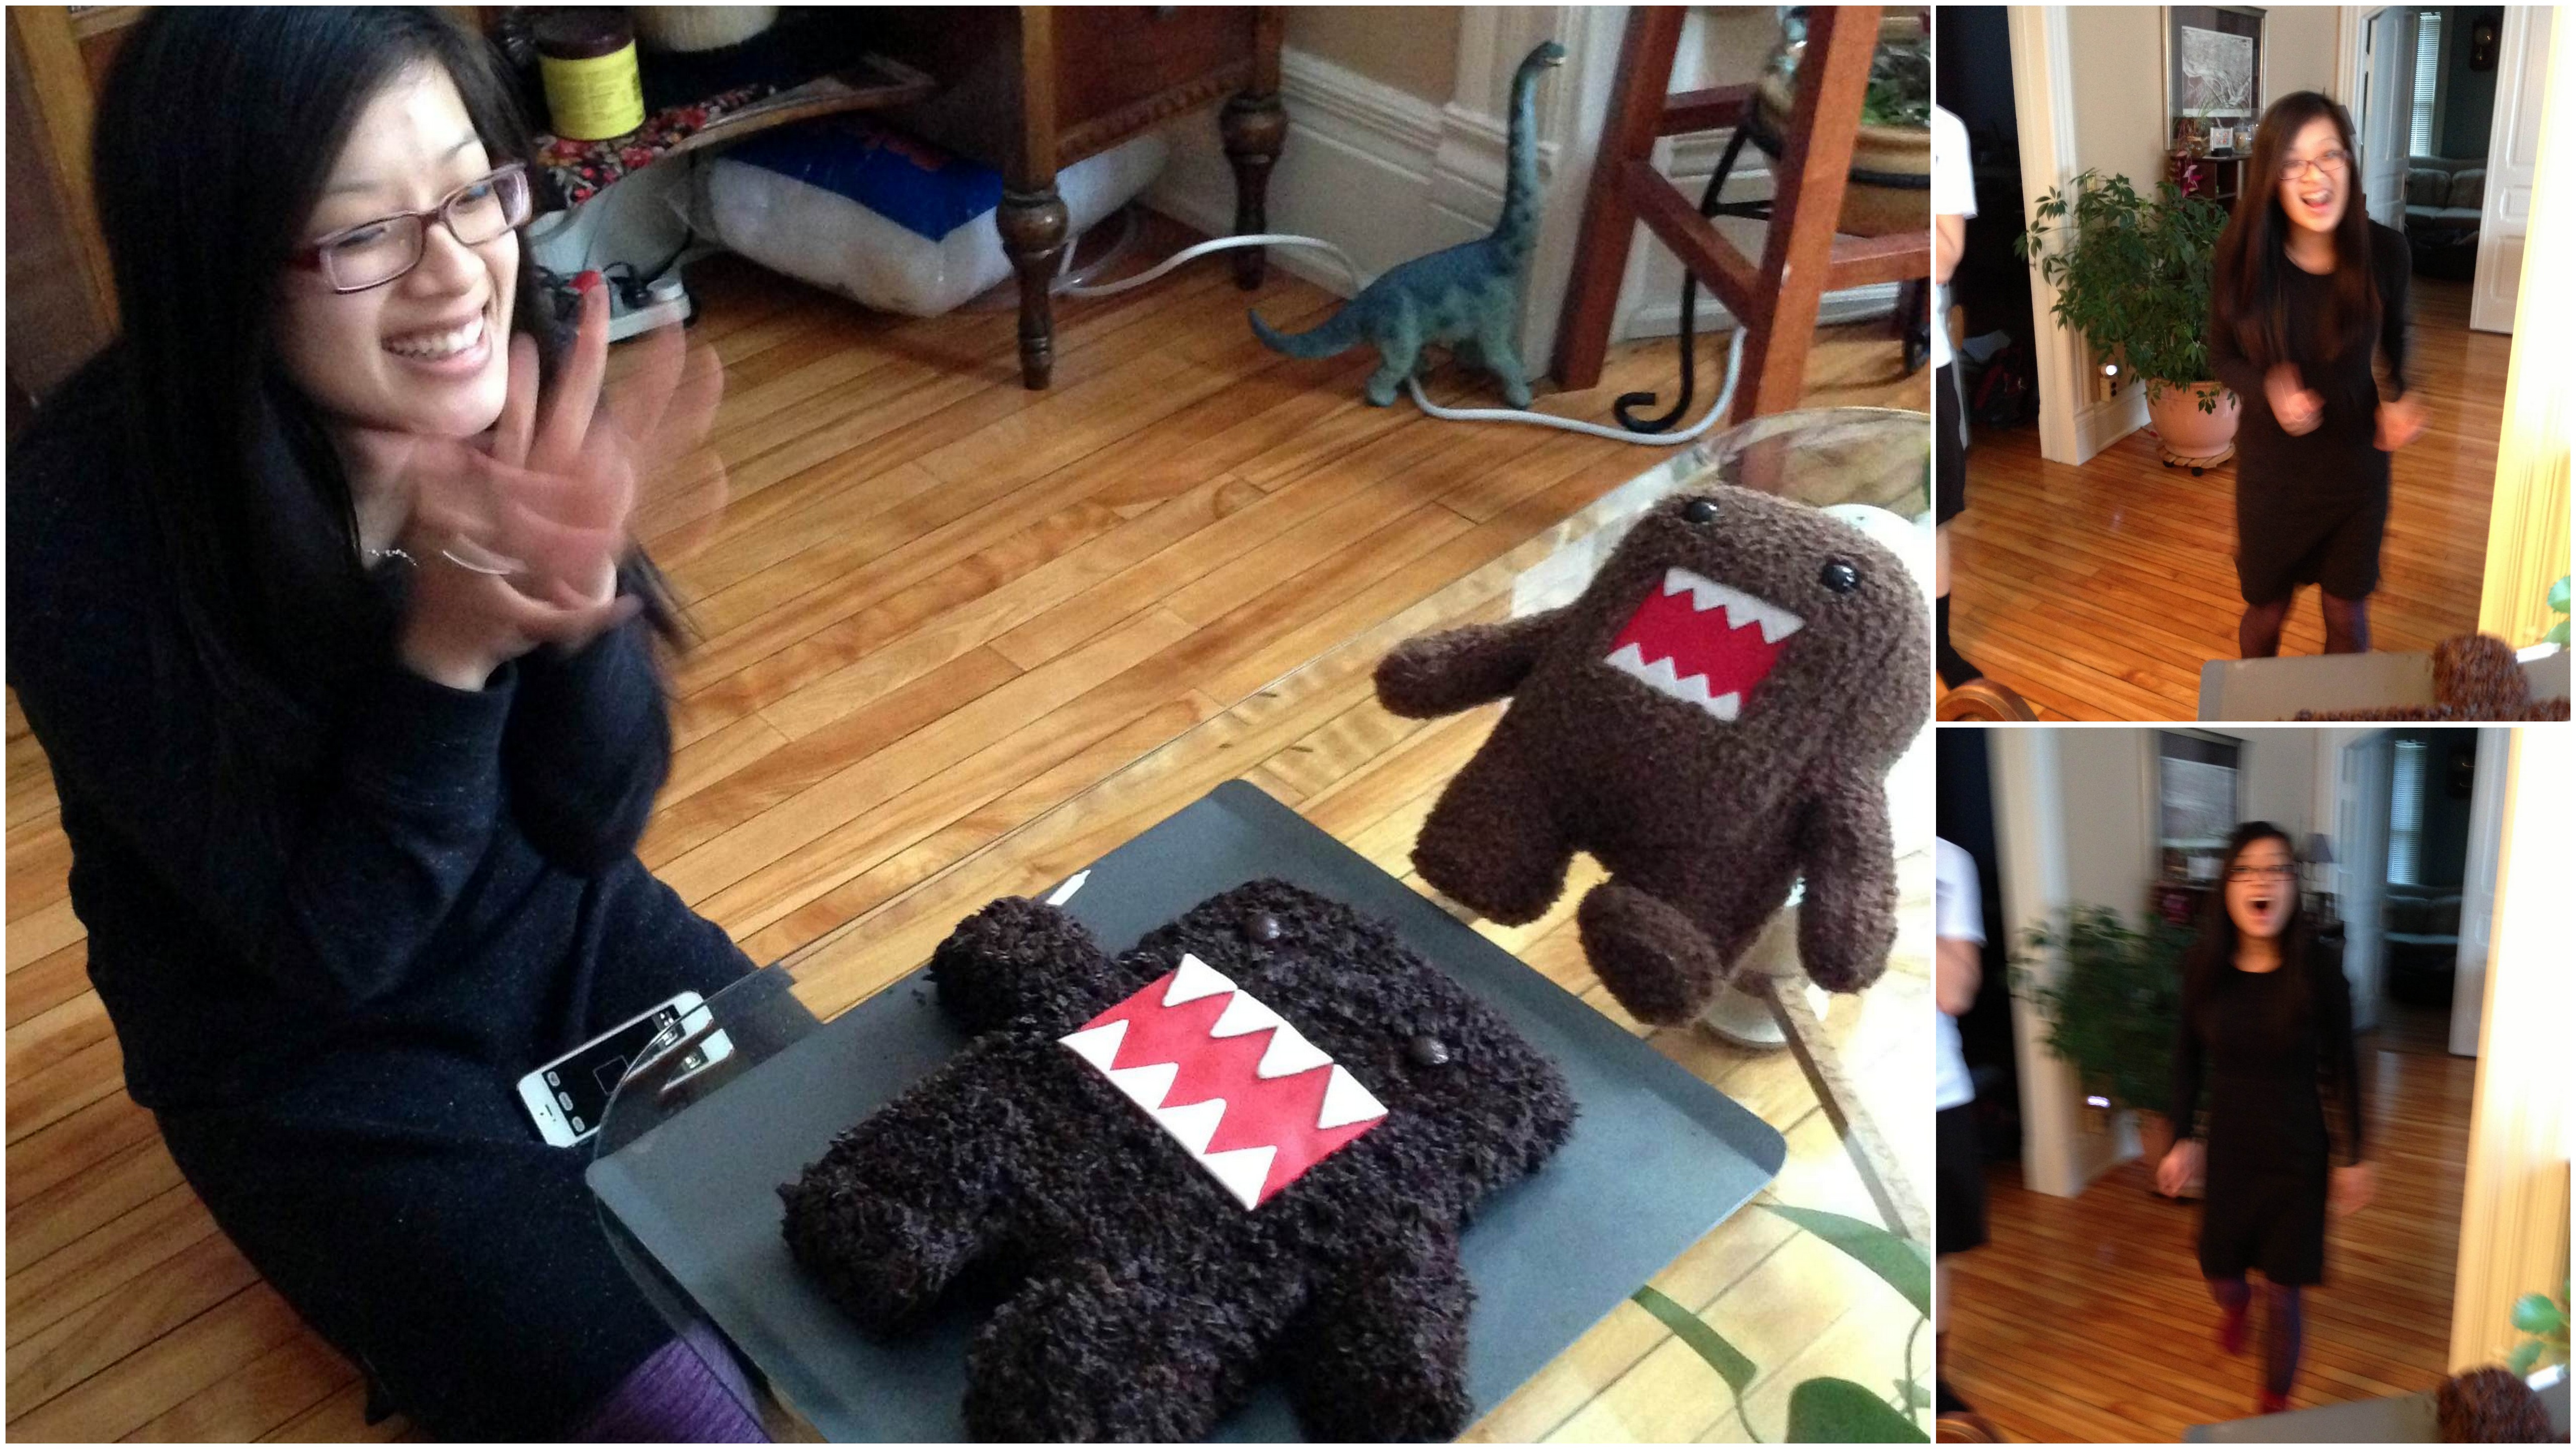
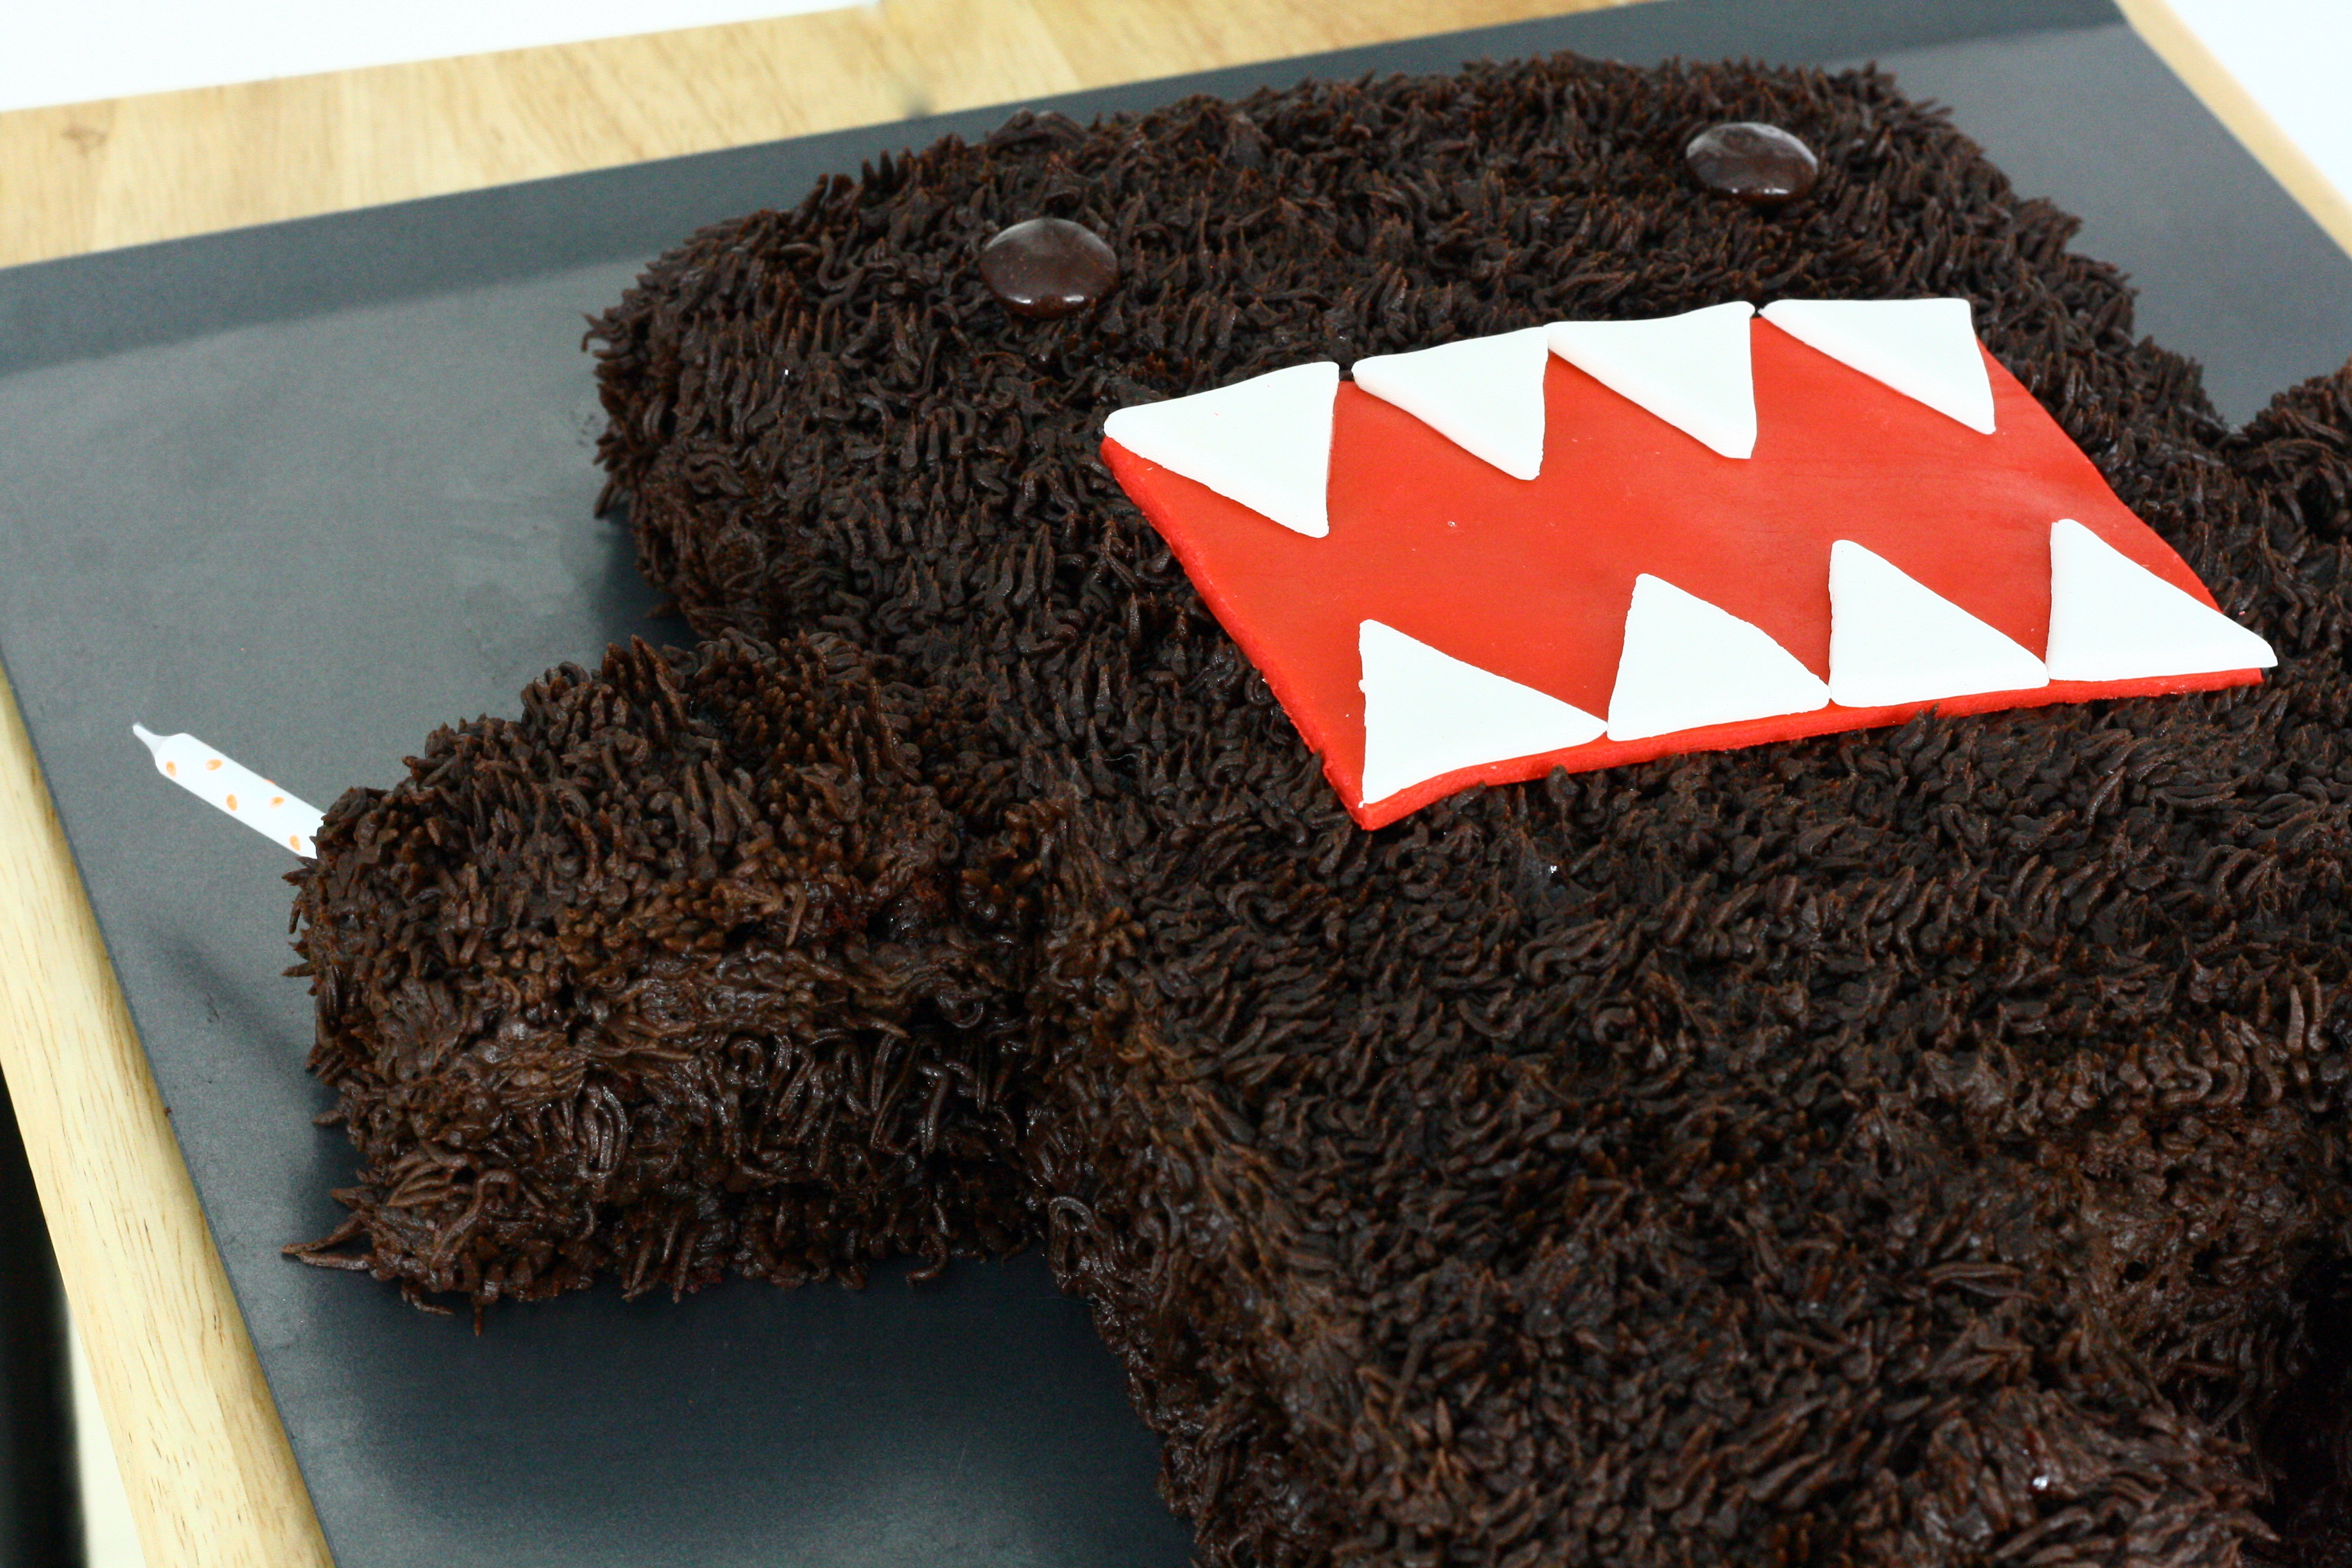
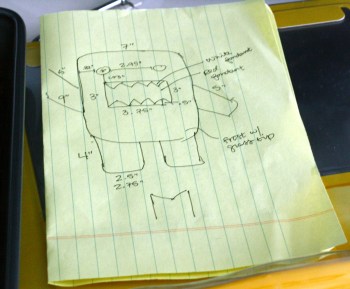
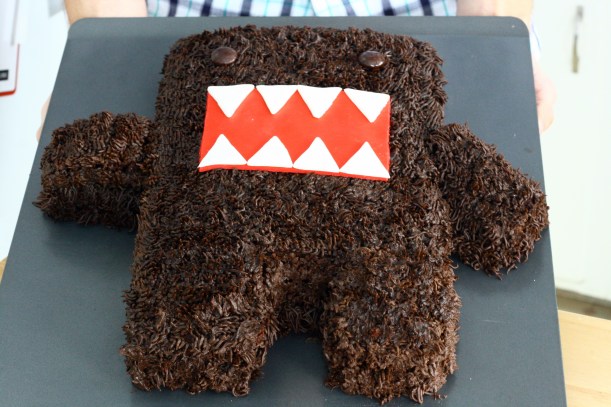
So, here’s my edible version of Domo. I’m going to be upfront – this cake was not a quick project. It took quite a few hours to get all the components ready, including my weird sketch of the Domo dimensions (Domensions?). 

domo sketch

I don’t regret a second of it. The look on her face was priceless. We tried to capture her excitement when she first saw the cake, but all the pictures turned out really blurry. I guess bouncing around will do that!

becca & domo cake

Plus, Domo loved it, too 🙂

domo and domo cake

My suggested timeline – set aside one night and the next day to make this cake.

The night before: Bake cake and let cool. Store in cake pan covered. Make fondant and let rest in fridge overnight.

The next day: make frosting, roll fondant, decorate cake.

domo cake

Domo Shaped Chocolate Raspberry Layer Cake
cake recipe adapted from Bon Appetit and fondant from All Recipes

for the cake:
1 teaspoon lemon juice
1 cup skim milk
2 cups all purpose flour
1 3/4 cup sugar
3/4 cup unsweetened cocoa powder
2 teaspoons baking soda
1/4 teaspoon salt
3/4 cup water
3/4 cup canola oil
3 eggs

for the fondant:
8 ounces mini marshmallows
2 tablespoons water
1/2 teaspoon vanilla
1 pound powdered sugar
red gel food coloring

for the frosting & filling:
1 cup unsalted butter, room temperature
3 1/2 cups powdered sugar, sifted
1/2 cup Hershey’s Special Dark Cocoa Powder, sifted
1/2 teaspoon salt
1 teaspoon vanilla extract
4 tablespoon heavy whipping cream

2/3 cup seedless raspberry jam

2 Junior Mints, for the eyes
1 teaspoon cornstarch, plus more for dusting
2 tablespoons water

  1. For the cake: Preheat oven to 350°F. Grease two 9×13 pans. Line bottoms with parchment paper and grease well with butter. Set aside. 
  2. Mix together lemon juice and milk and let stand for 10 minutes.
  3. Whisk together flour, sugar, cocoa powder, baking soda, and salt in a large bowl. Form a well in center.
  4. Whisk together lemon juice/milk mixture with water, oil, and eggs in a medium bowl until well combined. Pour wet ingredients into well of dry ingredients. Whisk until just blended.
  5. Divide batter evenly between the two pans. Bake until toothpick inserted in the center comes out clean, about 25 – 30 minutes. Cool completely and cover baking pan with plastic wrap. Set aside until the next day.
  6. For the fondant: Place marshmallows in a large microwave-safe bowl and heat on high for 1 minute. Mix in water and vanilla extract to hot marshmallows and stir until smooth.
  7. Grease mixer bowl and dough hook attachment well with shortening. Place mixture in well-greased mixing bowl. Add in powdered sugar, 1/2 cup at a time, and knead on medium-low with dough hook until fondant is smooth. If you don’t have a stand mixer, you can do this by hand. Grease hands and kneading surface thoroughly with shortening.  Knead in powdered sugar by hand 1/2 cup at a time. Once all sugar is incorporated, continue to knead for 5 – 10 minutes, or until fondant is smooth.
  8. Divide fondant in half. Form one half into a ball, wrap tightly in plastic wrap, and refrigerate. Spoon 1/4 teaspoon of red gel food coloring until remaining half of fondant and knead until color is well blended. Add more gel coloring as needed to reach desired color. Form into a ball, wrap in plastic wrap, and refrigerate overnight.

The next day:

  1. For the frosting: cream butter in a mixer on medium speed. Add in powdered sugar and cocoa powder. Beat on low until just combined. Increase mixer speed to medium and add in salt, vanilla, and whipping cream and beat until fluffy, about 3 minutes.
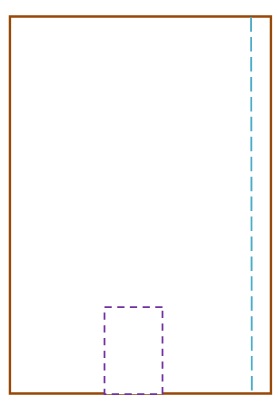
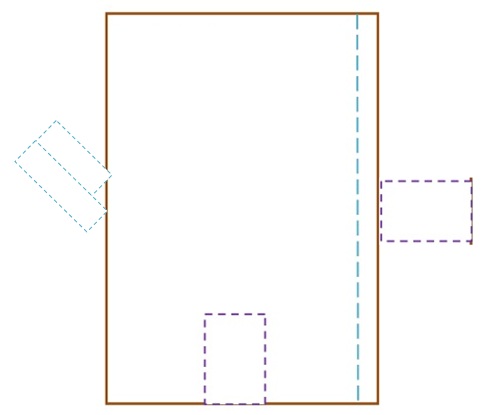
  2. To shape Domo: Place 1 cake layer on serving platter, short edge facing you. Trim off 1″ from one of the long edges and set aside (blue line). Trim a 2″ piece from the enter of the bottom short edge to form the two legs (purple lines). Remove the trimmed piece and set aside. Repeat with other cake.
    domo cuts
  3. Take reserved trimmed pieces and form arms. The 1″ section (blue cuts) – 4 pieces formed the arm on the left. The 2″ piece removed for Domo’s legs (purple cuts) turned into the right arm. domo cuts arms
  4. Assemble 1 layer of the arms on the bottom layer of the cake. Spread half the raspberry jam on top. Place other layer of the cake body and arms on top and spread remaining raspberry jam on top.
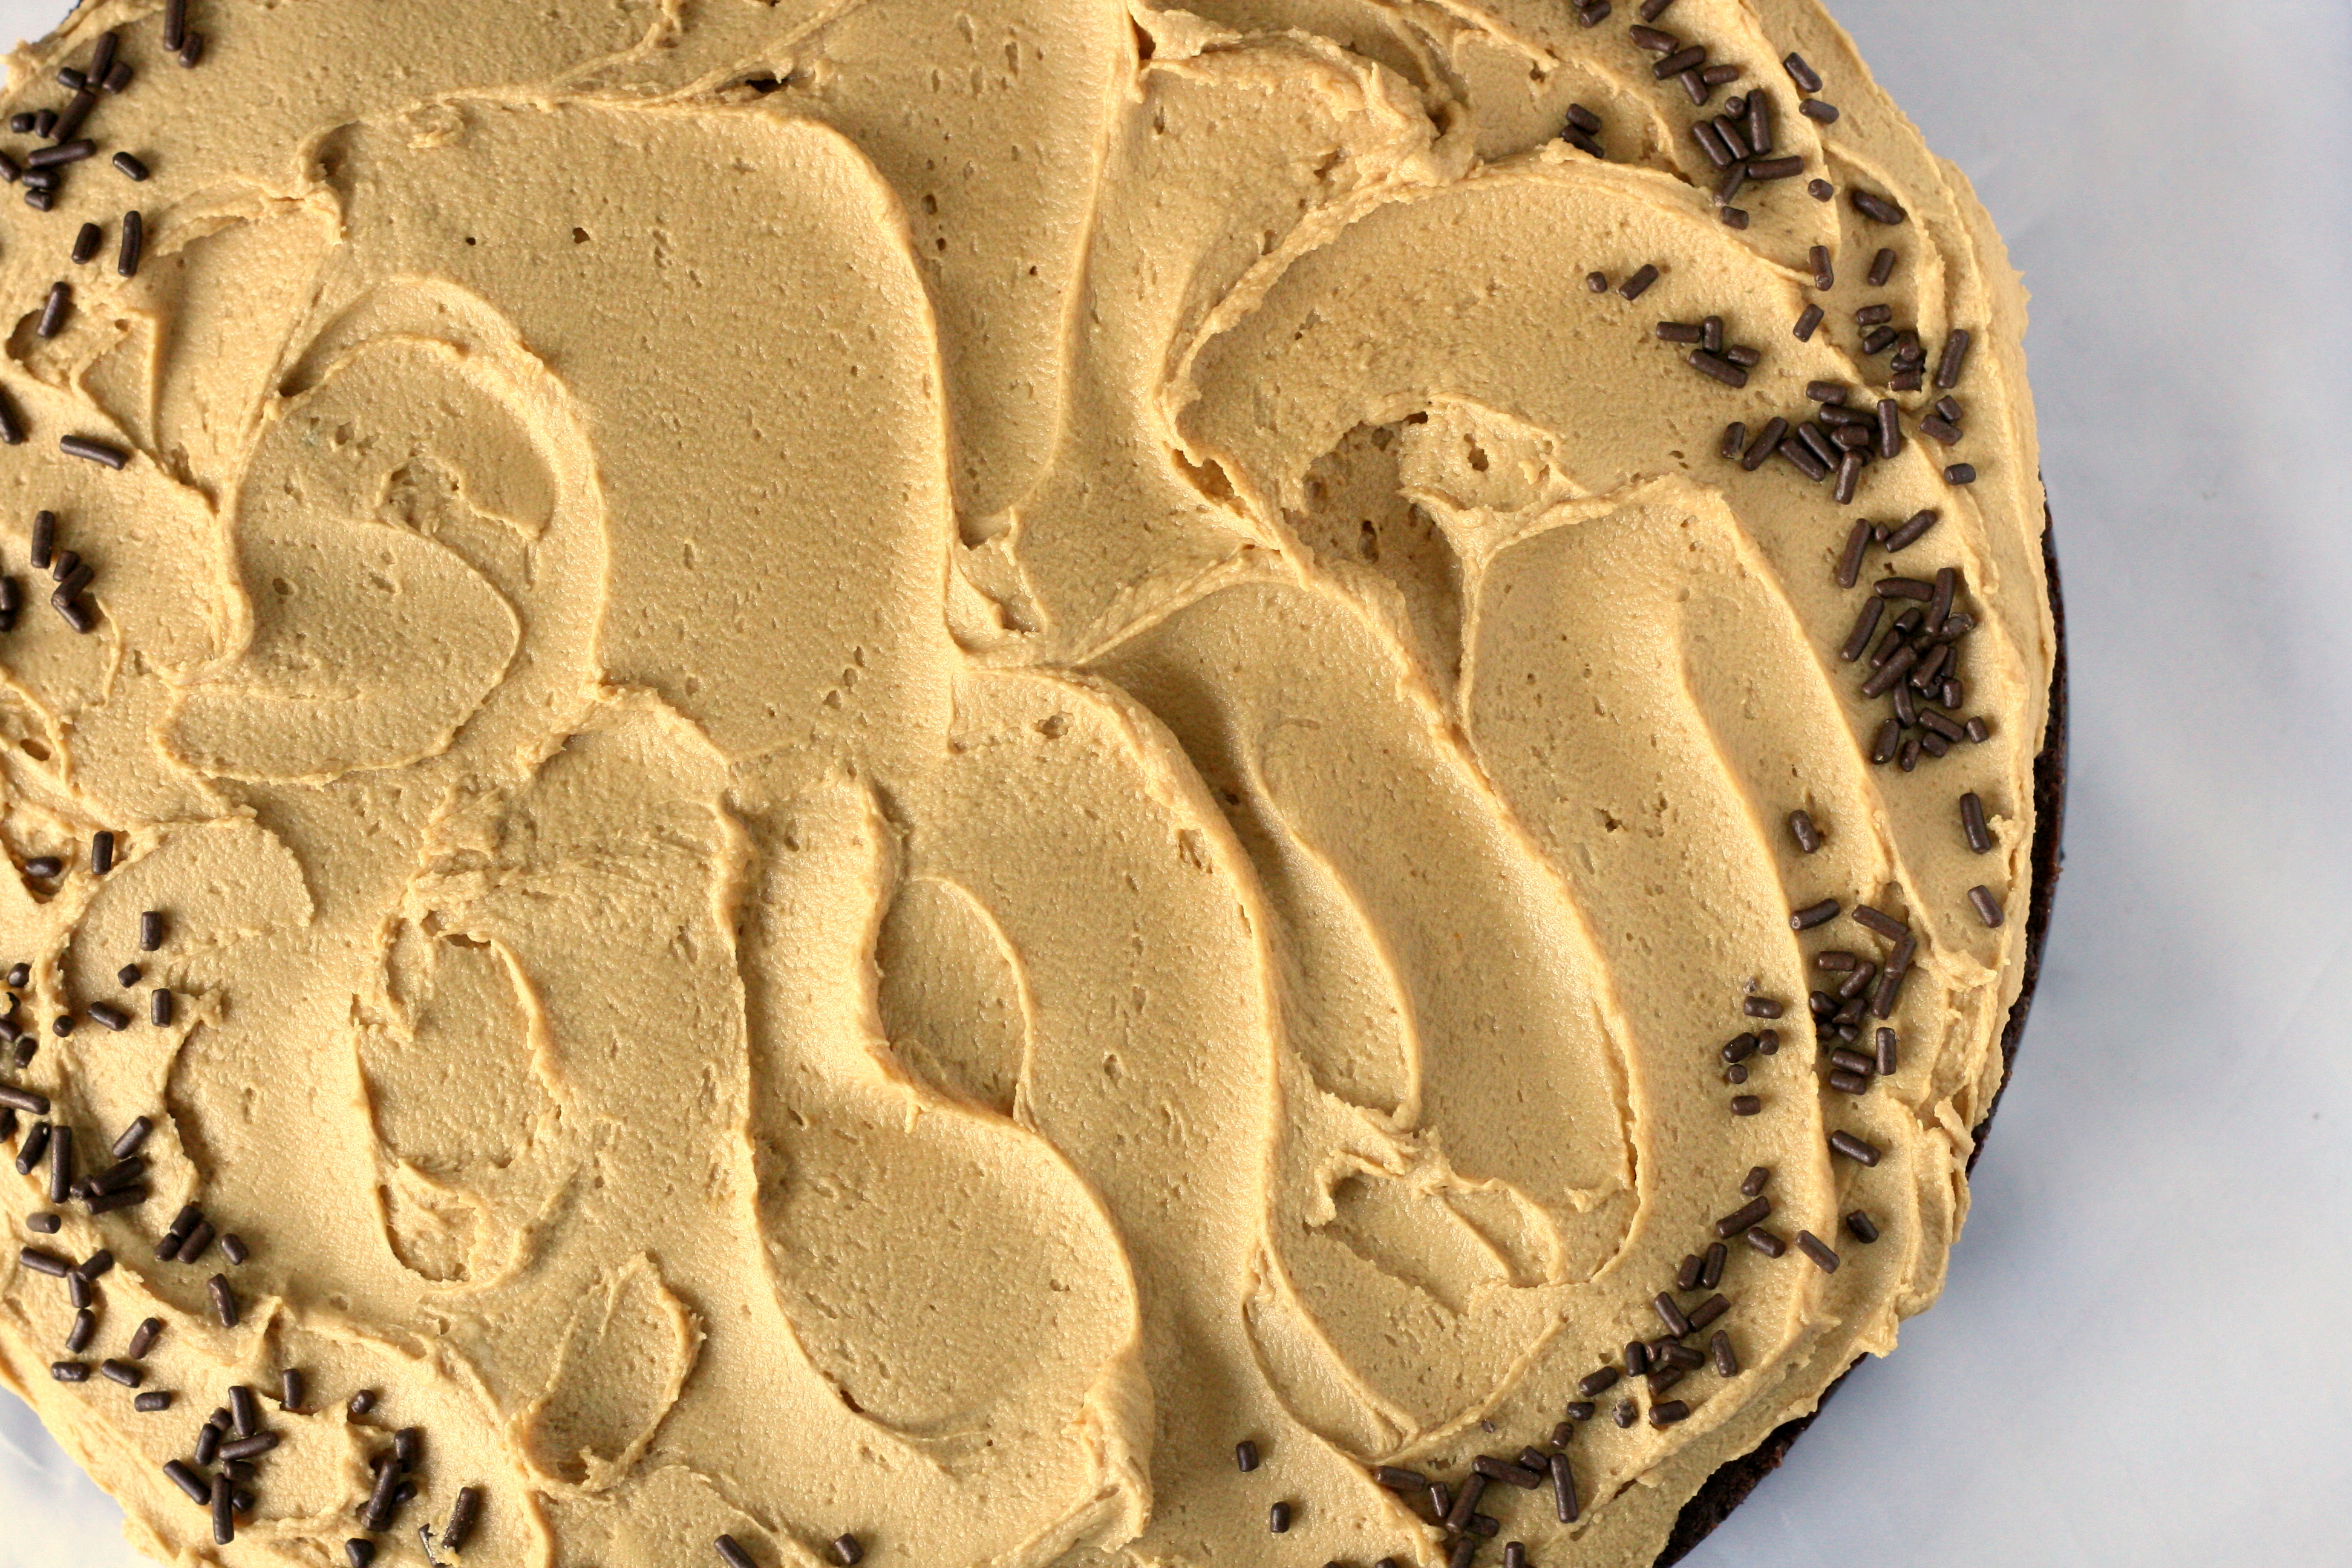
  5. To frost, fit a pastry bag with a Wilton #233 tip (the grass tip) and fill with frosting. Pipe frosting on sides of the cake first, working in sections. Continue to frost the remainder of the cake.
  6. To decorate the face: Place one Junior Mint about 1.5″ from the left side of the cake and 2.5″ from the top of the cake. Repeat with the other Junior Mint for the other eye.
  7. To make the mouth: Allow fondant to come to room temperature. Combine 1 teaspoon cornstarch and 2 tablespoons water and set aside. Dust surface and hands lightly with cornstarch. Take 1/4 of the red fondant and roll to 1/16″ thick. Cut into a rectangle 4.5″ long and 3.5″ tall.
  8. Take 1/4 of the white fondant and roll out to 1/16″ thick. Cut into 8 triangles 1″ wide and 1″ tall for the teeth. Brush the back of each triangle lightly with the cornstarch-water mix and place on arrange four triangles on the top of the rectangle and four on the bottom to make the teeth. Press lightly to adhere.
  9. Move “mouth” to cake. Place in center of the cake, about 1.5″ below the eyes.
  10. Take a deep breath, step back, and enjoy the cutest cake you’ve ever made 🙂

domo cake

And don’t forget the candle. After all, it is a birthday!

domo with candle


1 Comment

Red Velvet Cake

I made this cake for Mike’s 21st birthday party. It was a huge hit and everyone thought it tasted great. I made the cake with cream cheese frosting, even though that isn’t the traditional frosting used for red velvet cake. I think next time I will make the cake with the traditional frosting though!

Unfortunately, I wasn’t able to get great pictures of the cake after it had been cut since my camera ran out of battery, but I managed to get a few during the assembly process.

Red Velvet Batter

Red Velvet Cake

2 1/2 cups cake flour, sifted
1 teaspoon baking powder
1 teaspoon salt
2 tablespoons cocoa powder
2 ounces red food coloring
1/2 cup unsalted butter,  room temperature
1 1/2 cups sugar
2 eggs, room temperature
1 teaspoon vanilla extract
1 cup buttermilk,  room temperature
1 teaspoon white distilled vinegar
1 teaspoon baking soda

  1. Preheat the oven to 350°F. Grease and flour two 9 inch round baking pans.
  2. In a medium bowl, sift together flour, baking powder and salt. In a smaller bowl, mix together cocoa powder and food coloring until a smooth paste forms.
  3. In a large bowl with a mixer, cream together butter and sugar until light and fluffy, about 3 minutes. Mix in eggs one at a time and then blend in vanilla extract and red cocoa paste. Make sure to mix thorougly, scraping the sides of the bowl with a spatula.
  4. Add 1/3 of the flour mixture to the butter mixture. Add in half of the buttermilk. Mix in another 1/3 of the flour mixture, followed by the remainder of the buttermilk. Add the last 1/3 of the flour mixture and mix in, making sure that the batter is well incorporated.
  5. In a small bowl, mix together the vinegar and baking soda. Add this to the batter and mix in thoroughly. Divide the batter equally between the two pans.
  6. Bake for 25 – 30 minutes, rotating pans once during baking. The cake is done when a toothpick inserted into the center comes out clean.
  7. Cool cakes in pans on a wire rack for 10 minutes. Remove cakes from pans and place on rack to finish cooling after 10 minutes.
  8. Frost the cake with the traditional icing or cream cheese icing – recipes are included below.

Red Velvet Assembly

Cream Cheese Icing

2 packages cream cheese, room temperature
1 stick unsalted butter, softened
1 teaspoon vanilla extract
2 1/2 cups powdered sugar, sifted

  1. Blend together cream cheese and butter with a mixer until smooth. Add in vanilla extract.
  2. Add powdered sugar with the mixer on low speed.
  3. Blend the frosting on high speed until light and fluffy, about 3 minutes.

Red Velvet

Traditional Red Velvet Cake Icing

1 cup milk
5 tablespoons all purpose flour
1 cup white sugar
1 cup butter, room temperature
1 teaspoon vanilla extract

  1. In a medium saucepan, combine milk and flour. Cook over low heat, stirring constantly, until mixture thickens. Cool completely.
  2. Using a mixer, blend together sugar, butter and vanilla until light and fluffy.
  3. Stir in the flour mixture. Mix until the icing is a good spreading consistency.