DoughSeeDough

a balanced plate with room for dessert


9 Comments

BBQ Chicken Pizza

BBQ chicken pizza | doughseedough.net

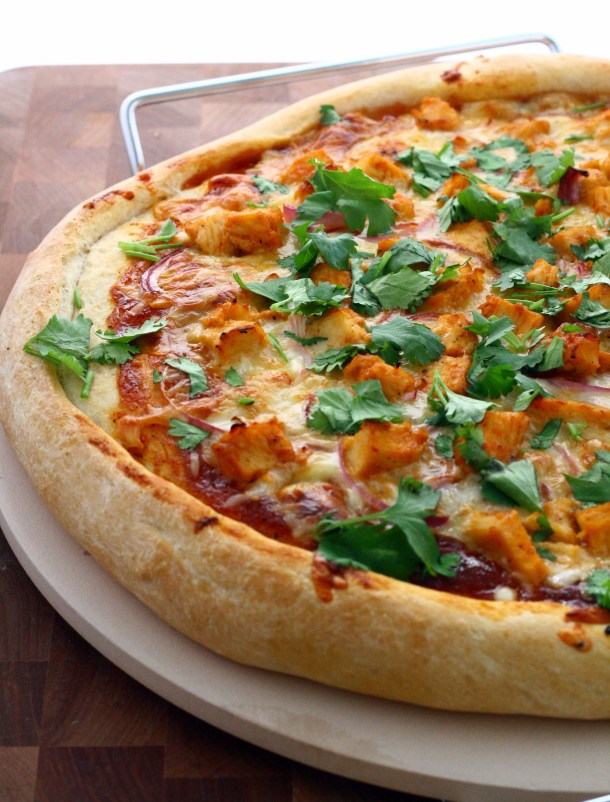
This pizza kicks some serious butt. I stumbled across it in Food Network magazine a while ago (ahem, a year ago) but never got around to making it because our pizza stone cracked in half. I don’t even know what happened. I baked a loaf of bread on it, took it out of the oven, set it down and… it died. We actually kept the larger half for a while, baking sad little loaves of bread on it. We finally got around to buying a replacement, but it just sat on our kitchen cart for months. I finally got around to using it this weekend!

Anyway, this recipe is supposed to be the copycat of California Pizza Kitchen’s BBQ Chicken Pizza. I can’t attest to whether or not this tastes like CPK’s pizza (I’ve only been there once a million years ago), but I will say that it is really, really good.

I opted to make the pizza dough and BBQ sauce from scratch, but store bought will do just fine! I don’t think I will ever buy bottled sauce again – I absolutely love the recipe that I have now. It’s tangy with the perfect balance of sweet and spicy. I’ve retyped the recipe for dough and sauce below. The dough recipes yields about 1 pound of dough and the sauce will yield 1/2 cup of sauce.

BBQ Chicken Pizza | DoughSeeDough.net

BBQ Chicken Pizza
adapted from Food Network

for the pizza dough:
3 cups all purpose flour
1 – .25 ounce package active dry yeast (2 1/4 teaspoons)
2 tablespoons vegetable oil
1 teaspoon salt
1 tablespoon sugar
1 cup warm water (~110°F)

for the barbecue sauce:
1/2 cup ketchup
1/4 cup water
2 tablespoons apple cider vinegar
1 tablespoon brown sugar
1 tablespoon honey
1/2 teaspoon black pepper
1/2 teaspoon onion powder
1/2 teaspoon garlic powder
1/2 teaspoon ground mustard
3/4 teaspoon lemon juice
3/4 teaspoon Worcestershire sauce

for the pizza:
1 teaspoon olive oil
1 8-ounce boneless, skinless chicken breast
3/4 cup grated smoked peppercorn gouda cheese or smoked gouda cheese
3/4 cup grated part-skim mozzarella cheese
1/2 small red onion, thinly sliced
1/4 cup fresh cilantro, chopped

  1. To make the dough: Fit stand mixer with dough hook. Combine dry ingredients in mixing bowl. Pour in oil and water. Mix on low speed until dough pulls away from side of bowl and gathers around hook and is smooth and elastic. Place dough in a large lightly greased bowl and cover loosely with plastic wrap. Set aside and let rise for 30 – 40 minutes.
  2. Meanwhile, make the BBQ sauce: combine all sauce ingredients in a small saucepan. Bring to a boil, stirring frequently. Reduce to a simmer and cook for 30 – 40 minutes or until thick.
  3. Preheat oven to 425°F and position rack in lower third of oven. Place a pizza stone on rack and let heat for at least 30 minutes.
  4. Lay out a sheet of parchment paper and lightly grease with olive oil. Transfer dough to parchment and roll and/or stretch it out into a 12-inch round. Gently roll up edges to form a crust. Lightly brush with olive oil and cover with plastic wrap. Let rise for 30 minutes.
  5. Heat olive oil in a pan over medium heat. Cook chicken until juices run clear. Remove chicken and cut into 1/2-inch cubes. Lightly toss with 1/4 cup of barbecue sauce. Set aside.
  6. Uncover pizza dough and spread remaining barbecue sauce on top. Top with gouda, mozzarella, red onion, and chicken. Slide pizza (on parchment paper) onto the preheated pizza stone. Bake for 25 minutes, or until crust is lightly browned and cheese is bubbly.
  7. Sprinkle with cilantro before serving.


8 Comments

Honey Mustard Chicken Skewers

Happy Friday! It’s time for another recipe swap! Before I get into that though, I have a funny story. I had first typed up this post over the weekend and (stupidly) wrote about how wonderful the weather was and how excited we were to start grilling again. Fast forward to Tuesday night/Wednesday. Ice storm. What the what?!?!

That said, Mike was such a trooper and grilled this for me so I would be able to post this as planned. I’m just thankful he didn’t get impaled by a falling icicle or tree branch. When is winter going to be over?

ice storm appleton | doughseedough.net

I loved that Jen at Becoming Pigzilla used a chardonnay jalapeno mustard, but I have no idea where I would even find something like that. I also don’t think I can justify another jar of mustard in my fridge, taking up very valuable fridge real estate. When I get around to buying more mustard, I’ll have to keep my eye out for more interesting flavors! I ended up using a small jar of sweet & hot mustard that we received a long time ago as part of a gift basket. It was absolutely perfect! I’m hoping to make this again soon… without the nasty weather!

honey mustard chicken skewers | doughseedough.net

Honey Mustard Chicken Skewers
adapted from Becoming Pigzilla

1 teaspoon olive oil
1/4 cup honey
3/4 cup mustard
2 teaspoons curry powder
salt and pepper, to taste
3 – 4 boneless skinless chicken breasts, cut in 2-inch pieces

  1. In a medium bowl, mix together olive oil, honey, mustard, and curry powder. Add salt and pepper to taste.
  2. Place chicken in a large dish and cover with 3/4 of the mustard sauce. Reserve the remaining sauce in an airtight container for serving.
  3. Marinate chicken for 4 – 24 hours in the refrigerator.
  4. Soak skewers for 30 minutes before grilling. Preheat grill to medium heat. Skewer chicken and grill until cooked through, about 12 minutes, turning every 3 – 4 minutes.
  5. Serve hot with remaining sauce.

Thanks to Taste of Home Cooking for organizing! Make sure to check out the other recipe swap posts!


1 Comment

Chicken Gyros & Homemade Pocketless Pita

chicken gyros | doughseedough.net

I love gyros. I love watching the cooks shave off pieces of the tender lamb from the… meat cone or whatever you might call it. This time, I tried making my own at home. I chose to make the pita versus buying it, but if you’re looking to save some time then by all means use a pocketless pita from the grocery store!

pocketless pita | doughseedough.net

The entire process took me just under two hours, but the results were so worth it. My schedule was like this: marinate chicken and refrigerate, mix dough for pita and let rise for 30 minutes, make tzatziki while waiting for chicken and dough. Refrigerate finished tzatziki, roll out dough for pita, cook chicken and pita simultaneously. In between flipping pitas, slice tomatoes and onions. Assemble and serve.

Sure, it’s quite a bit of multitasking, but I think I made pretty good use of my time and when I got around to assembling, the chicken was still piping hot and the pitas were perfectly warm. The best part? I had all ingredients on hand already. Yes, I do keep a huge tub of Greek yogurt in my fridge at all times.

chicken gyros | doughseedough.net

Chicken Gyros
adapted from Elly Says Opa and Kalofagas

For the chicken:
1.25 pounds chicken breast
4 cloves garlic, smashed
juice of 1 lemon
2 teaspoons red wine vinegar
2 tablespoons extra virgin olive oil
1/4 cup plain nonfat Greek yogurt
1 tablespoon dried oregano
salt and pepper

For the tzatziki:
1 – 17.6 ounce tub of plain nonfat Greek yogurt
1 cucumber, seeded
4 cloves garlic, minced
1 teaspoon white wine vinegar
juice from half a lemon
salt and pepper, to taste

For the pita:
1 1/2 teaspoons active dry yeast
1 teaspoon salt
1 teaspoon sugar
2 tablespoons olive oil
1 1/2 cup warm water (110°F)
3 1/2 cups all purpose flour, plus more for dusting
canola oil

For toppings:

1 medium red onion, thinly sliced
3 roma tomatoes, thinly sliced

  1. Make a marinade for the chicken by whisking together garlic, lemon juice, vinegar, oil, yogurt, oregano, salt and pepper in a large bowl. Add the chicken and rub the marinade in. Cover and refrigerate for 1 hour. 
  2. Heat a large nonstick pan over medium heat and lightly coat with olive oil. Brown chicken on both sides and cook until juices run clear, about 4 – 6 minutes per side.  Let rest before slicing into strips.
  3. To make the tzatziki: shred or grate the cucumbers and squeeze excess moisture out. Make sure to get as much liquid out as possible! Mix together yogurt, cucumbers, garlic, vinegar, lemon juice, salt and pepper. Refrigerate at least 30 minutes before serving to allow flavors to meld.
  4. To make the pitas: in a large bowl, mix together yeast, salt, sugar, olive and water and let stand for 5 minutes or until top is foamy.
  5. Using your hands, gradually add in flour 1/2 cup at a time to the wet ingredients. Knead until dough pulls away from the sides of the bowl. Cover with a damp towel and let rise in a warm spot for 30 minutes.
  6. Divide dough into 6 pieces and roll out on a floured surface into 8-inch rounds about 1/4 inch thick. Lightly poke the surface with the tines of a fork, being careful not to poke through the dough.
  7. Heat a large cast iron skillet over medium-high heat. Lightly coat the skillet with oil and place one dough round into the skillet and fry the bread until it starts to puff and bubble, about 1 – 2 minutes. Flip and fry the other side. Repeat with remaining dough.
  8. Assemble gyros by piling a pita with chicken, tzatziki sauce, tomatoes, and onions. Enjoy!


3 Comments

Grilled Kimcheese Sandwich

Is there such thing as too much kimchi? I don’t think so. Or at least I haven’t reached that point yet. Today I have yet another kimchi dish. This time, in sandwich form. Yeah, you read the title right. It’s a grilled cheese sandwich with kimchi. Grilled kimcheese. See what I did there?

So, this dish doesn’t really need a recipe because nothing is easier to cook than grilled cheese, but… why not? I just  had to. Imagine it: ooey, gooey cheese with crunchy, tangy, spicy kimchi.

grilled kimcheese sandwich | doughseedough.net

Grilled Kimcheese Sandwich
makes 2 sandwiches

1/4 cup unsalted butter
4 slices sourdough bread
1/2 cup kimchi, chopped
4 ounces havarti cheese, sliced

  1. Heat a large pan over medium heat. 
  2. Butter bread slices with butter on one side and place 2 of  them in the pan butter side down.
  3. Distribute the 1/4 of the cheese onto each bread slice in the pan. Top with 1/4 cup kimchi, remaining cheese, and the remaining 2 slices of sourdough bread, butter side up.
  4. Cook for 1 minute or until golden brown and cheese has started to melt. With a spatula, flip sandwiches and cook until other side is golden brown and cheese is completely melted. Serve immediately.


Leave a comment

Korean Steak & Mushroom Tacos with Kimchi

korean steak & mushroom tacos with kimchi | doughseedough.net

Have you ever eaten something so good that you wanted nothing more than to eat it alone?

Not because you didn’t want people to distract you from the deliciousness, but because you were ashamed at the rate in which you were shoveling the food into your mouth.

No? Well, that happens to me once in a while. Most recently with these tacos. These tacos were a-ma-zing. One of my favorite ways to get kimchi into my mouth, I think. These tacos were so good that I couldn’t decide if one was enough. If I only had one that meant I would have more leftovers for future meals. But… one just wasn’t enough. And if I ate only one that meant I might have to share the leftovers with Mike. Hmm…

I mean, seriously. These tacos are the perfect balance of sweet, savory and crunchy. And they were super easy to cook.

korean steak & mushroom tacos with kimchi | doughseedough.net

Korean Steak & Mushroom Tacos with Kimchi
adapted from Eating Well

1/4 cup low sodium soy sauce
2 tablespoons toasted sesame oil
2 tablespoons brown sugar
2 tablespoons mirin
2 tablespoons gochujang
5 cloves garlic, minced
1.25 pounds skirt steak, trimmed
1 teaspoon canola oil
8 ounces shiitake mushrooms, stems removed
8 flour tortillas
1 cup kimchi, roughly chopped
2 large carrots, shredded
4 scallions, thinly sliced

  1. Heat a large cast iron skillet over medium-high heat. 
  2. Combine soy sauce, sesame oil, brown sugar, mirin, gochujang, and garlic in a small saucepan over medium heat. Bring to a boil and then reduce to a simmer. Cook, stirring occasionally, until slightly thickened, about 5 minutes. Cover and keep warm.
  3. Add oil to heated pan and cook steak until browned and desired level of doneness is reached (I cooked about 3 minutes on each side). Remove from pan and set on cutting board to rest for 5 minutes.
  4. Meanwhile, add mushrooms to skillet and cook until heated through and slightly soft, about 1 – 2 minutes on each side. Remove mushrooms from skillet and slice. Slice steak across the grain. Add steak and mushrooms to sauce and stir to combine.
  5. To assemble tacos, divide and steak and mushrooms among the tortillas. Top with chopped kimchi, shredded carrots, and scallions.

Ok, now get off your computer/iPad/phone and go to the grocery store and pick up the ingredients you need to make this. Then, kick everyone out of your house and eat in silence and with reckless abandon.

I swear I’m not an animal…


4 Comments

Kimchi Fried Rice

Fried rice is good. Kimchi is good. Together, they are phenomenal. The addition of a sunny-side up egg makes it even better.

kimchi fried rice | doughseedough.net

Breaking an egg yolk and watching it run all over the place and slowly soak into the rice is the most beautiful thing.

kimchi fried rice | doughseedough.net

I can’t stress the importance of using day-old rice enough. Day old as in you cook it the night before, stick it in the fridge, and then use it the next day. Day-old rice has a harder texture and will give you a much better fried rice. If you don’t have time to make the rice the day before, cook it and then spread it out in a thin layer and stick it in the fridge to cool it quickly.

I used to make all my fried rice in a wok, but this time I used a huge nonstick skillet and I think it worked out a lot better. This is probably mostly due to the fact that I made less of a mess in the skillet. There’s just something about a wok that causes me to violently stir the food in it. Obviously, this creates a mess. Either way, this fried rice is a winner and it couldn’t be easier.

kimchi fried rice | doughseedough.net

Kimchi Fried Rice

1 tablespoon canola oil
1 onion, diced
2 cloves garlic, minced
1 cup kimchi, roughly chopped
4 cups day-old white rice
1 tablespoon gochujang (chili paste)
2 tablespoons low sodium soy sauce
1/2 teaspoon freshly ground black pepper
5 green onions, green parts sliced, divided
4 eggs, cooked sunny side up

  1. Heat canola oil in a large nonstick oil over medium-high heat. Add onion and garlic and cook until onion is translucent. Stir in kimchi and stir until well combined.
  2. Add in rice and stir to break up large pieces. Cook, stirring frequently, until the rice is well incorporated with the kimchi.
  3. Stir in gochujang, soy sauce, pepper, and half the green onions until well combined.
  4. Portion into 4 serving dishes and sprinkle with remaining green onions. Top with egg and serve immediately.


Leave a comment

Meatballs in Creamy Dill Sauce

My work hours are still really unpredictable. Because of this, I like to find foods that I can make in big batches and freeze. I rely on meals like this to get me through super busy weeks. I ended up making a double batch of the meatballs and freezing half of them for later. I mean, let’s be real – this dish is super easy to make after the meatballs are cooked and it sure beats a bowl of mac & cheese or ramen for dinner!

After I typed up this post I went digging through the freezer to find the rest of the meatballs… there were none. I guess I cooked them up already. Sad, sad day. Guess I’ll be making some mac & cheese 😉

meatballs in creamy dill sauce

Meatballs in Creamy Dill Sauce

for the meatballs:
1 pound lean ground beef
1 slice of day-old whole wheat bread, processed into crumbs (or 1/3 cup whole wheat bread crumbs)
1/4 cup skim milk
1/4 teaspoon salt and pepper
1 egg

for the sauce:
1 teaspoon extra virgin olive oil
1 medium onion, sliced
2 tablespoon flour
2 cups beef broth
8 ounces cremini mushrooms, thinly sliced
1/4 cup plain nonfat Greek yogurt
1 tablespoon chopped fresh dill

cooked egg noodles or other pasta of your choice for serving

  1. Preheat oven to 350°F. 
  2. Combine beef, bread crumbs, skim milk, salt, pepper and egg in a large bowl. Stir to combine. Roll into 1″ balls and place on a rimmed baking sheet. Bake for about 40 minutes or until browned and no longer pink in the middle.
  3. Heat olive oil in a large pan over medium heat. Add onion and cook until translucent and slightly browned. Stir in flour and cook for 1 minute. Stir in beef broth, mushrooms, and meatballs. Bring to a simmer and cook until sauce reduced and slightly thickened, about 10 minutes.
  4. Remove sauce from heat and stir in Greek yogurt and dill until well combined.
  5. Serve meatballs and sauce over egg noodles. Serve immediately.


Leave a comment

Hearty Guinness Stew

Happy Monday! I hope you all had a good weekend full of good food, good company, and perhaps a drink or two!

If you like drinking Guinness, you will love this stew. If you’re like me and prefer whiskey over beer, you will still love this stew. So, if you happen to have a bottle or two of Guinness left, give this stew a try. And if you don’t have any Guinness left, go out and grab yourself a 6 pack of the stout because you will definitely want to make this.

I’ll let you in on a little secret – I didn’t actually use Guinness when I made this. The Irish stout I used was actually home-brewed by Mike! It was the first beer he made and he reluctantly sacrificed one for the stew. I thanked him by giving him a bowl of the stew 🙂

guinness stew

Hearty Guinness Stew
adapted from Cooking Light

1.5 pounds boneless chuck roast, cut into 1″ pieces
1 teaspoon salt
1/4 cup flour
1 tablespoon canola oil
2 onions, chopped
3 cloves garlic, minced
2 tablespoons tomato paste
1 bottle Guinness or other Irish stout
4 cups beef broth
freshly ground pepper, to taste
8 ounces cremini mushrooms, quartered
3 medium carrots, peeled and sliced into 1/2″ pieces
4 stalks celery, sliced into 1/2″ pieces
3 medium potatoes
flat leaf parsley for garnish, optional

  1. Sprinkle beef with salt and then dredge in flour. Heat canola oil in a Dutch oven over medium high heat. Add half the beef and cook, turning until browned on all sides, about 5 minutes. Repeat with other half. Remove beef from pan and set aside. 
  2. Add onion and garlic to pan and cook until onions are translucent, about 5 minutes.  Stir in tomato paste and cook 1 minute, stirring frequently. Stir in broth and stout, scraping up the browned bits on the bottom of the pan. Stir in pepper and beef and bring to a boil. Reduce heat to a simmer and cover. Cook for 30 minutes, stirring occasionally.
  3. Uncover and bring to a boil. Add mushroom, carrot, celery, and potato. Cover, reduce heat to low, and simmer for 30 minutes, stirring occasionally. Uncover and bring to a boil and cook until vegetables are tender, about 10 more minutes.
  4. Sprinkle with parsley before serving.


2 Comments

Baked Chicken Nuggets

Chicken nuggets bring out the kid in all of us! Mike told me that he used to put down a 20 piece McD’s chicken nugget “family” sized box like it was nothing. Gross. Impressive, but gross. I decided to cook him a little pick-me-up after I got him sick (oops). These little bites are far from the nuggets that you would find in a drive-through. They’re made with chicken breast and packed with flavor. Best of all, they’re baked, not fried! And there’s no limit to how much dipping sauce you can have either 😉

baked chicken nuggets

Baked Chicken Nuggets
adapted from Martha Stewart

4 chicken breasts
1 tablespoon lemon juice
3/4 cup skim milk
1 teaspoon garlic powder
1 teaspoon Worcestershire sauce
1/4 teaspoon salt
2 cups panko bread crumbs
1/2 cup freshly grated Parmesan cheese
1/2 teaspoon salt
3/4 cup all purpose flour
3 large eggs, whisked

  1. Lightly pound chicken breast to 1/2 inch thickness. Cut into 1.5 – 2″ pieces. Set aside in a large bowl. 
  2. Combine lemon juice and milk in a bowl, stir to combine. Let sit for 15 minutes. Stir in garlic powder, Worcestershire, and 1/4 teaspoon salt. Pour over chicken and stir to combine. Cover and refrigerate for 30 minutes.
  3. Preheat oven to 475°F. Spread panko on a rimmed baking sheet and bake for 5 minutes or until golden brown, being careful not to burn.
  4. Transfer panko to a shallow dish. Once cool, mix in grated Parmesan and 1/2 teaspoon salt. Set aside.
  5. Set out flour in a second shallow dish and whisked eggs into a third shallow dish.
  6. Line a large baking sheet with parchment paper.
  7. Remove chicken from the fridge and discard marinade. Working a few pieces at a time, dredge chicken through flour and shake off excess. Dip in the egg, and then lastly coat with panko. Transfer to baking sheet. Continue until all chicken has been coated.
  8. Bake for 12 minutes, turning halfway through, until panko is lightly browned and chicken has an internal temperature of 165°F.
  9. Serve with spicy ketchup and honey mustard dipping sauces, recipes below.

Spicy Ketchup

1/4 cup ketchup
3 tablespoons Sriracha
2 tablespoons low fat mayonnaise

  1. Combine all ingredients and stir well to combine. 

Honey Mustard Dipping Sauce

1/4 cup honey
1/4 cup Dijon mustard

  1. Stir honey and mustard together well to combine. 


1 Comment

Mapo Tofu – A Healthier Version

Mapo tofu is delicious. It might be the soft, silky tofu that melts in your moth. It might be the in-your-face kick of Szechuan peppercorn. But, I think the real reason it’s delicious is because it’s traditionally made with very, very fatty ground pork. I was afraid that when I “trimmed down” this recipe by subbing in lean turkey for fatty pork it would lose its great depth of flavor. After all, I’ve tried to make healthier version of various dishes and ended up with not-so-appetizing results (I’m looking at you, rock-hard muffins).

Fortunately, this healthier version of mapo tofu is far from being unappetizing. In fact, I would say that it’s pretty dang stellar. I challenge you tofu  haters to try this. It just might change your mind about tofu. If you still don’t like it, then I guess you can mash it up and pretend like it’s just a huge bowl of ground turkey.

mapo tofu

Healthier Mapo Tofu
serves 6

1 tablespoon Szechuan peppercorns
1 tablespoon corn starch
2 tablespoons water
1 teaspoon canola oil
2 tablespoons minced garlic
1.5″ piece of ginger, minced (about 2 tablespoons)
6 green onions, thinly sliced; whites and greens separated
1 1/2 cups low sodium chicken broth
1/4 cup low sodium soy sauce
2 tablespoons hot chili bean sauce
14 ounce package soft tofu, drained and cut into 1″ cubes
1 pound extra lean ground turkey
1/2 teaspoon toasted sesame oil
steamed rice, for serving

  1. Toast peppercorns in a small dry skillet over medium-high heat until fragrant, about 1 minute. Allow to cool and then grind in a spice grinder.*
  2. In a small bowl, whisk together cornstarch and water until well combined. Set aside.
  3. Heat a large skillet over medium-high heat. Add in canola oil and swirl to coat. Add garlic, ginger, and white parts of the scallion and stir fry until fragrant, about 2 minutes. Add turkey and cook until meat is no longer pink.
  4. Add in chicken broth, soy sauce, and chili sauce, stirring to combine. Bring to a boil and add corn starch mixture and stir until the sauce becomes thick and clear. Gently stir in tofu and cook until heated through, about 2 – 3 minutes. Stir in Szechuan peppercorns, to taste. Drizzle with sesame oil.
  5. Serve immediately with steamed rice. Garnish with remaining green onions.


*I don’t own a spice grinder. I tossed the cooled peppercorns into a zip-top bag, shut it, and then rolled and lightly pounded it with a large rolling pin. It worked!