DoughSeeDough

a balanced plate with room for dessert


3 Comments

Char Siu Bao (Chinese BBQ Pork Buns)

I think making these buns might have been the biggest mistake of my life. They’re just too dang good and I crave them constantly. The first batch quickly dwindled to nothing – I sent a bun or two off to my family and to Mike’s parents and sent a half-dozen off with Mike. I was left staring at four buns. I tried to make them last as long as possible, but I have to be honest… they lasted four days. Maybe less.

Baked Char Siu Bao (Chinese BBQ Pork Buns) | doughseedough.net

I think these buns might be the first thing I will ever put on my monthly “must make” list. I rarely make repeat dishes. It takes a good dish to warrant a second visit into my kitchen more than once a year. It takes a stellar dish to make a visit a few times a year. A dish that I want to make every month? Unheard of, until now.

Baked Char Siu Bao (Chinese BBQ Pork Buns) | doughseedough.net

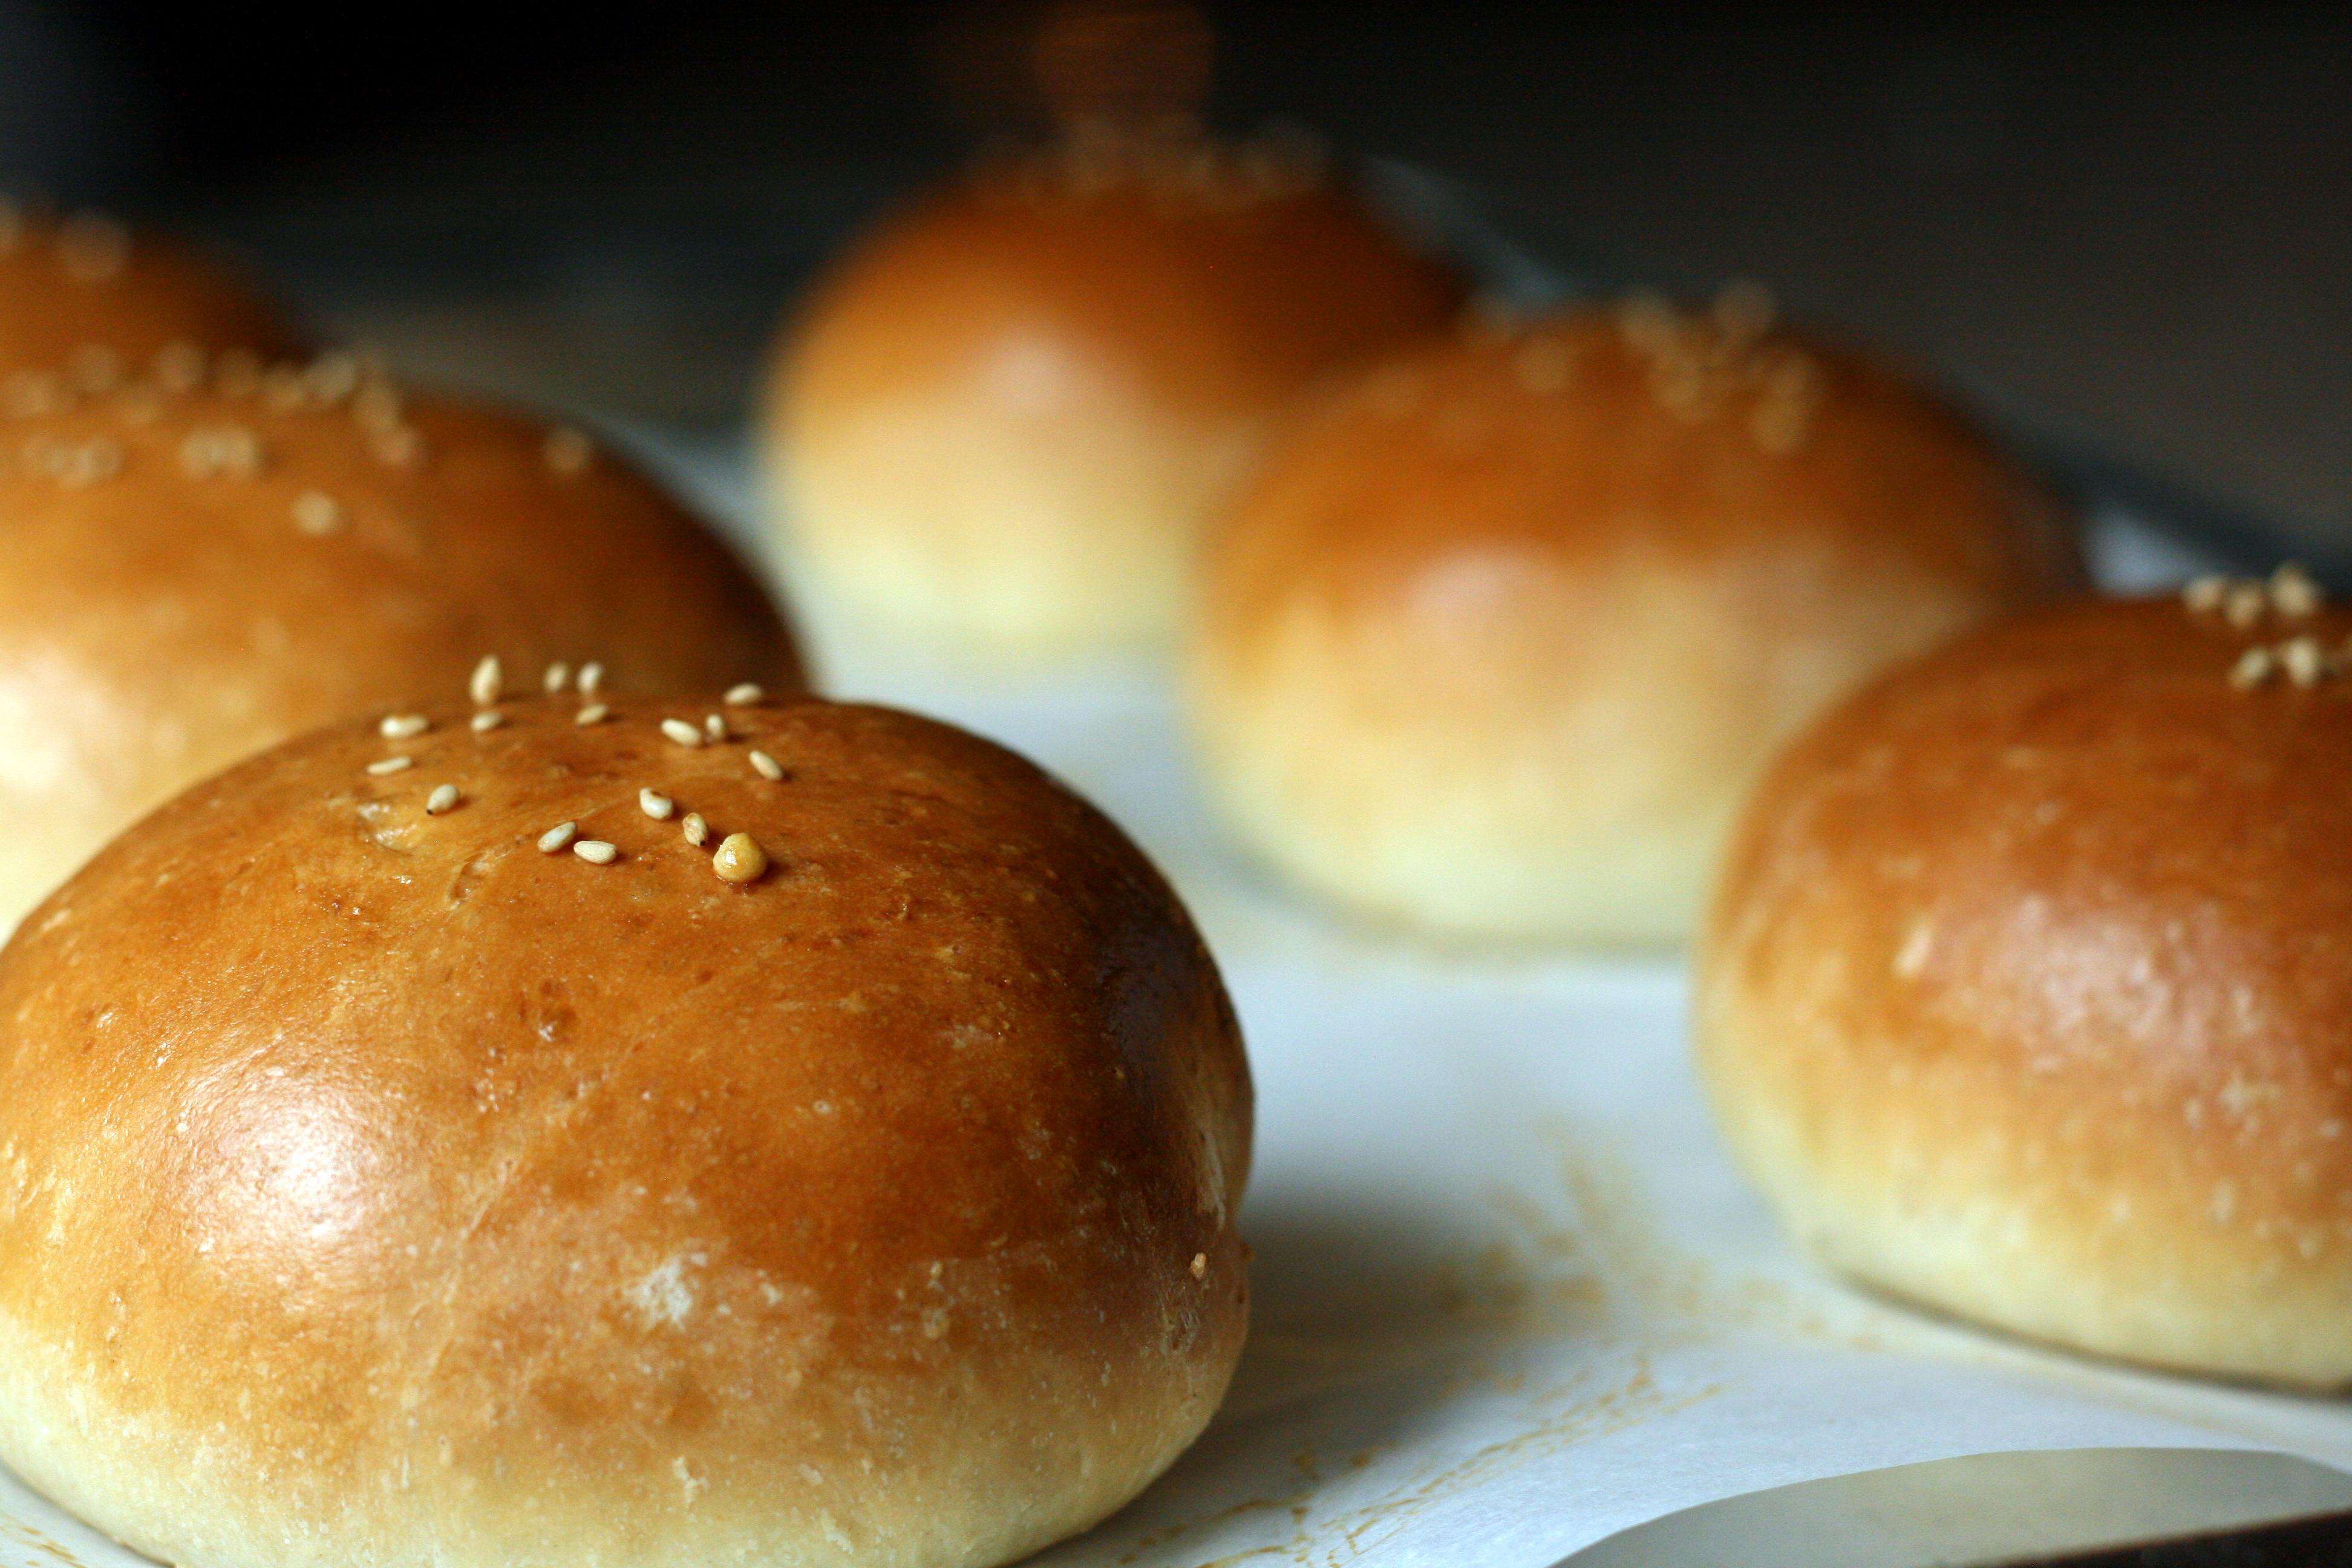
I just can’t explain why I loved these buns so much. It’s a combination of the slightly sweet, mostly salty filling surrounded by an impossibly soft, fluffy, yet chewy bun. The texture of the buns is partially due to the tangzhong (roux) made from combining flour with water and milk. The tangzhong  is incorporated into the dough and the endresult is a bun that’s… well, good.

Baked Char Siu Bao (Chinese BBQ Pork Buns) | doughseedough.net

I made this dish for this month’s What’s Baking. The host for August is Ali from Sparks from the Kitchen. She challenged us to bake up something to represent our heritage.  I waffled between making dan ta, an egg custard tart, and feng li su, little flaky cakes encasing a pineapple filling. I don’t know how I ended up making neither of those and instead making the char siu bao, but I don’t regret my actions one bit. I loved char siu bao growing up, and I love them still. I hope you enjoy them as much as I do!

Char Siu Bao (Chinese BBQ Pork Buns)

for the buns:
6 cups bread flour, divided
2/3 cup water
1 1/3 cup milk, divided
1/3 cup sugar
1 teaspoon salt
4 teaspoons instant yeast
2 large eggs
4 tablespoons butter, melted

for the filling:
1 tablespoon canola oil
1/2 cup finely chopped shallots
2 tablespoons honey
1 1/2 tablespoons low-sodium soy sauce
2 tablespoons oyster sauce
1 1/2 tablespoons sesame oil
1 tablespoon dark soy sauce
1/4 cup low-sodium chicken stock
3 tablespoons flour
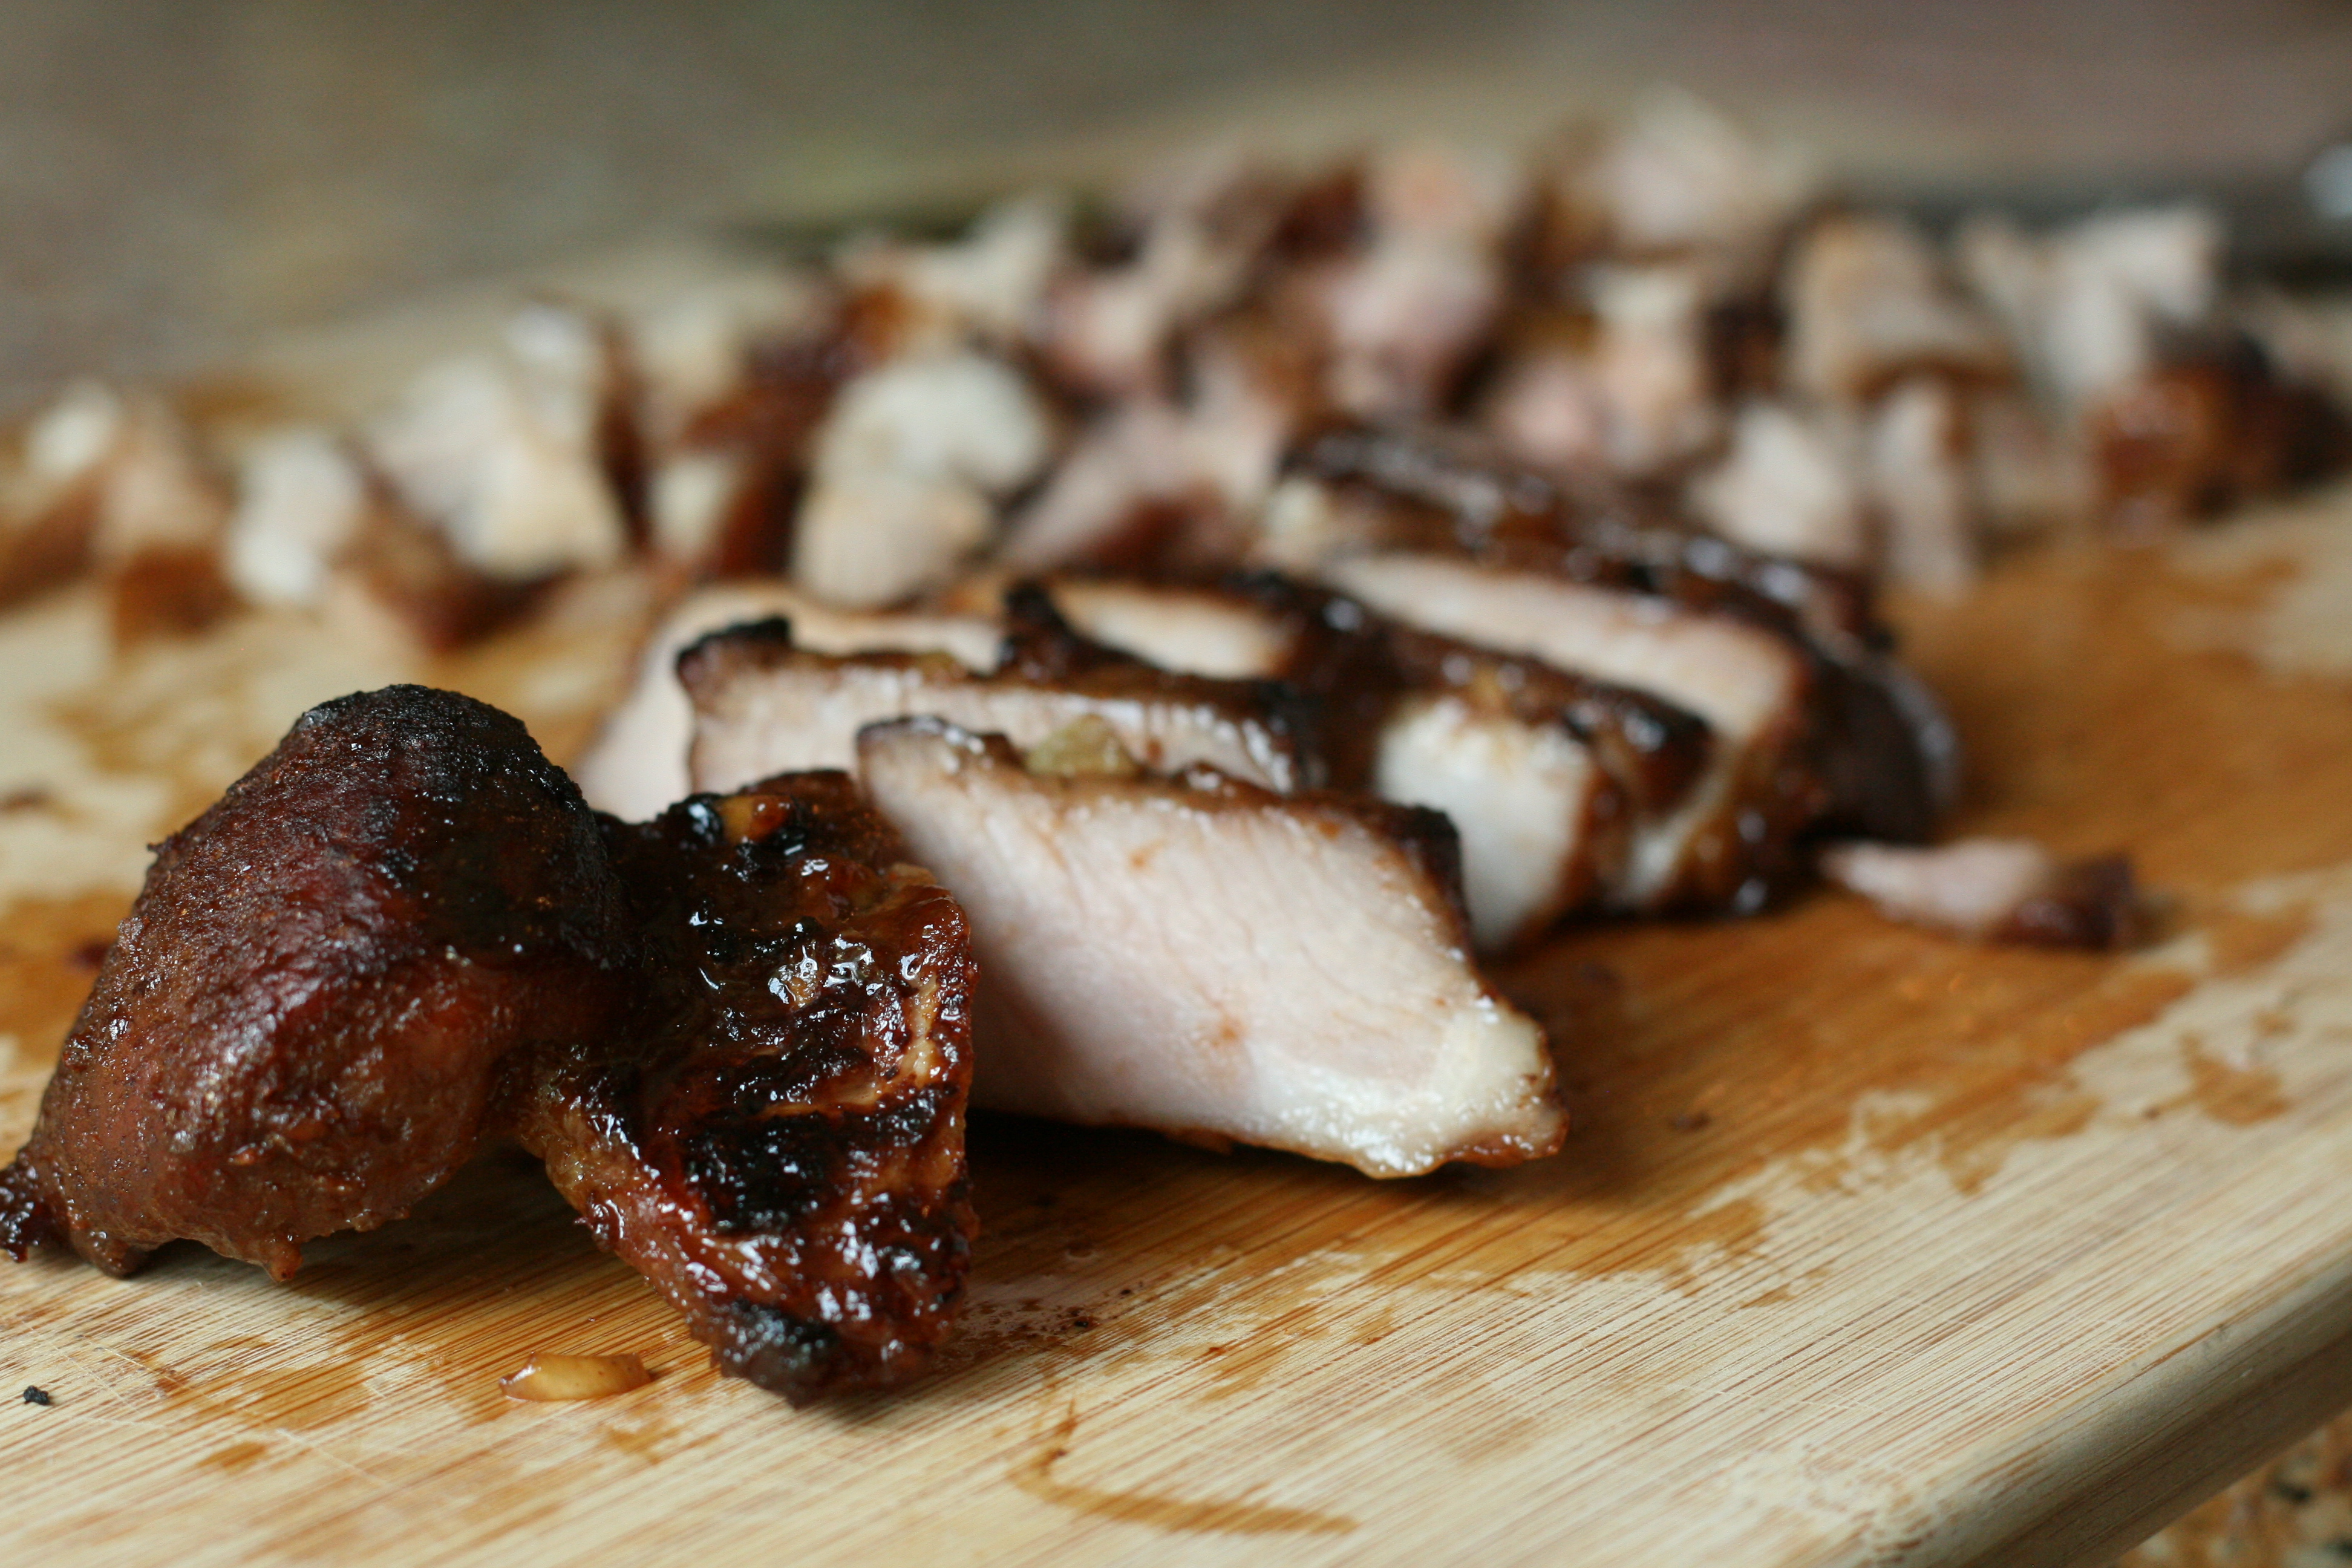
2 cups diced char siu (Chinese BBQ roast pork)

for garnishing:
1 egg beat with 1 teaspoon water (egg wash)
1 tablespoon sesame seeds

  1. To make the tangzhong (roux/flour paste), mix together 1/3 cup flour, 2/3 cup water, and 1/3 cup milk in a small saucepan until well combined. Place the pan over medium heat and cook, stirring constantly, until the mixture thickens up and has the consistency of a thick yogurt. The temperature of the roux should not exceed 150°F. Remove the mixture from heat and set aside to cool.
  2. In a large mixing bowl, combine 5 cups flour, sugar, salt, and yeast and mix with a wooden spoon to combine. Add the tangzhong/flour paste, 1 cup milk, 2 eggs, and melted butter. Stir together to form a soft dough. Knead by hand for 15 – 20 minutes. If your dough is sticky and not coming together, add the remaining 2/3 cup flour a little at a time until your dough is smooth and elastic.
  3. Lightly grease a large bowl. Place dough inside and turn to coat. Cover the bowl lightly with plastic wrap. Place the bowl in a warm, draft-free place and let rise for 60 minutes or until it has doubled in size.
  4. Meanwhile, get started on the filling. Heat the oil in a large pan over medium-high heat. Add the shallots and cook for 2 minutes, stirring constantly. Stir in the honey, soy sauce, oyster sauce, sesame oil, and dark soy sauce. Cook until mixture starts to bubble, stirring frequently. Stir in the chicken stock and flour until well combined. Reduce heat to medium-low and cook for 2 – 3 minutes, or until thickened. Remove from heat and stir in the diced roast pork. Set aside to cool.
  5. Separate the risen dough into 16 equal pieces. Roll each piece into a 4-inch circle, leaving the center slightly thicker than the edges. Place a heaping tablespoon of filling into the middle of each circle. Crimp them closed, making sure they are tightly sealed. Don’t fret if they’re a little ugly – the crimped side ends up on the bottom, hidden from judging eyes 😉
  6. Line baking sheets with parchment paper. Lay the buns seam-side down on the prepared baking sheets and let rise for another hour.
  7. Preheat oven to 350°F. Brush the tops of the buns with the egg wash. Sprinkle with sesame seeds and bake in the preheated oven for 25 minutes, or until buns are golden brown. Let cool slightly before eating.


yields 16 buns. recipe slightly adapted from The Woks of Life


2 Comments

Char Siu (Chinese BBQ Roast Pork)

Char siu, or Chinese BBQ roast pork, brings back really fond memories for me. I remember seeing huge slabs of roast pork hanging from windows in restaurants or at grocery stores. I remember stuffing my face full of buns filled with the sweet-salty succulent pork.

Char Siu (Chinese BBQ Roast Pork) | doughseedough.net

I can’t even begin to tell you how awesome this pork smelled as it was roasting away in the oven. I might go so far as to say that it beat any cookie, cake, or pie smell that I’ve ever created in my kitchen. Seriously. It was that good.

I think I spent the majority of the cook time staring all googly-eyed into the little oven window, watching this pork cook up into what I can only describe as heavenly. If you’re looking for a little happiness in your life, you’re in luck. I’m bringing it to you in the form of some Chinese roast pork.

This little piggy… turned out awesome. Stay tuned for part two when this little piggy gets turned into some char siu bao (Chinese roast pork buns). Yeehaw!

Char Siu (Chinese BBQ Roast Pork) | doughseedough.net

Char Siu (Chinese BBQ Roast Pork)

3 pounds pork shoulder
4 tablespoons sugar
1 teaspoon salt
1 teaspoon five spice powder
2 teaspoons paprika
1/2 teaspoon white pepper
2 tablespoons sherry
2 tablespoons low sodium soy sauce
1 teaspoon sesame oil
4 teaspoons hoisin sauce
4 teaspoons tomato paste
4 teaspoons molasses
1 tablespoon canola oil
6 cloves garlic, minced
2 tablespoons water

  1. Cut pork into 3-inch thick strips lengthwise. Place pork into a large zip-top bag and set aside.
  2. Combine the remaining ingredients in a medium bowl. Whisk until well combined. Remove 1/2 cup of the marinade into a container. Cover and refrigerate for later use.
  3. Pour the remaining marinade into the zip-top bag. Make sure pork is evenly coated with the marinade. Squeeze excess air out of the bag and seal it. Place bag into a baking dish and refrigerate overnight (at least 12 hours).
  4. Preheat oven to 375°F. Line a sheet pan with foil and place a metal baking rack on top. Remove pork from marinade, letting excess marinade drip off. Place pork on rack, making sure the pieces don’t touch. Bake the pork for 20 – 25 minutes on each side, or until pork reaches an internal temperature of 145°F. Baste pork with half of the reserved marinade. Move the oven rack to the top third and turn the broiler on. Return the pork to the oven and cook for a few minutes on each side or until the pork is slightly charred.
  5. Let the meat rest for 10 minutes before slicing.


recipe slightly adapted from The Woks of Life


3 Comments

Curried Mussels in White Ale

Curried Mussels in White Ale | doughseedough.net

I still remember when I made this dish – I had invited my mom over for dinner after she found out I was making mussels. I figured that since she fed them to us a couple weeks ago, it was my turn to host. She declined since they had some guests. Turns out, I am dang happy that she didn’t end up coming over (does that make me a bad daughter?). Mike and I devoured this entire dish by ourselves and were wishing we had more. We couldn’t get enough of how flavorful the curry ale sauce was. Seriously out of this world. Next time, I’m going to whip up a triple batch and force my mom to join us.

Curried Mussels in White Ale | doughseedough.net

Curried Mussels in White Ale

1 teaspoon canola oil
1 tablespoon Thai red curry paste
6 garlic cloves, chopped
1 1/2 tablespoon finely grated fresh ginger
1 large fresh lemongrass stalk, bottom two-thirds of the bulb smashed and chopped
2/3 cup Shaoxing wine
15 ounce can low fat coconut milk
1/4 cup low-sodium soy sauce
3 tablespoons Asian fish sauce
1/2 cup Thai basil leaves, plus 1/4 cup chopped
2 12-ounce bottles Belgian white ale
2 pounds mussels, scrubbed and debearded; toss any that do not close tightly when tapped
1/4 cup cilantro, chopped

crusty bread for serving

  1. Heat the oil in a large saucepan over medium heat. Add curry paste, garlic, ginger, and lemongrass and cook, stirring frequently, for 2 minutes or until fragrant. Add the Shaoxing wine, coconut milk, soy sauce, fish sauce and basil leaves. Reduce to a simmer and cook for 15 minutes. Strain the sauce into a bowl; discard the solids.
  2. Rinse the saucepan out and then bring the ale to a boil over high heat. Add the mussels, cover and cook for 5 minutes. Using a slotted spoon, transfer the mussels to four bowls, discarding any that are not open.
  3. Add the red curry sauce to the ale and bring to a boil. Let cook for 1 minute and spoon over the mussels. Sprinkle with the remaining chopped Thai basil and cilantro and serve.


recipe slightly adapted from Food & Wine


Leave a comment

One Pan Sausage Skillet Dinner

It’s been quite a few days and I still smell campfire everywhere I go. I finally realized that it wasn’t my skin, hair, or clothing. The smell has somehow permeated into my glasses. I’ve soaked and scrubbed them, but to no avail. I love campfires, but this is a little much! I guess from now on I’ll have to camp sans-glasses. Essentially blind. I may end up just falling into the campfire…

When you’re camping, the fewer dishes to wash, the better. Seriously. Mike and I are so determined to keep our dirty dishes to a minimum that we ate straight out of the pan instead of dirtying two plates 🙂 This one-pan meal takes minutes to throw together and minutes to clean up. If you don’t have a fire to cook over, try baking this in the oven!

One Pan Sausage Skillet Dinner | doughseedough.net

(Please forgive me for the photo – turns out that Me + Camera – Light – Tripod = Disaster)

One Pan Sausage Skillet Dinner 

serves 4 – 6

1 tablespoon olive oil
1 1/2 pounds baby red potatoes, cut into 1-inch pieces
1/2 large red onion, sliced into 1/4-inch pieces
2 cloves garlic, minced
1/2 pound baby carrots
1/2 pound mushrooms, halved (quartered if large)
12 ounce package of chicken sausage (I used Johnsonville’s Chipotle & Jack sausage)
4 beef bouillon cubes, crushed
1 teaspoon onion powder
1 teaspoon garlic powder
1 tablespoon dried minced onion
1/2 teaspoon freshly ground black pepper
2 tablespoons low sodium soy sauce, chicken broth, or water
shredded cheddar cheese, optional

  1. Coat a large cast iron skillet with olive oil. Arrange potatoes on bottom in an even layer. Spread onions, garlic, carrots and mushrooms evenly on top. Arrange sausage over the vegetables.
  2. In a small bowl, mix together beef bouillon, onion powder, garlic powder, dried minced onion, and black pepper. Sprinkle spices and soy sauce over the sausage and vegetables. Cover the skillet tightly with heavy-duty foil and cook over a fire for 20 – 30 minutes, stirring once or twice, until potatoes and carrots or tender and sausage is cooked through. Sprinkle with cheese, cover and return to fire for an additional 1 – 2 minutes or until cheese is melted.


1 Comment

Turkey & Rice Taco Skillet

Before I dive into our weekend adventures and the recipe,  I want to explain why I haven’t been posting as much (and why I’m eating dairy again). I’m unable to complete even a simple 5 mile run without almost collapsing. I can’t eat without being sick. Two of the most important things in my life: running and food, are now what frustrate me the most.  I’m taking it a day at a time, praying that my doctors can figure out what’s wrong with me soon so I can go back to being normal. Until then, I’ll be posting a bit less; it’s hard to post new recipes when you don’t each much of anything besides cereal and salads 🙂

But onto happier things… Mike and I went on our first camping trip of the season this past weekend with our pups. It rained Friday, but Saturday was picture-perfect and we were able to get in a nice long hike. Really long hike. Because we got lost. But hey, what’s the point of life without a little adventure? I’ve got two camping meals to share with you this week. For our Friday night dinner, I made a Turkey and Rice Taco Skillet. It was pouring, but we huddled under the tarp with the dogs and ate our dinner. It was the perfect meal to keep us warm in the cold, wet weather. I figured I would share this recipe first since it kind of works with the whole Cinco de Mayo thing, too.

Though this was made over a campfire, it is easily adaptable to be made at home on the stove top. That’s the beauty of cast iron – it can be used inside and outside. I’ve finally gotten my “inside use” Dutch oven and skillet to where they are pretty darn well seasoned. The skillet I used while we were camping, though, has been on hundreds of camping trips with Mike when he was growing up. The skillet is so perfectly seasoned that it puts my pieces to shame. I guess I have something to work on, eh?

Turkey & Rice Taco Skillet {camping meal} | doughseedough.net

Turkey and Rice Taco Skillet
serves 4 – 6

2 cloves garlic, minced
1/2 red onion, diced
1 jalapeno, minced (seeded if desired)
1.25 pounds lean ground turkey
1 packet hot taco seasoning mix
4 cups water, divided
3 cups Minute Brown Rice
1 – 15 ounce can corn
1 – 15 ounce can black beans, rinsed and drained
1 – 14.5 ounce can chopped tomatoes with jalapenos
1 cup shredded extra sharp cheddar cheese
2 cups shredded romaine lettuce
sour cream to garnish
olive oil spray

  1. Spray a large 12″ cast iron skillet with olive oil. Add garlic, onion, and jalapeno and cook over the fire (or medium-high heat) until onions are tender. Add the turkey and cook until browned, about 5 minutes. Stir in taco seasoning and two cups of water. Bring to a simmer and stir in rice and remaining two cups of water. Let simmer for 10 minutes, stirring occasionally. Stir in tomatoes, beans, and corn and continue to cook, stirring occasionally, until liquid is absorbed.
  2. To serve, divide between 4 – 6 bowls. Sprinkle with lettuce, cheese and top off with sour cream.


2 Comments

Hawaiian Chicken with Pineapple Salsa

So, remember that amazing (and easy!!) pineapple salsa I posted a couple weeks ago? It’s not only good on chips, with pretzel thins, or plain by the spoonful… it’s delicious on marinated chicken, too! I’m loving all the pineapple that’s on sale right now and this dish is super easy to prepare. Prep and marinate the chicken the night before and then you have dinner on the table in 30 minutes the next day!

Pineapple Chicken with Fresh Pineapple Salsa and Cilantro Rice | doughseedough.net Pineapple Chicken

1/2 cup pineapple juice
3 tablespoons ketchup
3 tablespoons low-sodium soy sauce
2 teaspoons minced peeled ginger
4 garlic cloves, minced
4 boneless, skinless chicken breast halves
cooking spray
salt and freshly ground black pepper
2 cups hot cooked brown rice
1/4 cup chopped fresh cilantro
2 cups fresh pineapple salsa

  1. Whisk together pineapple juice, ketchup, soy sauce, ginger, and garlic in a small bowl. Reserve 1/4 cup of the marinade. Place chicken in a shallow dish and pour the remaining marinade over it. Cover and refrigerate for 2 hours or overnight, turning halfway through.
  2. Preheat oven to 350°F. Coat a baking pan with cooking spray. Discard marinade and place chicken into prepared baking dish. Season with salt and pepper.
  3. Bake chicken for 30 – 40 minutes, or until chicken is cooked through and it has reached an internal temperature of 165°F. Pour reserved 1/4 cup marinade over chicken.
  4. Combine brown rice and cilantro in a bowl. Serve chicken with brown rice and pineapple salsa.


adapted from Cooking Light


Leave a comment

Hoisin-Lime Chicken with Zucchini

This recipe involves a little bit of planning since you have to prepare a marinade, let it cool, and then marinate the chicken for a few hours, but the results are worth it. Once the marinade is prepared, and the chicken is in the fridge, the rest is easy – grill and enjoy!

Hoisin-Lime Chicken with Zucchini | doughseedough.net

Hoisin-Lime Chicken with Zucchini

2 1/4 cups hoisin-lime sauce, divided (recipe below)
1 tablespoon sambal oelek
6 boneless, skinless chicken breasts
1/2 cup thinly sliced green onions, plus more for garnish
4 zucchini, halved lengthwise
salt and freshly ground black pepper, to taste

  1. Combine 1 1/2 cups of hoisin-lime sauce and sambal oelek in a large non-reactive container or bowl. Add the chicken and scallions and toss well. Cover and let the chicken marinate in the refrigerator for 2 – 24 hours. Turn the chicken at least one time. Thirty minutes before cooking, add the zucchini and toss to coat.
  2. Heat a grill pan over medium-high heat. Spray with nonstick spray. Remove chicken from marinade and grill, turning once, until the chicken is cooked through and reaches an internal temperature of 165°F, about 8 – 12 minutes.
  3. Remove zucchini from the marinade and cook, tuning once, until brown, about 8 minutes. Discard the marinade.
  4. While chicken and zucchini are being grilled, pour marinade into a saucepan and bring to a boil. Reduce heat to a simmer and cook until thickened.
  5. Slice the zucchini and chicken diagonally and arrange on a serving platter. Drizzle with reserved 3/4 cup marinade and garnish with additional sliced green onions, if desired.


Hoisin-Lime Sauce

1/4 cup canola oil, divided
2 tablespoons minced garlic
1 tablespoon peeled and minced fresh ginger
2 cups hoisin sauce
1/2 cup fresh lime juice
1/4 cup low-sodium chicken broth
salt and freshly ground black pepper, to taste

  1. Heat a large pan over medium heat. Add 2 tablespoons of oil and swirl to coat the bottom of the pan. Add the garlic and ginger and cook until soft and fragrant, about 2 minutes. Add the hoisin sauce and cook, stirring frequently, for 1 minute. Stir in lime juice.
  2. Transfer mixture to a blender and blend, drizzling in remaining 2 tablespoons of canola oil and the 1/4 cup chicken broth. Season with salt and pepper to taste. Cool completely before using.


recipes from Ming Tsai


Leave a comment

Southwest Turkey Meatball Skillet

This easy meal uses my favorite baked turkey meatballs and is on the table in 20 minutes. The best part? Cleanup is simple – this is a one pot meal, folks. If you’re a starch-lover like me, serve this with your favorite crusty bread, quinoa, or brown rice.

Southwest Turkey Meatball Skillet | doughseedough.net

Southwest Turkey Meatball Skillet
serves 4 – 6

16 baked turkey meatballs (recipe here)
2 teaspoons extra virgin olive oil
1 large onion, chopped
3 cloves garlic, minced
1 cup frozen corn
1-15 ounce can low-sodium black beans, drained and rinsed
4 vine-ripened tomatoes, diced
4 cups chopped kale
1 cup low-sodium chicken broth
juice of 1 lime
1 teaspoon cumin
salt and freshly ground black pepper, to taste
1/4 cup fresh cilantro, chopped

  1. Heat olive oil in a large skillet over medium-high heat. Add onions and garlic and cook, stirring frequently, until onions are soft, about 3 – 5 minutes. Stir in corn, beans, tomatoes, kale, and broth. Season with lime juice, cumin, salt and pepper and stir to combine.
  2. Nestle meatballs into the vegetables and bring mixture to a simmer. Partially cover and let cook for 3 – 5 minutes, or until meatballs are heated through.
  3. Sprinkle with cilantro before serving.


Leave a comment

Cheeseburger Chili Mac

This dish is obviously cheesy and not at all dairy-free. The crazy thing is, it actually tastes really, really good without the cheese. I guess the version I had would be more appropriately titled “Chili Burger Mac” or something. It makes me incredibly happy when I can find a dish that tastes good with and without cheese. Mike had it both ways and insisted that the cheesy version wasn’t better than the non-cheesy version. I think he’s full of it, but it does make me feel a bit better 🙂

This recipe makes a scary amount of chili mac. But don’t fret – it freezes beautifully! I made it so Mike would have enough food to feed him for a few days while we were apart. If you’re ever short on time, give this meal a try. It’s super simple and comes together in just minutes. As an added bonus, you probably have most of these ingredients lurking around in your pantry and fridge already!

Cheeseburger Chili Mac {dairy-free adaptable} | doughseedough.net

Cheeseburger Chili Mac // Chili Burger Mac
serves 8 – 10

olive oil spray
2 pounds lean ground beef
2 large onions, finely chopped
1/4 cup chili powder
salt and freshly ground black pepper, to taste
1 cup ketchup
1/2 cup dijon mustard
2 cups beef stock
2 pounds whole wheat elbow macaroni
2 cups shredded extra sharp cheddar cheese, optional

  1. Coat a large pan with olive oil spray and heat over medium-high heat. Add beef and cook, stirring occasionally, until browned and cooked through, about 8 minutes. Drain the meat thoroughly and return to pan.
  2. Add in onions, chili powder, salt and pepper and stir to combine. Cook until onions are soft, about 5 minutes. Stir in ketchup, mustard, and beef stock. Bring mixture to a simmer and allow to cook until thickened, about 5 minutes.
  3. Bring a large pot of water to boil over high heat for the pasta. Cook pasta according to package directions, drain, and set aside.
  4. Serve macaroni with a scoop of the chili and top with shredded cheddar, if desired.
  5. Alternatively, mix the chili and macaroni together and pour into an oven-safe dish. Sprinkle with cheese and broil until cheese is browned and melted.


adapted from Rachael Ray


2 Comments

Bangers and Mash with Red Wine Onion Gravy

Happy St. Patrick’s Day to you all! If you didn’t get a chance to drink a ton of green beer this weekend, don’t worry – you can still celebrate by whipping up the quick and easy meal of bangers and mash.

Bangers and Mash with Red WIne Onion Gravy | doughseedough.net

I found the bangers at Trader Joe’s. If you can’t find any, another type of pork sausage should do. I was blown away by how tasty this was and I kind of regret not buying more of the sausages to freeze for later. This, folks, is comfort food.

Ripley | doughseedough.net

Mr. Ripley was watching me intently as I photographed this meal. He ended up with some mashed potatoes on his ear (see bottom right). Don’t know how, but he did. Weird dog.

Bangers and Mash with Red WIne Onion Gravy | doughseedough.net

And, yes, that is a bottle of 3-buck-Chuck in the background. Turns out, we still like to drink like poor college kids.

Bangers and Mash with Red Wine and Onion Gravy
serves 4 – 6

for the bangers:
1 pound Irish banger sausages
1/4 cup dry red wine
extra virgin olive oil spray
2 tablespoons fresh sage leaves, torn

for the mash:
2 pounds Yukon gold potatoes, peeled and quartered
2 tablespoons dairy-free butter
1/4 cup dairy-free milk
salt and freshly ground pepper, to taste

for the gravy:
1 tablespoon extra virgin olive oil
2 large sweet onions, thinly sliced
2 tablespoons all purpose flour
1/2 cup dry red wine
1 1/2 cup beef broth
1 tablespoon Worcestershire sauce

  1. To prepare the bangers: Preheat oven to 350°F. Heat a cast iron skillet over medium high heat and spray with olive oil. Add the bangers and brown on all sides. Add red wine and sprinkle with sage. Transfer the skillet to the oven and bake until fully cooked, about 15 – 20 minutes.
  2. Meanwhile, prepare the mashed potatoes and gravy. Bring a large pot of water to a boil. Add the potatoes and cook until tender. Drain and return potatoes to the pot. Mash potatoes with butter, milk, salt and pepper.
  3. While potatoes are cooking, prepare the gravy. Heat 1 tablespoon olive oil in a large skillet over medium heat. Add onions and cook, stirring occasionally, until onions are very soft and browned, about 20 minutes. Sprinkle onions with flour and stir to coat. Continue to cook, stirring frequently, for 2 minutes. Stir in red wine, broth, and Worcestershire sauce. Allow to cook until reduced to desired thickness.
  4. Place the mash on a plate and top with bangers and serve with a generous spoonful of onion gravy.

adapted from Williams-Sonoma