DoughSeeDough

a balanced plate with room for dessert


3 Comments

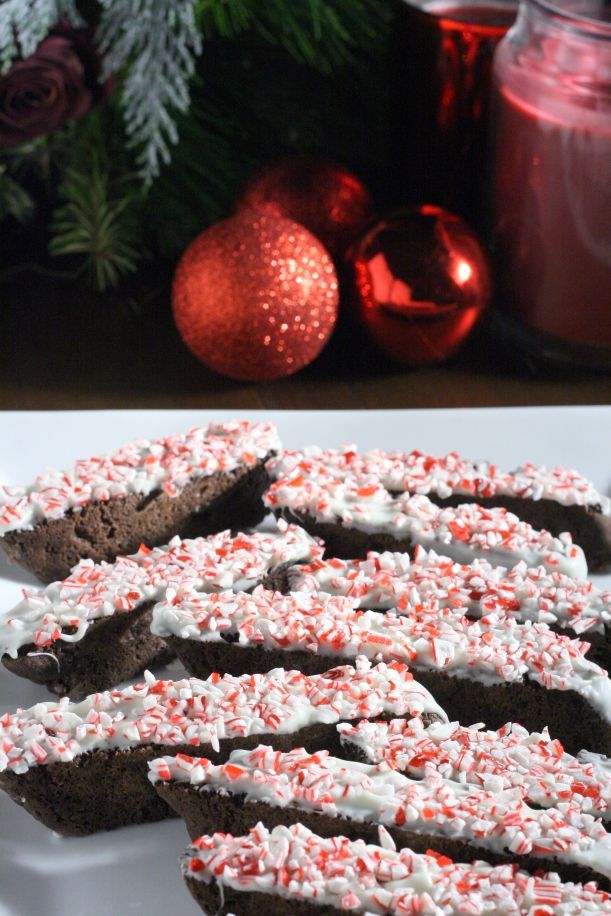
Double Chocolate Peppermint Biscotti

2015 has been quite the year for us. I just finished my first year of grad school and I am transitioning to a new job that will allow me to be at home with Mike once again. While I have loved my work in Madison the last 2 1/2 years, being away from my husband during the week was more difficult than I had anticipated. I’m sad to be leaving a great job and my wonderful coworkers, but I am excited to see what opportunities my new position will bring.

Christmas is just a few days away, but the weather outside is more spring-like than winter. I’m not sure how I feel about the lack of snow. I’m trying to find ways to get into the Christmas spirit and this biscotti really hit the spot. The double chocolate base pairs perfectly with the white chocolate and candy canes. It’s sweet and crunchy and perfect with a mug of hot chocolate or some coffee.

Double Chocolate Peppermint Biscotti | doughseedough.net

I made my go-to Andes mint cookies for a cookie exchange last week, but I think that these biscotti will be my new holiday treat. So easy, so festive, and so good!

Double Chocolate Peppermint Biscotti | doughseedough.net

I want to wish you and your loved ones a very merry Christmas and a wonderful new year!

Double Chocolate Peppermint Biscotti

1 stick (8 tablespoons) unsalted butter, room temperature
3/4 cup + 2 tablespoons granulated sugar
2 large eggs
2 teaspoons vanilla extract
1 3/4 cup + 2 tablespoons all-purpose flour
1/4 cup + 2 tablespoons unsweetened cocoa powder
1 teaspoon baking soda
3/4 teaspoon salt
3/4 cup semisweet chocolate chips
8 ounces white chocolate chips
3/4 cup crushed peppermint candies

  1. Preheat oven to 350°F and line a baking sheet with parchment paper.
  2. In the bowl of a stand mixer, beat the butter and sugar together until light and fluffy, about 1 – 2 minutes. Scrape down the sides and add eggs in, one at a time, until well combined. Scrape down the sides and add in the vanilla extract.
  3. In a medium bowl, whisk together flour, cocoa powder, baking soda, and salt.  Add the dry ingredients and semisweet chocolate chips into the butter mixture and mix on low speed until just combined.
  4. Lightly flour a work surface. Using a rubber spatula, scrape the dough onto the work surface (it will be very sticky) and lightly dust with flour. Using your hands, shape the dough into a ball and divide into two even pieces.
  5. Form the dough into a log by rolling it back and forth. Place the logs onto the prepared baking sheet and press the dough into a longer log that is about 2 inches wide and 3/4 inch high. Make sure to leave enough room between the logs to allow them to spread slightly during baking.
  6. Bake in preheated oven for 35 minutes. Allow to cool on the baking pan for a couple minutes, or until just cool enough to handle.
  7. Using a sharp knife, cut the logs diagonally into 3/4 inch slices. Turn the biscotti onto their side and bake for 10 more minutes to allow the biscotti to crisp up. Allow biscotti to cool for 5 minutes on the pan and move to a wire rack to cool completely .
  8. Once biscotti are cool, it’s time to decorate them. Line the baking pan with a clean sheet of parchment paper.
  9. Place white chocolate chips into a microwave-safe bowl and microwave for about 1 minute, stirring every 20 seconds, or until chocolate is melted and smooth.
  10. Dip one side of the biscotti into the melted chocolate, using the back of a spoon to make sure the biscotti is evenly covered. Sprinkle with crushed peppermint candy. Repeat with the remaining biscotti, re-heating the chocolate as needed.

recipe adapted from Once Upon a Chef


1 Comment

Cheesy Sweet Corn Fritters with Sauteed Tomatoes

Cheesy Sweet Corn Fritters with Sauteed Tomatoes | doughseedough.net

I can’t believe summer is coming to an end; how is it almost September? The last few months flew by – a blur of work, school, and so many great vacations. I haven’t been able to cook much this summer – I spent most of my days traveling for work or traveling for fun – so every moment I get in the kitchen is extra special.

Mike and I finally had a quiet weekend at home to get caught up on housework and finally relax. A trip to the farmers’ market inspired this dish packed full of local foods – sweet corn, gorgeous cherry tomatoes, zucchini, and cheese. Seriously – there is nothing quite like Wisconsin sweet corn (sorry, Cape Cod, but the corn we had out there was terrible).

Cheesy Sweet Corn Fritters with Sauteed Tomatoes | doughseedough.net

I served these fritters with a side of zucchini noodles sautéed in a bit of olive oil and lightly seasoned with some roasted red pepper and garlic seasoning we got from Soulard Spice Shop.

Cheesy Sweet Corn Fritters with Sauteed Tomatoes| doughseedough.net


Cheesy Sweet Corn Fritters with Sautéed Tomatoes
serves 6

3 tablespoons olive oil
1 large red onion, finely chopped and divided
1 red bell pepper, finely chopped
1 – 2 small green chile peppers, minced (optional)
2 ears sweet corn, kernels removed
2 1/3 cup yellow corn meal
1/4 cup all-purpose flour
1 teaspoon sugar
1 teaspoon cayenne pepper, divided
1 cup buttermilk (or combine 1 cup milk with 2 teaspoons white vinegar and let sit for 5 minutes)
1 egg
2 cups shredded sharp cheddar
2 tablespoons basil, roughly chopped
1 pint cherry tomatoes, halved

  1. Heat 1 teaspoon oil in a large non-stick pan over medium-high heat. Add half the onions and sauté for 1 minute. Add the bell pepper and chile peppers and cook for an additional 2 minutes, or until vegetables begin to soften. Add sweet corn and cook for two minutes, or until corn softens. Season with salt and pepper to taste. Set vegetables aside to cool.
  2. Meanwhile, combine the corn meal, flour, sugar, and 1/2 teaspoon of the cayenne in a large bowl. In a small bowl, whisk together buttermilk and egg. Add the buttermilk mixture to the dry ingredients and mix until just combined. Stir in the vegetables, cheese, and basil.
  3. Heat 1 teaspoon oil in a large non-stick pan over medium heat. Add the remaining onion and cook until softened, about 2 – 3 minutes. Stir in tomatoes and season with remaining 1/2 teaspoon of cayenne, salt, and pepper. Cook until tomatoes begin to soften, about 2 minutes. Set aside and keep warm.
  4. Heat a very thin film of oil in a large non-stick frying pan over medium heat. Working in batches, cook 1/4 cup scoops of batter in the oil. Cook 2 minutes per side, or until fritters are golden brown. Repeat with remaining batter, adding more oil as needed. Serve fritters immediately with sautéed tomatoes.

recipe adapted from Weeknight Fresh & Fast


2 Comments

Thick & Chewy M&M Cookies

Thick & Chewy M&M Cookies | doughseedough.net

I took today off work with the hopes of getting stuff done around the house. My garden is a jungle of weeds. I need to dust, vacuum, and do approximately 20 loads of laundry. Instead of doing anything productive, so far today I have made bourbon caramel apple cinnamon rolls, biked to Baskin Robbins for ice cream, and watched a shameful amount of Netflix. I decided to blog a bit so I could cross at least one thing off my “to do” list.

I’ve been meaning to share this cookie recipe with y’all for a while. I first made them in the winter, during my search for the perfect chocolate chip cookie. I tested several recipes, and decided that Cook’s Illustrated’s Thick and Chewy Chocolate Chip Cookies were the winner.

I’ve been making them 4 dozen at a time ever since with a variety of mix-ins – chocolate chips, M&Ms, nuts… basically whatever your heart desires. Mike told me that he prefers them with M&Ms, so I’ve been making them with just M&Ms ever since. The best part of this recipe? Unlike this awesome cookie recipe, it doesn’t require any overnight refrigeration. That means instant gratification. Enjoy them this holiday weekend with some red, white and blue M&Ms! Happy Independence Day, everyone!

Thick & Chewy M&M Cookies | doughseedough.net

Thick and Chewy M&M Cookies
slightly adapted from Cook’s Illustrated

2 1/8 cups all-purpose flour
1/2 teaspoon salt
1/2 teaspoon baking soda
12 tablespoons butter, melted and cooled
1 cup brown sugar
1/2 cup sugar
1 large egg + 1 large egg yolk
2 teaspoons vanilla extract
2 cups of any combination of the following: chocolate chips, chocolate chunks, M&Ms, nuts

  1. Preheat oven to 325°F. Line two baking sheets with parchment paper and set aside.
  2. In a medium bowl, mix together flour, salt, and baking soda; set aside.
  3. In the bowl of a stand mixer, mix butter, brown sugar, and sugar until blended. Mix in egg, yolk, and vanilla. Add in dry ingredients until just combined. Stir in chocolate chips.
  4. To form the cookie: Scoop a heaping tablespoon of dough and form it into a ball. Using the fingertips of both hands, pull the ball into two equal halves. Rotate the halves ninety degrees so that the jagged edges are facing up. Gently press the halves together to form a single cookie dough ball, being careful not to smooth out the jagged surface. Place the dough 2 inches apart on the prepared cookie sheet.
  5. Bake cookies for 10 – 13 minutes, or until cookies are a light golden brown and the outer edges have started to harden. Let cookies cool for 5 minutes on a cookie sheet before transferring to a cooling rack to cool complete.

Thick & Chewy M&M Cookies | doughseedough.net


1 Comment

Rhubarb Ginger Crisp {GF & Vegan}

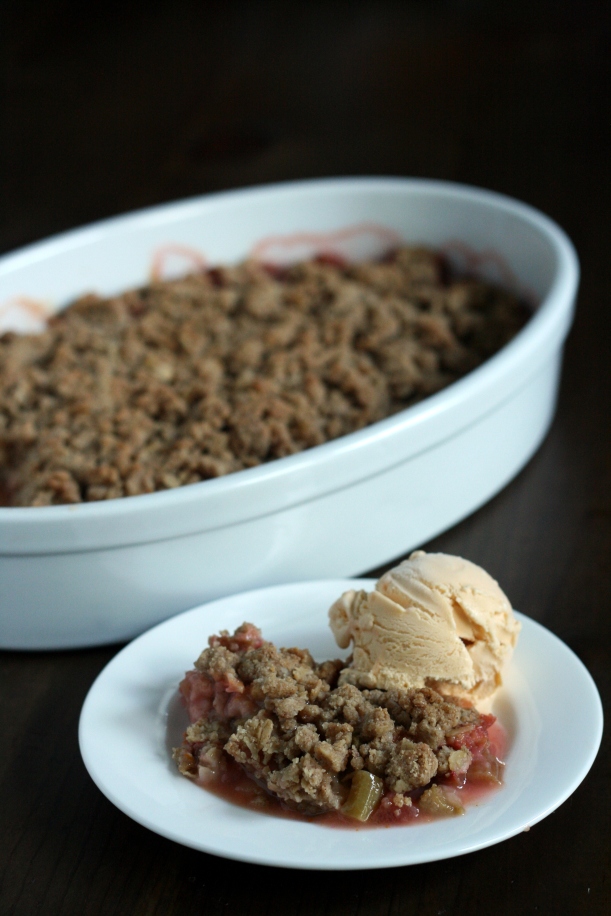
Rhubarb Ginger Crisp {GF & Vegan} | doughseedough.net

I’m a bit of a cheater. This month’s What’s Baking theme was “Baking with Fresh Fruit”. Rhubarb is a veg, but I’m going to go and act like it’s a fruit. Because rhubarb is seriously one of my favorite things to bake with in the summer. Over the years, I’ve drifted towards a preference of rhubarb dishes that are a bit more in-your-face tart. The tartness of rhubarb is one of the reasons I love it so much. I’ve mentioned that I’m obsessed with sour candy, right? Rhubarb is nature’s sour candy and I can’t get enough of the stuff.

Rhubarb Ginger Crisp {GF & Vegan} | doughseedough.net


Want to know how much I loved this? I served this during dinner with Mike’s family and instantly regretted it. I selfishly kept the leftovers to myself and managed to eat them before I crawled into bed. So, do yourself a favor and just make a double batch: one to share and one to keep for yourself. Or just keep both for yourself. Good food is meant to be shared, but really good food is meant to be hoarded and eaten in secret without the threat of someone swooping in to take a bite.

Rhubarb Ginger Crisp

for the filling:
5 cups chopped rhubarb (about 2 pounds)
1/3 cup finely chopped crystallized ginger
1/3 cup sugar
2 tablespoons oat flour
zest and juice of 1 orange

for the topping:
1 cup oat flour
1 cup old fashioned oats
1/2 teaspoon salt
1 teaspoon cinnamon
1/2 cup brown sugar
1 tablespoon freshly grated ginger
7 tablespoons Earth Balance, softened

  1. Preheat oven to 350°F. Butter a 2 quart baking dish and set aside.
  2. To make the filling: In a large bowl, combine the rhubarb, crystallized ginger, sugar, 2 tablespoons oat flour, orange zest and juice. Stir until well combined. Spread filling into the bottom of the prepared dish.
  3. To make the topping: In a separate bowl, stir together the oat flour, oats, salt, cinnamon, brown sugar, and grated ginger. Using your clean hands, work in the softened butter until the mixture coarse crumbs the size of a pea. Spread topping evenly over rhubarb filling.
  4. Bake for 45 minutes to 1 hour in preheated oven or until filling is tender and bubbling and topping is golden brown.


5 Comments

Cheesy Roasted Garlic Pull-Apart Bread

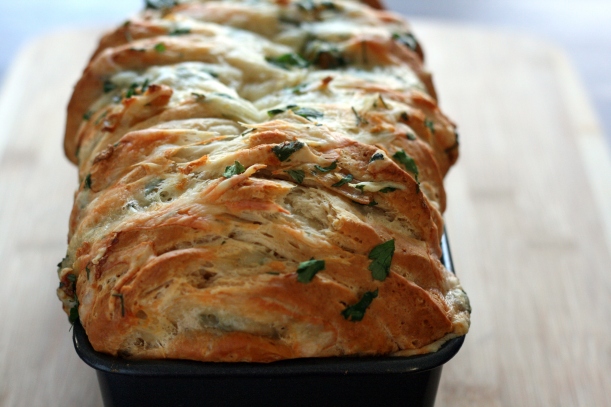
There is something about roasted garlic that makes me swoon. The anticipation of waiting for it to cook up in the oven is almost too much. I’m the one poking at it every ten minutes, impatiently waiting for it to reach that perfect golden color and becomes buttery soft.

Cheesy Roasted Garlic Pull Apart Bread

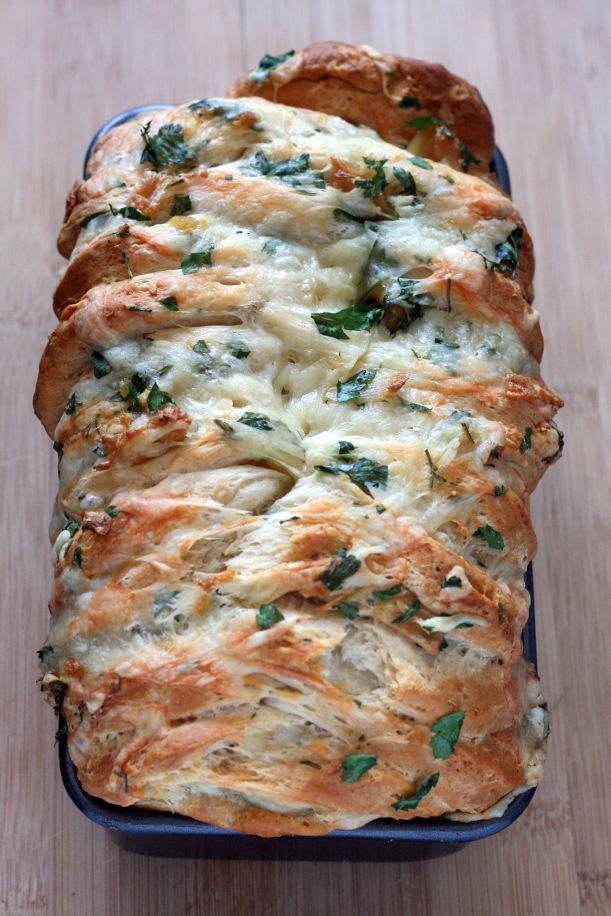
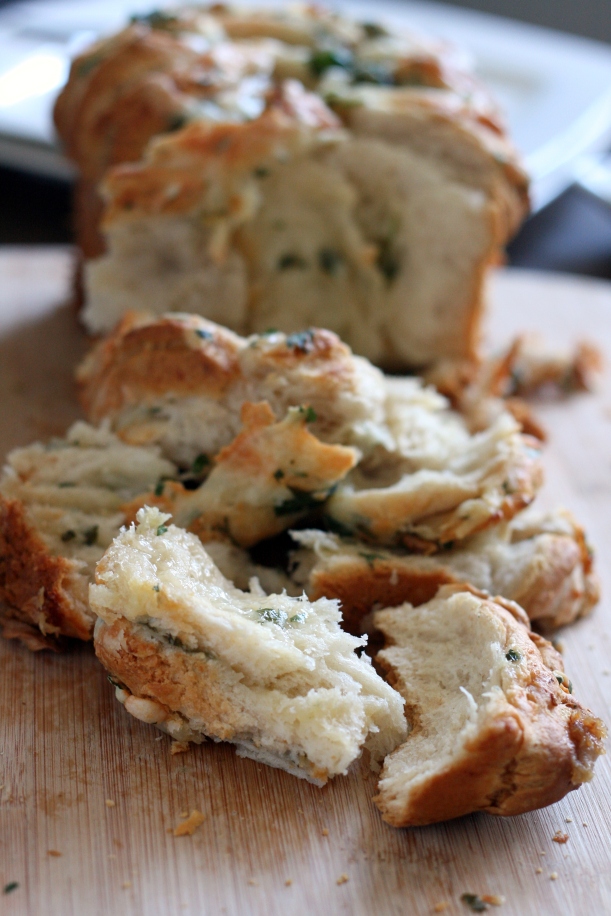
This bread? A killer way to use some roasted garlic. It’s like garlic bread x 1000 and super simple to throw together. Easy, breezy, beautiful… garlic bread.

Cheesy Roasted Garlic Pull Apart Bread

A big thank you to Nicole over at Seven 8 Nine for hosting this month’s ‘baking with garlic’ theme! Love garlic? Want more? Make sure to check out her blog for a roundup of all the  delicious garlicy recipes!

Cheesy Roasted Garlic Pull-Apart Bread

2 heads of garlic
2 teaspoons olive oil
2 cans Pillsbury Grands Homestyle biscuits
8 ounces Swiss cheese, shredded
1 cup flat leaf parsley, roughly chopped

  1. Roast the garlic: Preheat oven to 400°F. Peel most of the paper off the garlic. Cut about ¼-inch off the top of the garlic bulbs to expose the tips of the cloves. Drizzle each head with 1 teaspoon of olive oil and wrap in foil. Place garlic in preheated oven and bake for 35 – 40 minutes, or until golden brown and soft. Unwrap garlic and set aside to cool.
  2. Reduce oven temperature to 350 °F. Lightly grease a 9×5 loaf pan and set aside.
  3. Once garlic is cool enough to handle, gently squeeze the base of the bulb to release the cloves of garlic. Place cheese, garlic, and parsley in a bowl and mix until well combined.
  4. To build the bread: slice biscuits in half horizontally. Lay one half on your workspace and sprinkle with a bit of the cheese and garlic mixture. Top with another half of biscuit. Repeat until you have a stack 6 biscuits high. Transfer this to your prepared loaf pan and repeat until the pan is full. (You may have leftover biscuits and/or cheese – it’s ok! Sprinkle any remaining cheese on top of the biscuits in the pan and bake the leftover biscuits according to package directions.)
  5. Bake in preheated oven for 45 minutes or until golden brown. Serve warm.

recipe slightly adapted from Real Food by Dad

Cheesy Roasted Garlic Pull Apart Bread


Leave a comment

Brownie Cake with Biscoff Frosting

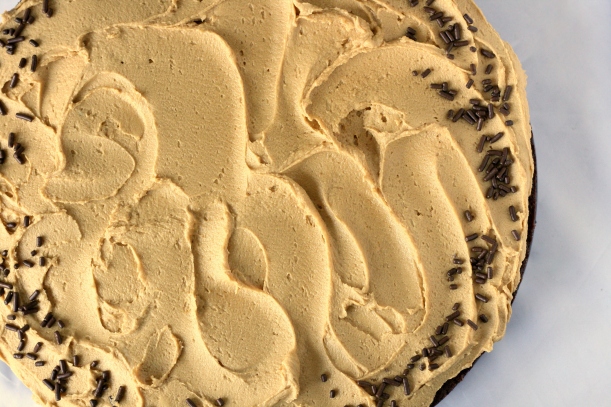
Brownie Cake with Biscoff Frosting |doughseedough.net

I can’t really explain my obsession with Biscoff cookies. I love them so much that my sister hoards them from her travels and gives them to me. On her last trip back from the UK, she brought me a jar of Biscoff spread along with a handful of the cookies. The spread sat in my pantry for months; I didn’t know what to do with it. She threw some ideas at me – eat it with a spoon! on bread with Nutella! with a banana! – but none of them really sounded special enough to me. This was my first experience with Biscoff spread. I wanted everything to be perfect. After searching a bit, I found this recipe for a Biscoff Brownie Cake and I was sold.

Brownie Cake with Biscoff Frosting |doughseedough.net

I will admit that I ate a disgusting amount of frosting with a spoon. And I may have eaten a spoonful of the spread when I was making the frosting, too. Maybe.

Brownie Cake with Biscoff Frosting
slightly adapted from Bakers Royale

for the brownie:
12 tablespoons unsalted butter
6 ounces unsweetened chocolate, roughly chopped
2 1/4 cups granulated sugar
1/2 teaspoon salt
3 teaspoons vanilla extract
3 large eggs
1 1/2 cups all purpose flour
3 tablespoons cocoa powder

for the frosting:
1/2 cup butter, room temperature
1 cup Biscoff spread
1 1/2 cups powdered sugar, sifted
1 – 3 tablespoons milk

  1. Preheat oven to 350°F. Line a 9-inch springform pan with parchment paper and butter parchment paper. Set aside.
  2. To make the brownie: Combine butter and chocolate in a large microwave-safe bowl. Heat in 30 second increments, stirring after each increment, until chocolate is melted and mixture is smooth. Set aside to cool slightly. Stir in sugar, salt, and vanilla until blended. Add in eggs, one at a time, stirring after each egg until well blended. Stir in flour and cocoa powder and mix until just combined. Scrape batter into prepared springform pan and smooth out the top with a spatula. Bake for 35 – 40 minutes, or until a toothpick inserted into the center comes out with a few moist crumbs.
  3. Set pan on a wire rack to cool. Run a knife around the edge of the brownie and release from the springform pan. Flip brownie onto a flat surface and peel off parchment paper. Turn brownie right-side up and allow to cool completely.
  4. To make the Biscoff frosting: Beat butter and Biscoff spread on medium speed until smooth. Add in powdered sugar and milk until mixture is smooth. Add more milk and/or powdered sugar to reach desired consistency.
  5. To assemble: Spread frosting on top of cake and smooth with an offset spatula. Decorate with chocolate sprinkles, if desired.

Brownie Cake with Biscoff Frosting |doughseedough.net


3 Comments

Carbonara Pizza

Carbonara Pizza | doughseedough.netI love weekends more now than I ever did before. Weekends are associated with quality time with Mike and my pups; something I took for granted when I could come home to them every night. Weekends are associated with cooking new foods since cooking for one on during the week isn’t really all that fun. I love binge watching shows on Netflix with Mike, going for long walks with the dogs, and cooking up food for us to enjoy as a couple.

Carbonara Pizza | doughseedough.net

This weekend, I was inspired to make a carbonara pizza after I bought some farm fresh eggs. The grocery store eggs don’t even come close to fresh eggs. Really. I wanted to showcase the eggs in something wonderful. What better way to do that than incorporate the eggs into a creamy sauce for the pizza and then crack a few on top? Eggs, cheese, bacon – you honestly can’t go wrong with that combination.

Carbonara Pizza | doughseedough.net

Carbonara Pizza

for the dough:
3 cups all purpose flour
1 – .25 ounce package active dry yeast (2 1/4 teaspoons)
2 tablespoons vegetable oil
1 teaspoon salt
1 tablespoon sugar
1 cup warm water (~110°F)

for the pizza:
4 ounces mozzarella, shredded
6 ounces Parmesan, grated and divided
5 large eggs, divided
8 ounces bacon, diced
2 sprigs thyme
2 cloves garlic, smashed
4 green onions, thinly sliced
freshly ground black pepper

  1. Preheat oven to 450°F. Place a pizza stone or baking sheet in the middle of the oven to heat up for at least 30 minutes.
  2. To make the dough: Fit stand mixer with dough hook. Combine dry ingredients in mixing bowl. Pour in oil and water. Mix on low speed until dough pulls away from side of bowl and gathers around hook and is smooth and elastic. Place dough in a large lightly greased bowl and cover loosely with plastic wrap. Set aside and let rise for 30 – 40 minutes.
  3. While dough is rising, cook bacon in a large pan with thyme and garlic until crispy. Remove cooked bacon from the pan and drain on a paper towel. Discard bacon drippings, garlic, and thyme.
  4. To make the sauce: Place 4 ounces Parmesan, 2 eggs, and 1 teaspoon of black pepper into a food processor and blend until smooth.
  5. To form the dough: Place dough on a flat surface. Gently press the center to create a large dimple. Gently push it outward from the center with your fingertips. Pick up the dough circle and, holding it under the rim, turn the dough in a circle; gravity will gently stretch the dough. Drape the dough over the back of your hands and gently stretch outward while rotating. Your pizza dough should have a thinner middle and a thicker edge. Place the dough onto a piece of parchment paper.
  6. Spread the sauce over the dough. Sprinkle shredded mozzarella on top, followed by bacon and green onions. Top with remaining 2 ounces of grated Parmesan. Slide pizza onto preheated pizza stone and bake for 10 minutes.
  7. Remove pizza from oven and use a large spoon to create 3 indentations on the top of the pizza. Crack the 3 remaining eggs into each of the indentations and return the pizza to the oven for 3 – 5 minutes, or until the egg whites are set but the yolk is still runny.
  8. To serve, use a knife to break the yolk and spread it around. Season with freshly ground black pepper before serving, if desired.

Carbonara Pizza | doughseedough.net


2 Comments

My Favorite Slow Cooker Ribs

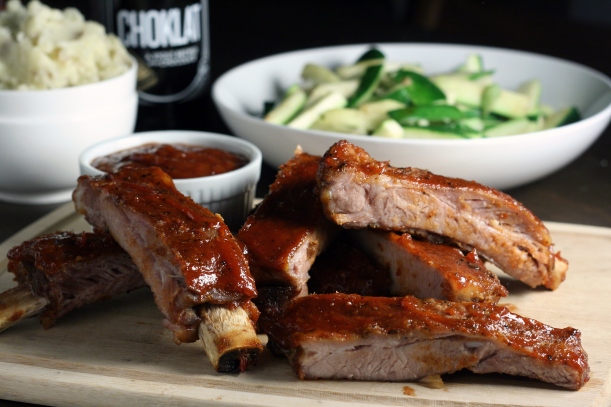
Slow Cooker Ribs | doughseedough.net

Years ago when I first started blogging, I posted about slow cooker ribs. To this date, it’s one of the most popular recipes on the blog. My cooking techniques and recipes have evolved over the years and I thought that it might be a good time to make an updated post about my favorite ribs. Instead of baking the ribs first, I bake them after the slow cooking to get the caramelized stickiness that we all know and love. I also start the ribs out with a rub to give them an extra dose of flavor.

I know that some people might consider sticking ribs into the slow cooker sacrilegious, but it works for me and I think the results are pretty stellar! Plus, I don’t know the first thing about starting up a grill. That’s Mike’s domain.

Slow Cooker Ribs | doughseedough.net


As a side note – that beer you see in the back? Amazing. Two thumbs up for Southern Tier and their amazing Choklat stout.

Slow Cooker Ribs

3 pounds baby back ribs
1/2 cup light beer (don’t use the previously mentioned Choklat!)
1 onion, sliced
2 cloves garlic, smashed
2 1/2 cups barbecue sauce (storebought or homemade), divided

for the rub:
2 tablespoons paprika
1 teaspoon freshly ground black pepper
1 teaspoon salt
1 teaspoon chili powder
1 teaspoon garlic powder
1 teaspoon onion powder
1/2 teaspoon cayenne pepper (optional)

  1. Make the rub: mix all ingredients together.
  2. Season ribs evenly with the rub to taste. Brush 1 cup of the barbecue sauce over the ribs. Arrange ribs along the side of the slow cooker insert or cut ribs into thirds or halves and place them in the bottom of the insert. Pour in beer and add onion and garlic cloves. Cook on high for 3.5 – 4 hours or until ribs are tender but not falling off the bone.
  3. Preheat oven to 350°F. Transfer ribs to a baking sheet and baste with remaining barbecue sauce. Bake for 10 – 15 minutes, turning every 5 minutes and basting with additional sauce as needed.


2 Comments

Bananas Foster Bread

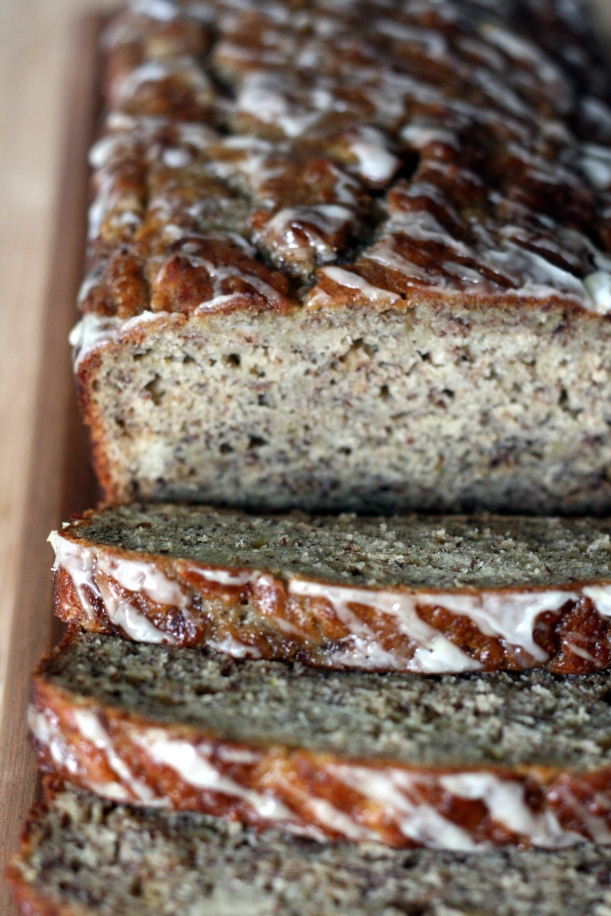
How do you make banana bread better? Add booze, of course! This recipe is a “lightened up” version, but the bananas cooked in brown sugar, butter, and rum will make you forget that it’s a bit healthier than your typical banana bread.

Heather at Hezzi-D’s Books and Cooks hosted this month’s What’s Baking Challenge: Bread! I can’t wait to see what the other ladies have baked up!

Whip up a batch of this goodness for breakfast or brunch and win over the heart of everyone who takes a bite. Valentine’s Day is coming up (nudge nudge nudge)!

Bananas Foster Bread | doughseedough.net

Bananas Foster Bread

1 1/2 cups mashed ripe banana
1 cup packed brown sugar, divided
6 tablespoons butter, melted and divided
1/4 cup dark rum, divided
1 teaspoon vanilla extract
1/3 cup plain fat-free Greek yogurt
2 large eggs
1 1/2 cups all-purpose flour
1/4 cup ground flaxseed
3/4 teaspoon baking soda
1/2 teaspoon salt
1/2 teaspoon ground cinnamon
1/8 teaspoon ground allspice
cooking spray
1/3 cup powdered sugar

  1. Preheat oven to 350°. Lighting coat a 9×5-inch loaf pan with cooking spray and set aside.
  2. Combine banana, 1/2 cup brown sugar, 5 tablespoons butter, and 3 tablespoons rum in a nonstick pot. Cook over medium heat until bubbly; remove from heat and let cool. Stir in vanilla extract, yogurt, remaining 1/2 cup brown sugar, and eggs. Beat until well combined.
  3. In a separate bowl, combine flour, flaxseed, baking soda, salt, cinnamon and allspice. Whisk together until blended. Carefully pour dry ingredients into wet ingredients and stir until just combined. Pour batter into prepared loaf pan. Bake for 1 hour or until a wooden toothpick inserted into the center comes out clean. Plan pan on a wire rack until cool enough to handle. Remove bread from pan and place on wire rack.
  4. Combine remaining 1 tablespoon melted butter, 1 tablespoon rum, and powdered sugar; whisk until smooth. Drizzle over the bread. Serve warm or at room temperature.

slightly adapted from Cooking Light


2 Comments

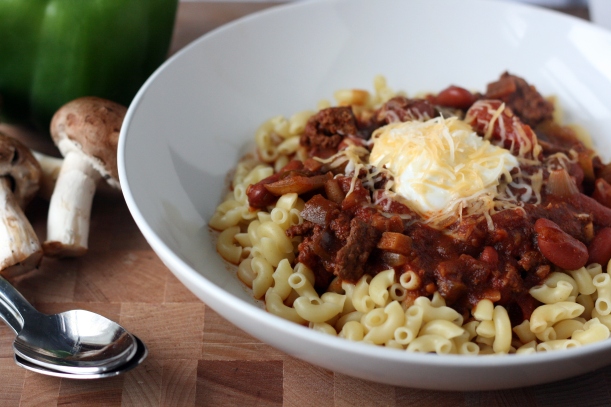
Slow Cooker Beef & Veggie Chili

Is it cold where you live? Do you have mountains of snow outside your window? Are you short on time? Do you hate doing dishes? Do you love comfort food that warms you up? If you answered yes to any or all of those questions, this chili is for you. Tossing everything into the slow cooker means you don’t have to spend hours standing over the stovetop, stirring and tending to your chili. Plus, who doesn’t love coming home after a long day to a house that smells amazing?

Slow Cooker Beef & Veggie Chili | doughseedough.net

Slow Cooker Beef & Veggie Chili

1 tablespoon olive oil
1 pound 93% lean ground beef
2 medium onions, diced
8 cloves garlic, minced
1/3 cup chili powder
1 tablespoon ground cumin
2 bell peppers, diced
8 ounces cremini mushrooms, chopped
16 ounces tomato sauce
2 (15-ounce) cans diced tomatoes
2 (15-ounce) cans kidney beans, drained and rinsed
1 jalapeno, seeds removed and minced (optional)

for serving (optional):
cooked macaroni noodles
fat free Greek yogurt or sour cream
shredded cheese
thinly sliced green onions
jalapeno slices
hot sauce
diced onions

  1. Heat oil in a large skillet over medium-high heat. Add beef, onions, and garlic and cook until beef is no longer pink, about 7 minutes; stir with a spoon to break beef up into smaller pieces. Add chili powder and cumin and stir to coat. Cook for 1 – 2 minutes or until fragrant, stirring frequently. Transfer mixture to a slow cooker.
  2. Stir in bell peppers, mushrooms, tomato sauce, diced tomatoes, and kidney beans. Cover slow cooker and cook for 6 hours on high or 8 hours on low. Season with salt and pepper to taste before serving  toppings of your choice.