DoughSeeDough

a balanced plate with room for dessert


1 Comment

Healthy Oatmeal Craisin Cookies

Oatmeal cookies are the seems-healthy-but-are-not-really-healthy cookie. Sure, it’s got oatmeal, but that oatmeal is usually accompanied by a lot of butter and sugar. But these oatmeal cookies are different. These just might be the healthiest cookie I’ve ever made. They are chock full of the good stuff: bran, whole wheat flour, and even some flax.

In fact, these little cookies are almost too packed full of healthy ingredients that it seems wrong to call them cookies… but they look like a cookie. And they taste like a cookie… so a cookie it is!

Healthy Oatmeal Craisin Cookies | doughseedough.net

Healthy Oatmeal Craisin Cookies
makes 24 cookies

1/3 cup wheat bran
2/3 cup whole wheat flour
1 teaspoon baking powder
1/2 teaspoon baking soda
2 tablespoons unsalted butter, room temperature
1/2 cup sugar
1/2 cup packed brown sugar
1 tablespoon flax seed meal mixed with 3 tablespoons water
1/4 cup unsweetened applesauce
1 teaspoon vanilla extract
1 1/2 cups old-fashioned rolled oats
1/2 cup dried cranberries or raisins

  1. Preheat oven to 375°F. Line two baking sheets with parchment paper and set aside.
  2. In a small bowl, whisk together wheat bran, flour, baking powder, baking soda, and salt.
  3. In a large bowl, beat butter and sugars together on medium speed with an electric mixer until fluffy. Mix in flax, applesauce, and vanilla until combined. Mix in flour mixture, oats, and cranberries until combined.
  4. Drop byrounded tablespoonfuls onto prepared baking sheet. Gently flatten with palm of your hand. Bake in preheated oven for 12 – 15 minutes or until golden brown. Let cool completely on baking sheets and store tightly covered.


4 Comments

Banana Espresso Chocolate Chip Muffins

Lightened Up Banana Espresso Chocolate Chip Muffins | doughseedough.net

I’m a cookbook junkie. I have shelves and shelves of cookbooks of all different types. I seriously love them. I honestly love just having them – I don’t cook a lot from them. In fact, most of my cookbooks get looked at once, maybe twice a year. As always, there are exceptions. Baked: New Frontiers in Baking is my most recent purchase and I’m obsessed with it. Every single dish I’ve made from it has been amazing. If you don’t own this book, I beg you – BUY IT!

Now, these muffins… so so good. In fact, I made these about 2 months ago for some friends. They were gobbled up before I even got a chance to take a photo for the blog. Thankfully, these muffins are also very easy to make and really tasty so I didn’t mind having to make these again! In fact, I whipped these up before heading to work on Friday. It only took about 20 minutes of prep time and another 20 for baking. I  made a few adjustments so they would be a bit healthier and I loved how they turned out!

Lightened Up Banana Espresso Chocolate Chip Muffins | doughseedough.net

Banana Espresso Chocolate Chip Muffins
very slightly adapted from Baked: New Frontiers in Baking

3 cups mashed, very ripe bananas (6 – 7 medium – large bananas)
1 cup sugar
1/2 cup packed brown sugar
1 stick unsalted butter, melted
1 cup unsweetened applesauce
1/2 cup skim milk
2 large eggs
1 1/2 cup all purpose flour
2 tablespoons instant coffee granules
3 teaspoons baking soda
2 teaspoons salt
2 cups bittersweet chocolate chips

  1. Preheat oven to 350°F. Line 2-12 cup muffin pans with liners or grease with nonstick spray.
  2. In a medium bowl, stir together bananas, sugar, brown sugar, butter, applesauce,  milk, and eggs.
  3. In a large bowl, whisk together flour, instant coffee, baking soda, and salt. Make a well in the middle of the dry ingredients and slowly pour in wet ingredients. Stir until just combined. Fold in chocolate chips.
  4. Fill prepared muffin cups with batter, filling each one 3/4 full.
  5. Bake for 20 – 25 minutes, or until a toothpick inserted into the center comes out clean.
  6. Let cool in pan for 10 minutes before removing the muffins and placing on a cooling rack to cool completely.


3 Comments

Strawberry Rhubarb Coffee Cake

Spring means rhubarb to me. I’ve been lucky enough to get a fair share of rhubarb from my in-laws and parents over the years to bake with. But, this weekend, things changed!

I was able to take my first cutting off our rhubarb plant! We transplanted it two years ago and the past two years it’s been extremely sad looking and scraggly. I actually thought it had died after it got trampled during our garage re-siding project last summer. It looked dead, that’s for sure.

Then this year, it miraculously grew into beautiful stalks. I got a mere half pound off of it, so it still has a long ways to go, but it’s a great start!

This was originally meant to be a 9×13 pan of coffeecake, but all of my 9×13 pans have disappeared. I really need to keep better track of my bakeware. Thankfully, the muffin pan worked just as well 🙂

Strawberry Rhubarb Coffee Cake | DoughSeeDough.net

Strawberry Rhubarb Coffee Cake
makes 1 9×13 cake or 24 individual cakes

for the filling:
1/2 pound fresh rhubarb, sliced (about 2 cups)
1 pound strawberries, hulled and sliced (about 3 cups)
2 tablespoons lemon juice
1/2 teaspoon freshly grated ginger
1/4 cup cornstarch

for the cake:
2 cups all purpose flour
3/4 cup sugar
1 teaspoon baking powder
1 teaspoon baking soda
1/2 teaspoon salt
1 cup butter, cut into small pieces
1 1/2 cups buttermilk
2 eggs
1 teaspoon vanilla extract

for the topping:
1/4 cup butter
3/4 cup all purpose flour
1/3 cup sugar
1/3 cup brown sugar
1/2 teaspoon freshly grated ginger

  1. Preheat oven to 350°F. Line a muffin pan with muffin liners or spray with nonstick spray.
  2. To make the filling: in a large saucepan, combine rhubarb, strawberries, and lemon juice. Bring to a simmer and let cook for 5 minutes. Stir in sugar and cornstach. Bring to a boil and let cook for 2 minutes or until thickened, stirring frequently. Remove from heat and set aside.
  3. To make the cake: whisk together flour, sugar, baking powder, baking soda, and salt in a large bowl. Cut in butter until mixture resembles coarse crumbs. In a medium bow, stir beat buttermilk, eggs, and vanilla until wellc ombined. Pour into crumb mixture and stir until combined.
  4. To make the crumb topping: melt butter in a small pan over medium heat. Stir in flour, sugar, brown sugar, and ginger until the mixture resembles coarse crumbs.
  5. Fill prepared muffin cups half way with batter. Add a heaping tablespoon of filling on top and drop 1 tablespoon of batter on top of filling. Sprinkle with  crumb topping.
  6. Bake for 25 – 30 minutes. Cool in pan for 5 minutes before moving a wire rack to cool completely.

recipe adapted from Taste of Home


1 Comment

Nutella Chocolate Chip Biscotti

I’m not a coffee drinker. Or a dunker. So, biscotti and I shouldn’t get along. But we do.

You see, these biscotti are delicious even when they are eaten plain. In fact, they are good enough to eat at breakfast, lunch, dinner, and for snacks. These biscotti were perfectly crisp yet still soft – nothing is worse than a biscotti that is break-your-teeth-hard. They weren’t overly sweet, either. So, whip yourself up a batch of these and enjoy!

Nutella Chocolate Chip Biscotti | doughseedough.net

Nutella Chocolate Chip Biscotti
very slightly adapted from Tracey’s Culinary Adventures

1 stick unsalted butter, room temperature
2/3 cup sugar
1/2 cup (6 oz) Nutella,  room temperature
3 large eggs,  room temperature
2 teaspoons vanilla
2 3/4 cups all-purpose flour
1/2 teaspoon baking powder
1/4 teaspoon salt
1/2 cup bittersweet chocolate chips

  1. Preheat oven to 350°F.  Line a baking sheet with parchment paper.
  2. In a large bowl, beat the butter and sugar on medium speed until smooth and slightly lightened in color, 2-3 minutes.  Add Nutella to the bowl and mix on medium speed until well combined, scraping down the sides of the bowl with a rubber spatula as needed.  Add the eggs, one at a time, beating well (15 to 20 seconds) and scraping down the sides of the bowl after each addition.
  3. In a medium bowl, whisk together the flour, baking powder, and salt.  Add flour mixture to Nutella mixture and beat on low speed until combined; scrape down sides of bowl as needed.
  4. Add chocolate chips and mix on low speed until just blended.
  5. Divide the dough in half and on a lightly floured surface, shape each half of dough into a 13-inch log.  Place the logs on the prepared baking sheet 4 inches apart.  Gently press down on the logs to flatten them slightly until they are about 2 inches across.
  6. Bake for 30-35 minutes, or until the logs are firm to the touch.  Transfer the baking sheet to a cooling rack and let the logs cool completely.
  7. Turn the oven down to 275°F and position racks in the upper and lower thirds of the oven.  Transfer the cooled logs to a cutting board and use a serrated knife to slice the logs on the diagonal into 1/2-inch thick cookies.  Line a second baking sheet with parchment paper.  Place the cookies, cut side down, on the prepared baking sheets.  Bake for 30-40 minutes, turning the biscotti over halfway through, until the cookies are dry.  Transfer to a rack to cool completely.


1 Comment

Hazelnut Tiramisu Brownies

hazelnut tiramisu brownies | doughseedough.net

When Jessica over at My Baking Heart posted these tiramisu brownies, I knew I had to make them. Immediately. Usually I find a recipe that calls out to me and put it on my “to do” list. These babies almost skipped every other dish I had on my list and I made them as soon as I could.

A little tip – if you don’t want the 8 egg yolks to go to waste, do as I did and use 5 of them in these Layered German Chocolate Cupcakes. Then you will have not one, but TWO super decadent treats. It’s probably a good idea to share 😉

hazelnut tiramisu brownies | doughseedough.net

Hazelnut Tiramisu Brownies
yield: 15 large brownies

2 oz dark chocolate chips
16 tbsp unsalted butter, room temperature
1 1/4 c granulated sugar, divided
4 whole large eggs
8 large egg whites, divided
1 cup cake flour
2 tablespoons instant coffee
1/4 cup chopped, roasted hazelnuts
8 ounces Mascapone cheese, room temperature
8 ounces Neufchatel cheese, room temperature
2 teaspoons vanilla extract
1 package ladyfingers
1 cup coffee
2 tablespoons dark rum

  1. Preheat oven to 350°F. Butter and flour a 13×9 baking pan and set aside.
  2. Place chocolate chips in a large microwavable bowl and microwave in 30 second intervals until smooth and melted, stirring after each time. Let cool slightly.
  3. Pour melted chocolate into a mixing bowl fitted with the paddle attachment. Beat in butter on medium speed until well incorporated. Add in 1 cup of sugar, 4 whole eggs, and 4 egg whites, mixing until well blended. Mix in flour and instant coffee on low speed until just combined. Carefully fold in hazelnuts. Remove 1 cup of batter and pour remaining batter into prepared pan.
  4. Place lady fingers rounded-side down on top of the batter, pushing down slightly on each one. Combine coffee with rum and brush onto the ladyfingers until saturated.
  5. In a separate bowl, combine mascarpone cheese, Neufchatel cheese, 1/4 cup sugar, 4 remaining egg whites, and vanilla extract. Carefully spread over the ladyfingers.
  6. Drop dollops of remaining brownie batter on top of the cheese layer and swirl gently with a knife.
  7. Bake for 45 – 50 minutes, or until brownies begin to pull away from the sides of the pan and the center is almost set. Let cool completely in pan before cutting.

Recipe slightly adapted from Chef Maureen Joyce & Barista Prima Coffee house via My Baking Heart


1 Comment

Layered German Chocolate Cupcakes

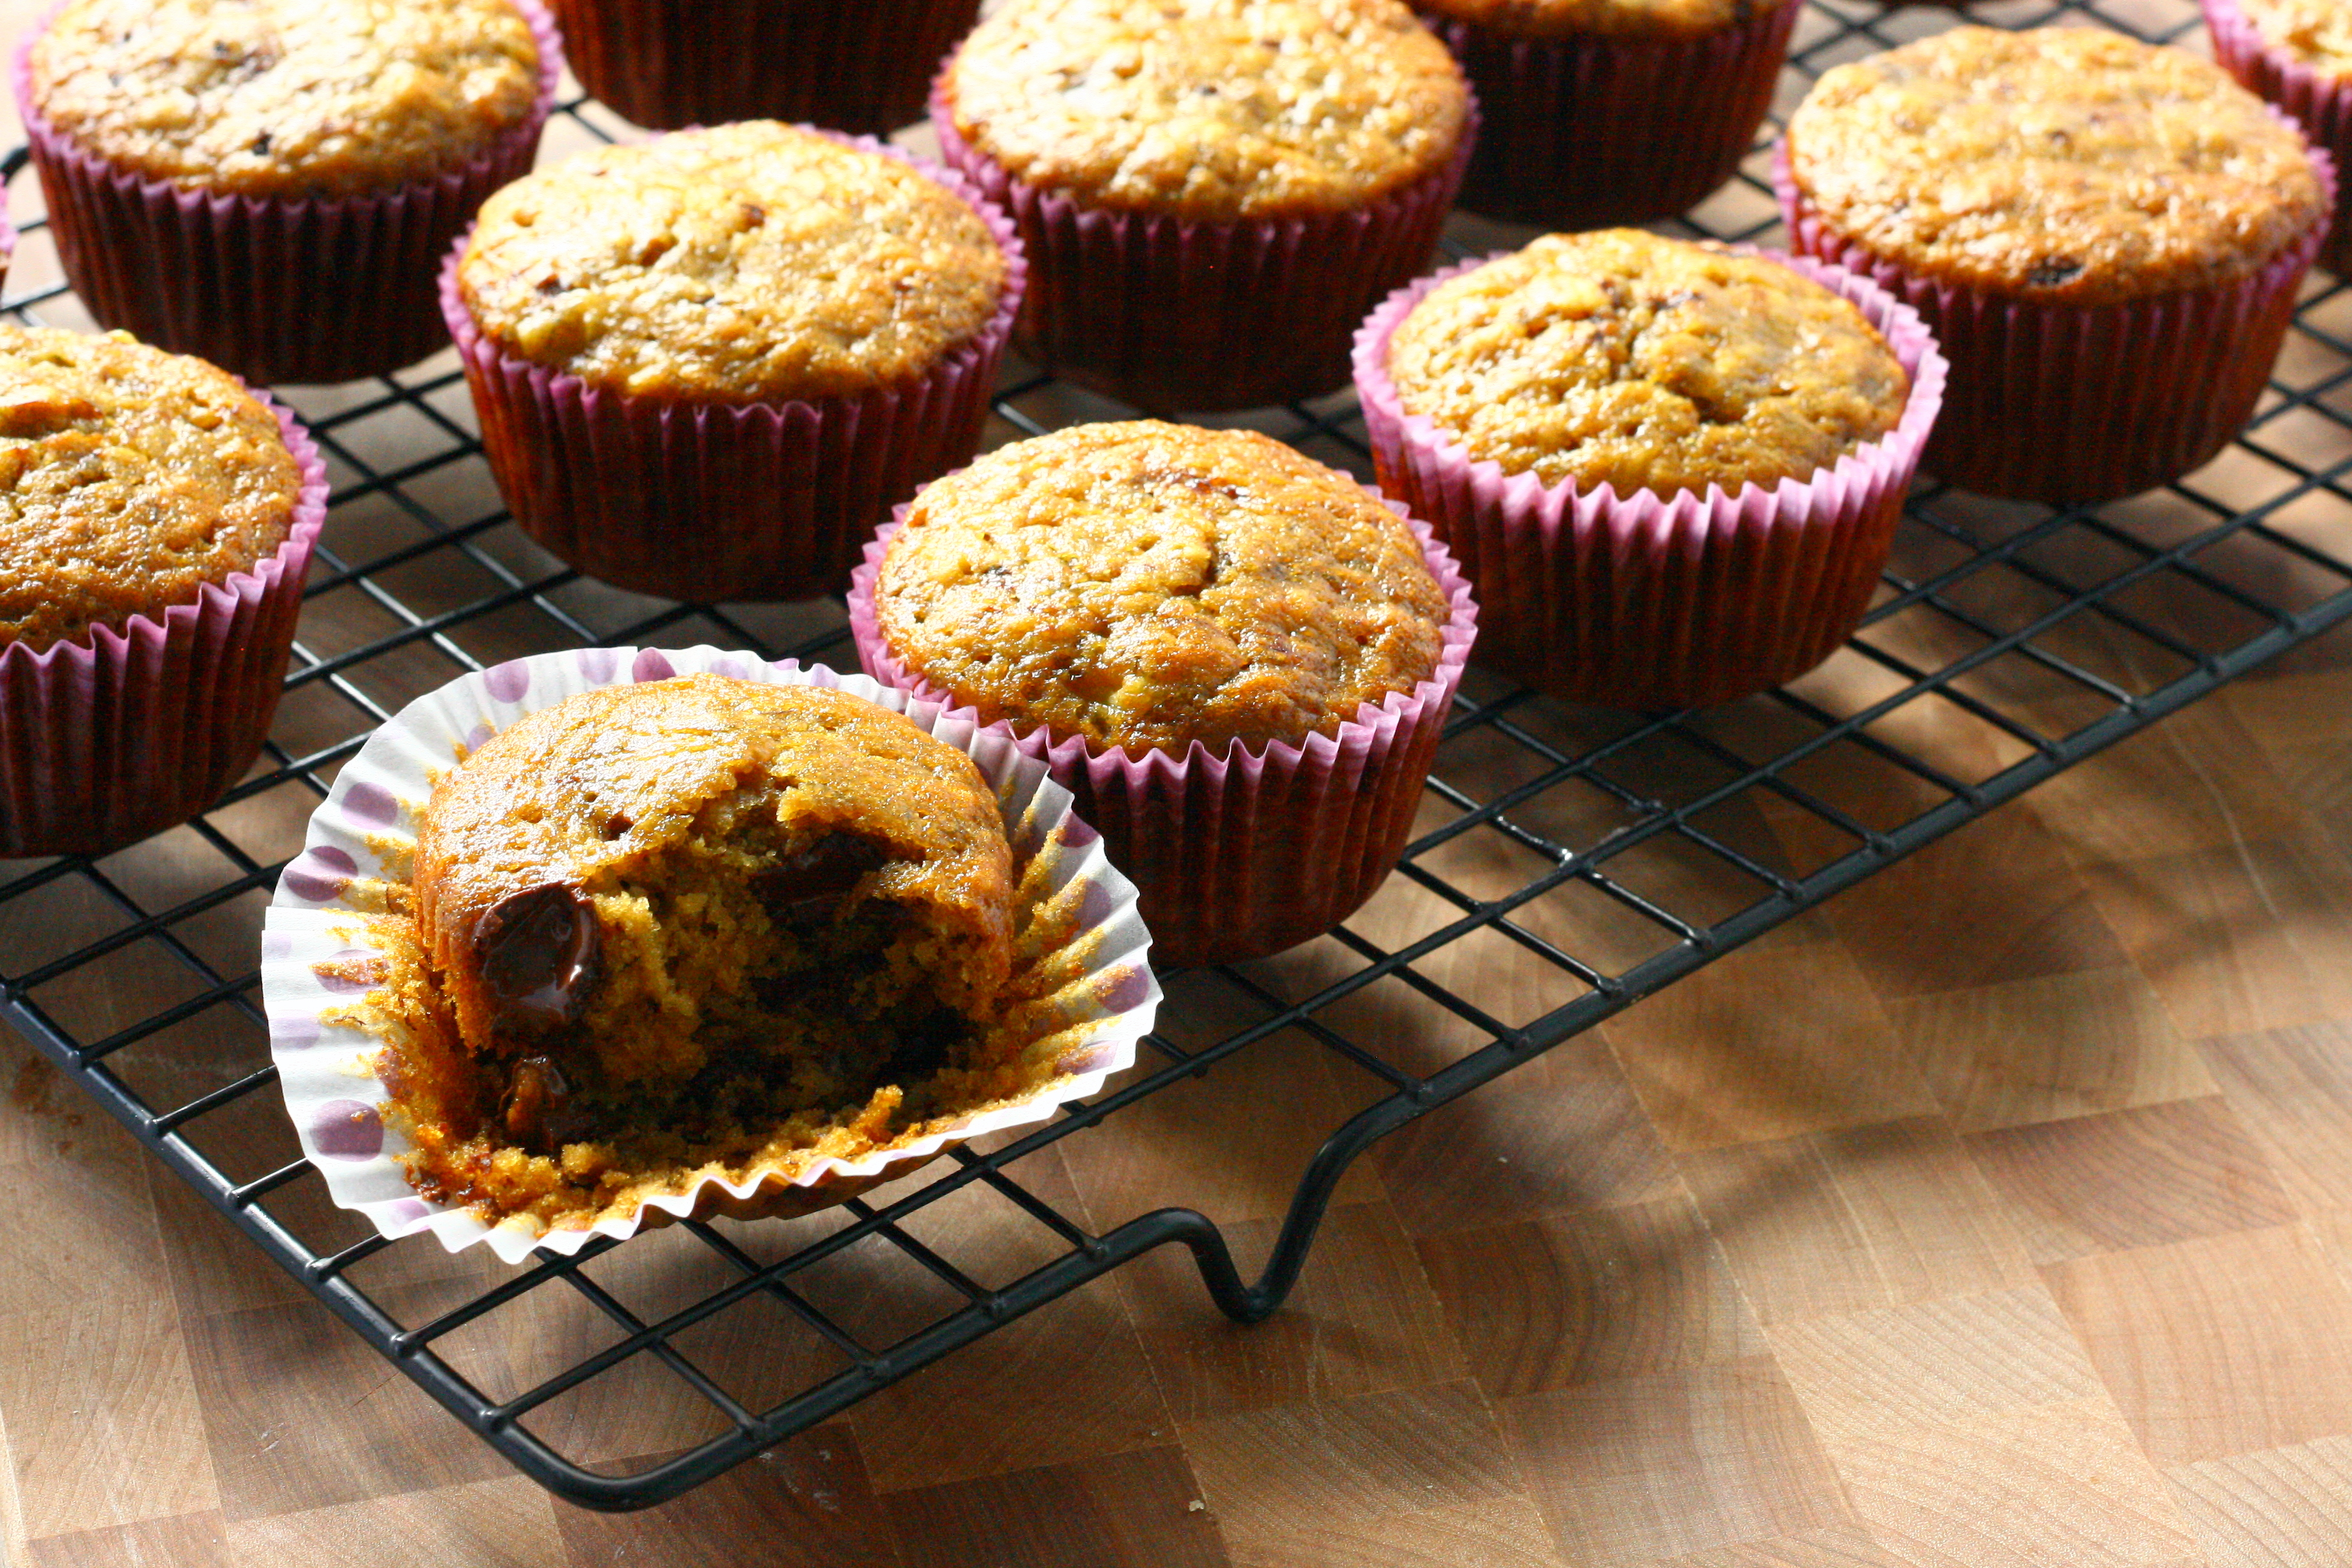
I rarely crave cake. When I do, it’s usually one of two types: a white cake with a strawberry filling or a chocolate cake with nuts.

german chocolate cupcakes | doughseedough.net

So German chocolate cupcakes? They totally hit the spot.

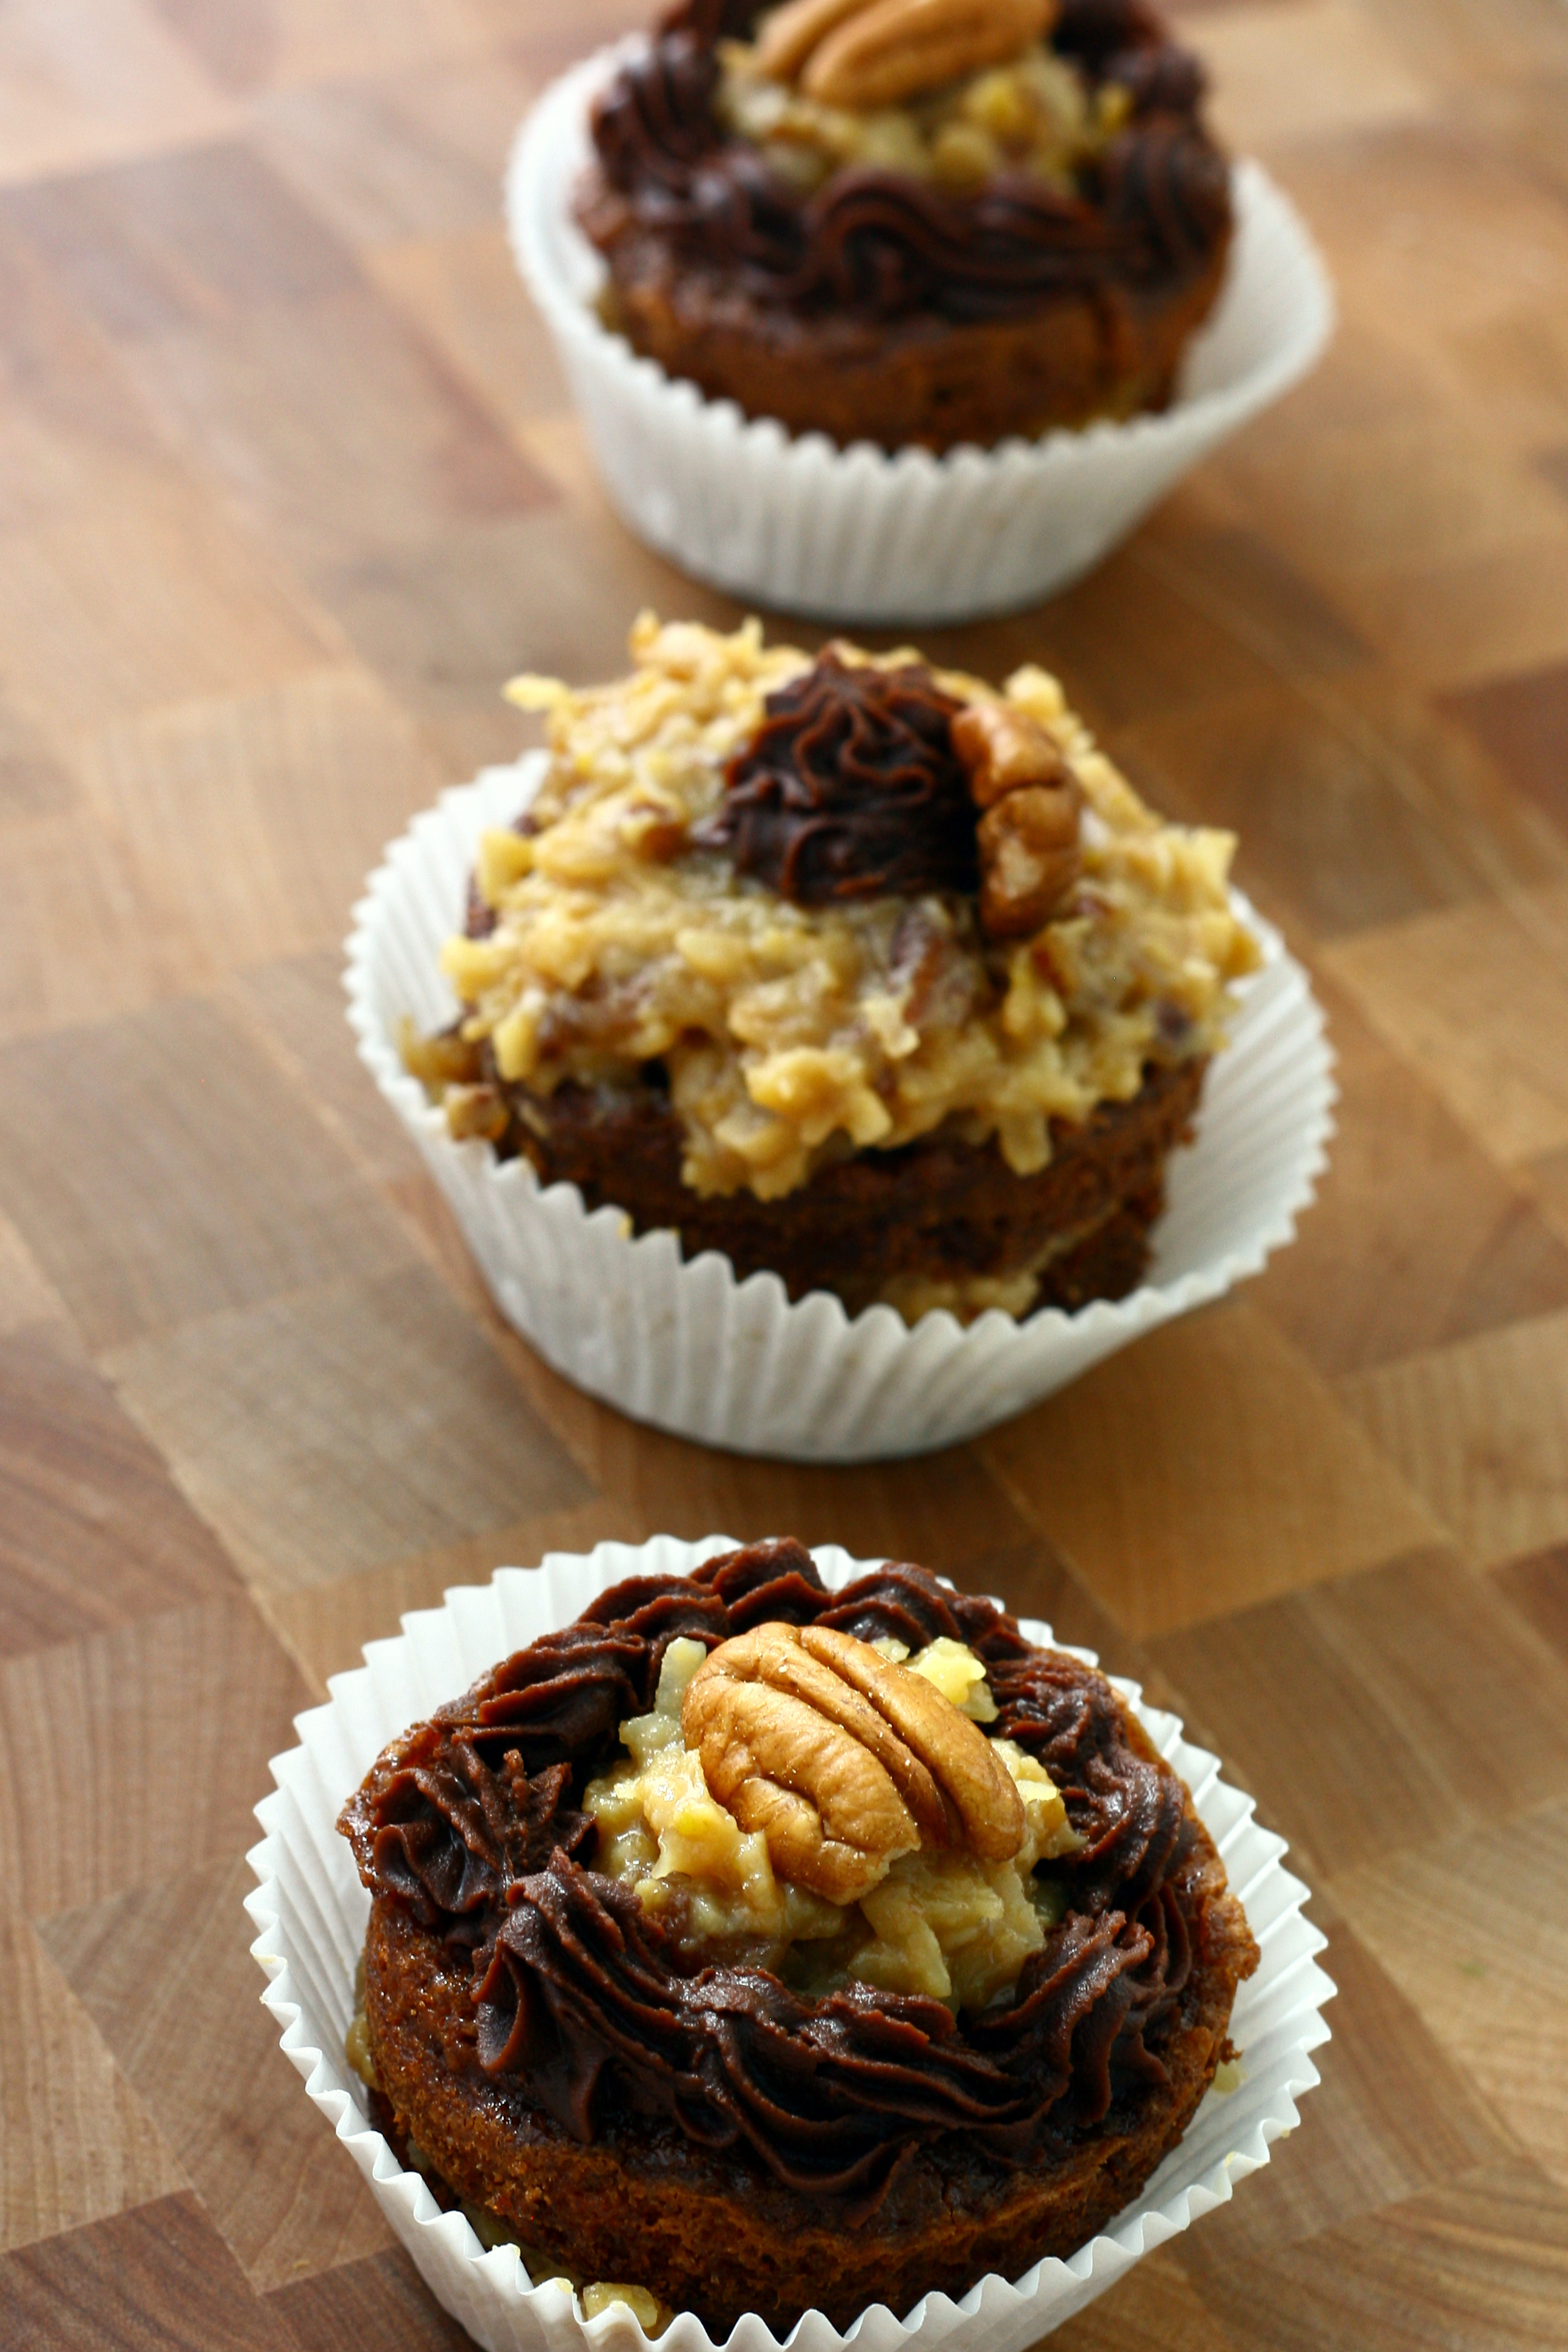
These bad boys were a two day project for me. It all started on Sunday night after a long, long day. I baked the cupcakes and decided that I was simply too exhausted to deal with them any more. I let them cool, scooped them out of the pans, and covered them before collapsing in bed.

On Monday morning, I got ready for work as fast as I could and whipped together the chocolate ganache and coconut-pecan filling for the cupcakes. After cooking them, I scooped them into bowls and let them hang out for the day while I went to work. After a crazy day at work, I finally got around to decorating and photographing them. Phew!

german chocolate cupcakes | doughseedough.net

A few lessons I learned along the way:

  • These cupcakes are fragile. I almost threw them all away after I spent what seemed like a million hours carefully removing them from the cupcake pans. I’ll probably opt to use cupcake liners in the future, even though it won’t look as nice.
  • Splitting this into a 2-day project was smart. The cupcakes were still very moist the next day (and for days after).
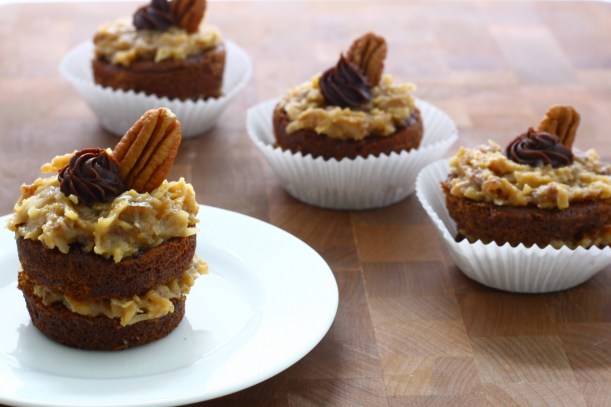
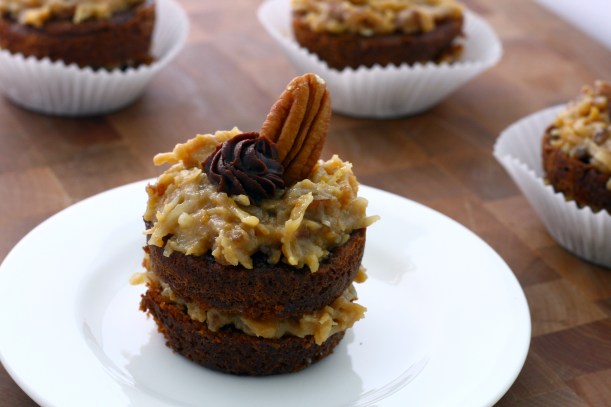
  • These are delicious (and dangerous to have around). How good are they? Well, I took the cupcakes that I failed to remove in one piece and layered them in a ramekin with the filling and ganache to create a little German chocolate cake parfait of sorts. I couldn’t bear to throw any of the goodness away.
  • The recipe from the box can be trusted!
  • German chocolate cupcakes >> German chocolate cake

german chocolate cupcakes | doughseedough.net

German Chocolate Cupcakes
adapted from Baker’s German’s Sweet Chocolate Box, makes 30 cupcakes

for the cupcakes:
1 cup skim milk
1 teaspoon lemon juice
4 ounces German chocolate
1/2 cup water
4 egg whites
4 egg yolks
2 cups flour
1 teaspoon baking soda
1/4 teaspoon salt
1 cup butter, room temperature
2 cups sugar
1 teaspoon vanilla

for the coconut-pecan filling:
5 egg yolks
12 ounces evaporated milk
1 1/2 teaspoons vanilla
1 1/2 cups brown sugar
3/4 cup butter
2 1/2 cups unsweetened flake coconut
1 1/2 cups chopped pecans

for the chocolate ganache:
12 ounces semisweet chocolate
1 pint whipping cream

To make the cupcakes:

  1. Preheat oven to 350°F. Generously grease cupcake pans and set aside.
  2. Mix together milk and lemon juice in a small bowl and let sit for 10 minutes.
  3. Heat chocolate and water in a large bowl for 1 1/2 – 2 minutes in the microwave, stirring every 30 seconds, until chocolate is melted.
  4. In a medium bowl, beat egg whites with a mixer on high speed until stiff peaks form.
  5. In a separate bowl, mix together flour, baking soda, and salt.
  6. In a large bowl, beat butter and sugar on medium-high speed until light and fluffy. Add egg yolks, one at a time, beating well after each. Mix in melted chocolate and vanilla. Stir in flour mixture alternately with the milk, beating well after each addition.
  7. Gently fold in egg whites until well combined.
  8. Fill prepared cupcake pan no more than half full. Bake for 15 – 18 minutes, or until a toothpick inserted into the center comes out clean.
  9. Immediately run a small spatula along the edges of the cupcakes to loosen. Allow to cool in the pan 15 minutes before removing to a wire rack to cool completely.

To make the coconut-pecan filling:

  1. Beat egg yolks, milk, and vanilla in a large saucepan with a whisk until well combined. Add sugar and butter and cook over medium heat for 12 minutes or until mixture has thickened and golden brown, stirring constantly. Stir in coconut and pecans until well combined. Let cool to room temperature before use.

To make the chocolate ganache:

  1. Place chocolate in a medium bowl. In a small saucepan over medium heat, bring cream to a boil. Remove from heat and pour over chocolate. Stir until chocolate is melted and the mixture is smooth. Let cool to room temperature before use.

To assemble the cupcakes:

  1. Carefully cut cupcakes in half horizontally. Spread a spoonful of coconut-pecan filling onto the bottom half. Place the top of the cupcake on and spread more coconut-pecan filling on top. Place the chocolate ganache into a piping bag fit with a medium or large star tip. Pipe ganache onto the top of the cupcake and garnish with a pecan, if desired.


5 Comments

Lightened Up Lemon Yogurt Cake

I’ve got a storm of baked goods comin’ your way. I would apologize for not posting healthier foods or main dishes, but I’m really not sorry. If you want someone to blame, you can start with Mothers’ Day. And then birthdays. Because all those occasions require baked goods. And when they all fall within a few days of each other… well, I end up pumping out a lot of goodies from my tiny kitchen.

I’ll start off with a lightened up lemon yogurt cake. I loved how light and spring-y this cake was. I’ve mentioned in the past how much I love lemons and their tartness. The next time I make this cake I will bump up the zest to 3 lemons and I’ll consider using a lemon-flavored Greek yogurt as well. I may double the glaze as well – I couldn’t get enough of that stuff! My sister liked it so much that she ate the top off a slice of the cake, leaving behind a sad naked slice. Rude 🙂

lightened up lemon yogurt cake | doughseedough.net

Lightened Up Lemon Yogurt Cake
adapted from Ina Garten

1 1/2 cups all-purpose flour
2 teaspoons baking powder
1/2 teaspoon kosher salt
1 cup plain nonfat Greek yogurt
1 1/3 cups sugar, divided
3 extra-large eggs
2 teaspoons grated lemon zest (2 lemons)
1/2 teaspoon pure vanilla extract
1/3 cup canola oil
1/3 cup freshly squeezed lemon juice

For the glaze:
1 cup confectioners’ sugar
2 tablespoons freshly squeezed lemon juice

  1. Preheat oven to 350°F. Butter an 8.5″ loaf pan with butter. Line the bottom with parchment paper and butter and flour the pan.
  2. In a medium bowl, whisk together flour, baking powder, and salt.
  3. In a large bowl, beat together yogurt, 1 cup sugar, eggs, lemon zest, and vanilla. Slowly pour dry ingredients into wet ingredients and stir gently to combine. Mix in canola oil until combined.
  4. Pour batter into prepared loaf pan and bake in preheated oven for 45 – 50 minutes, or until a toothpick inserted into the center comes out clean.
  5. Meanwhile, combine remaining 1/3 cup sugar and 1/3 cup lemon juice in a small pan. Cook over low heat, stirring frequently, until sugar has dissolved. Set aside.
  6. When cake is done, let cool in pan for 10 minutes before placing on a wire rack over a sheet pan . Using a toothpick, pierce top of cake several times. Pour lemon-sugar syrup over warm cake. Allow cake to cool completely.
  7. To make the glaze: in a small bowl combine lemon juice and confectioners’ sugar and mix until smooth. Pour over cake.


6 Comments

Grilled Banana S’Mores

grilled banana s'mores | doughseedough.net

I had no idea something as simple as a s’more could be so good. I’ll be honest – s’mores have never been that good to me. When we go camping, I usually pass on making them for a few reasons: 1) I’m not patient enough to toast the marshmallow ~perfectly~, 2) the effort put into making them was too much for me, 3) they just didn’t taste that good. I was much happier just skewering a marshmallow, torching it, and then popping the burnt morsel into my mouth.

All that said, I couldn’t wait to share this with you. So imagine my horror when I started typing on my laptop only to find out that my space, N and B keys don’t work. I started copy/pasting those letters and wrote out a couple sentences when it hit me – type it on my iPad! Duh. It’s still slower than typing on a keyboard, but a lot faster than having to paste in all my Bs, Ns, and spaces.

So, why is this s’mores recipe so good? I think it’s the addition of the grilled banana. Or maybe it’s the fact that all I had to do to make them was stand by the grill. I will admit that I spent about 90% of my 11 mile run on Sunday thinking about these bad boys. I told Mike that every mile I ran = 1 s’more. (Note: I didn’t end up eating 11 s’mores yesterday… but I kind of wish I had). So, here you go. Enjoy this supremely gooey, delicious mess.

grilled banana s'mores | doughseedough.net

Grilled Banana S’mores
makes 4

1 medium ripe banana
1 teaspoon brown sugar
4 graham crackers, halved
1 .5 ounce bar of milk chocolate, broken into 4 pieces
4 large marshmallows

  1. Heat grill to medium.
  2. Lay banana flat. Cut a slit down length of banana. Sprinkle brown sugar into the opening. Grill banana for 5 minutes, or until brown sugar is bubbling. Remove from grill and let cool slightly. Peel and slice into 1/2 inch pieces.
  3. Lay graham crackers down on grill. Top 4 crackers with chocolate and 4 crackers with marshmallows. Cover grill and cook until chocolate is melted and marshmallows are softened.
  4. Place sliced bananas on chocolate and place marshmallow cracker on top. Serve immediately.


10 Comments

Carrot Cake with Lemon Cream Cheese Frosting

Carrot cake. I love it in all different forms and with all different sorts of add-ins and toppings. Nuts, coconut, pineapple, cupcake or cake: I will shove it into my mouth. In fact, I love it so much that it made an appearance at our wedding:

Photo taken by Alacrity Photography

I don’t think I’ve ever had carrot cake with lemon, though. Not surprisingly, I love carrot cake with lemon, too. I love it a lot.

Let me back up a second. This whole carrot cake madness started because of a recipe swap. This swap was Blogger’s Choice. I was assigned Feed Me, Seymour. I found so many recipe on Kim’s blog it was impossible to narrow it down. I had five of her recipes open on my iPad, no joke. I finally narrowed it down to two and couldn’t go any further. So, I made both. The other recipe I picked from her blog will be coming shortly. I just couldn’t wait to share this carrot cake with you!

healthy carrot cake with lemon cream cheese frosting | doughseedough.net

Carrot Cake with Lemon Cream Cheese Frosting
adapted from Feed Me, Seymour

for the cake:
2 eggs
3/4 cup brown sugar
1/2 cup canola oil
1/4 cup honey
1 teaspoon vanilla
2 cups shredded carrots
1 teaspoon freshly grated ginger
1 cup white flour
1/2 cup whole wheat pastry flour
1/2 teaspoon ground cinnamon
1/4 teaspoon baking soda
1 teaspoon baking powder

for the frosting:
8 ounces reduced-fat cream cheese, softened
1 cup confectioner’s sugar
2 teaspoons lemon zest
1 tablespoon skim milk

  1. Preheat oven to 350°F. Grease a 9×13-inch cake pan with butter and line bottom with parchment paper. Grease parchment paper with butter. Set pan aside.
  2. In a medium-sized bowl, whisk together eggs, brown sugar, oil, honey, and vanilla until combined. Mix in carrots and ginger.
  3. In another medium-sized bowl, whisk together white and whole wheat flours, cinnamon, baking soda, and baking powder.
  4. Mix the dry ingredients into the wet ingredients until just combined. Pour mixture evenly into prepared cake pan. Bake for 20 – 25 minutes or until toothpick inserted into the center comes out clean. Cool completely and slice into 36 bars.
  5. To make the glaze: combine all ingredients in a large bowl and beat on medium until well combined. Pipe onto bars and serve immediately or store, covered in the refrigerator, for up to 3 days.

Thanks to Taste of Home Cooking for organizing! Make sure to check out the other recipe swap posts!


1 Comment

Peanut Butter Crispy Bars

Peanut Butter Crispy Bars | doughseedough.net

I’m going to be honest: this was my second attempt at making these bars from the Baked: New Frontiers in Baking cookbook. You see, the first time I didn’t make it too far. I started with the crispy rice cereal base and cooked the sugar base exactly as written. I used my candy thermometer and everything. Unfortunately, it wasn’t cooked long enough. The sugar water mess remained, well, a mess. It never got to the point where it became beautiful and syrupy. I mixed it into the cereal anyway, but the cereal turned into mush.

Take two was much more successful. I do think that I will make these a third time with a new modification: double the cereal base. These treats are decadent. The authors of the cookbook say that these can be cut into 9 squares. I say they should be cut into 16 squares. Or 25 squares. The chocolate:peanut butter:cereal ratio was just a little off to me. Mike loved them, though.

Peanut Butter Crispy Bars | doughseedough.net

Peanut Butter Crispy Bars
adapted from Baked: New Frontiers in Baking

for the crispy crust:
1 3/4 cups crisped rice cereal
1/4 cup sugar
3 tablespoons light corn syrup
3 tablespoons unsalted butter, melted

for the milk chocolate peanut butter layer:
5 ounces milk chocolate chips
1 cup creamy peanut butter

for the chocolate icing:
3 ounces dark chocolate, coarsely chopped
1/2 teaspoon light corn syrup
4 tablespoons unsalted butter

  1. Make the crispy crust: Lightly grease an 8×8-inch baking pan. Set aside. Place cereal in a large bowl and set aside.
  2. Pour 1/4 cup water into a small saucepan. Add sugar and corn syrup to the center of the pan, being careful to not let to let it touch the sides of the pan. Using a small wooden spoon, gently stir the mixture until just combined. Place a candy thermometer in the saucepan. Cook over medium-high heat and bring to a boil. Cook until the mixture reaches the soft ball stage, 235 – 245°F.
  3. Remove mixture from heat and stir in butter. Pour mixture over cereal and stir until thoroughly coated. Pour into prepared pan and using the palm of your hand, gently press mixture into the bottom of the pan (do not press up the sides). Let the crust cool to room temperature while you make the milk chocolate peanut butter layer.
  4. Make the milk chocolate peanut butter layer: in a large nonreactive metal bowl, stir together the chocolate and the peanut butter. Set the bowl over a saucepan of simmering water and cook, stirring constantly with a rubber spatula, until chocolate is melted and the mixture is smooth. Remove bowl from the pan and stir for about 30 seconds to let it cool slightly. Pour evenly over crispy crust. Place into the refrigerator and chill for one hour.
  5. Make the chocolate icing: in a large nonreactive metal bowl, combine all ingredients. Set the bowl over a saucepan of simmering water and cook, stirring with a rubber spatula, until mixture is smooth.  Remove bowl from the pan and stir for about 30 seconds to let it cool slightly. Pour mixture evenly over peanut butter layer. Place into the refrigerator and chill for one hour.
  6. Cut into 16 squares and serve. Or, store in the refrigerator, covered tightly, for up to 4 days.